How to Contribute
These instructions serve as a guide for contributing to the MoilApp repository with a personal repository project. The process includes forking the MoilApp repository, modifying the project code, and submitting a pull request to merge the changes. It is essential to keep in mind that the guidelines and instructions may differ depending on MoilApp specific requirements and guidelines.
Getting Started with Contributing
-
Before diving into contributing, take some time to understand the project’s purpose, goals, and existing structure. Browse through the project’s README file, documentation, and codebase to get a sense of how everything works.
-
Login to your GitHub account, Once you’re logged in, navigate to the project’s repository and click the “Fork” button in the upper right corner. This will create a copy of the repository in your GitHub account, allowing you to make changes without affecting the original project.
-
After forking the repository, clone it to your local machine using Git. Open your terminal or command prompt and run the following command, replacing <your-username> with your GitHub username:
https://github.com/<your-username>/moilapp.git
-
Set Up Your Development Environment
-
Browse through the project’s issue tracker or roadmap to find an issue or feature that you’d like to work on. Issues may be labeled with tags like “good first issue” or “help wanted” to indicate beginner-friendly tasks.
-
Before making any changes, create a new branch in your local repository to work on your contribution. Use a descriptive name for your branch that reflects the issue or feature you’re addressing.
-
Once you’ve selected an issue to work on, make the necessary changes to the codebase to address the issue or implement the feature. After making your changes, commit them to your local branch with descriptive commit messages.
-
Push Changes to Your Fork: After committing your changes, push your local branch to your forked repository on GitHub using the following command:
git push origin <your-branch-name>
-
Finally, navigate to your forked repository on GitHub and click the “New pull request” button. Compare the changes between your branch and the original project’s branch, provide a brief description of your contribution, and submit the pull request for review.
Contribution Workflow
The Contribution Workflow outlines the process by which contributions are submitted, reviewed, and integrated into the project. Below is a detailed guide to our contribution workflow:
-
Select a Contribution: The first step in the contribution workflow is to select a contribution you would like to make. This could be fixing a bug, implementing a new feature, improving documentation, or any other enhancement that aligns with the project’s goals.
-
Fork the Repository: Once you’ve identified the contribution you’d like to make, fork the project’s repository on GitHub. This creates a copy of the repository under your GitHub account where you can make changes without affecting the original project.
-
Create a Branch: Before making any changes, create a new branch in your forked repository to work on your contribution. Use a descriptive name for your branch that reflects the nature of your contribution.
-
Make Changes: With your branch created, make the necessary changes to the codebase to address the contribution you’ve selected. Ensure that your changes adhere to the project’s coding standards and guidelines.
-
Commit Changes: Once you’ve completed your changes, commit them to your branch with descriptive commit messages. Each commit should represent a single logical change and include a brief explanation of the changes made.
-
Push Changes: After committing your changes, push your branch to your forked repository on GitHub. This makes your changes available for review by the project maintainers.
-
Submit a Pull Request (PR): Once your changes are pushed to your forked repository, submit a pull request (PR) to the original project’s repository. In your PR, provide a detailed description of the changes you’ve made, including any relevant context or reasoning.
-
Review Process: After submitting your PR, the project maintainers will review your changes. They may provide feedback, ask questions, or request additional changes. Be responsive to feedback and be prepared to make further revisions to your contribution if necessary.
-
Address Feedback: If feedback is provided on your PR, address it by making the requested changes to your branch and committing them. Once you’ve addressed all feedback, push your changes to your forked repository and update your PR.
-
Merge PR: Once your PR has been approved by the project maintainers and all feedback has been addressed, it will be merged into the original project’s repository. Congratulations, your contribution has been successfully integrated into the project!
GitHub Operations
Forking a Repository
To share a GitHub repository, first note its name and go to its page on GitHub. Then, click the <b>Fork</b> button in the upper right corner to make a copy on your own account. Be sure to select “Copy Main Only” in the confirmation windows to avoid affecting the original repository and its other branches with changes or updates.
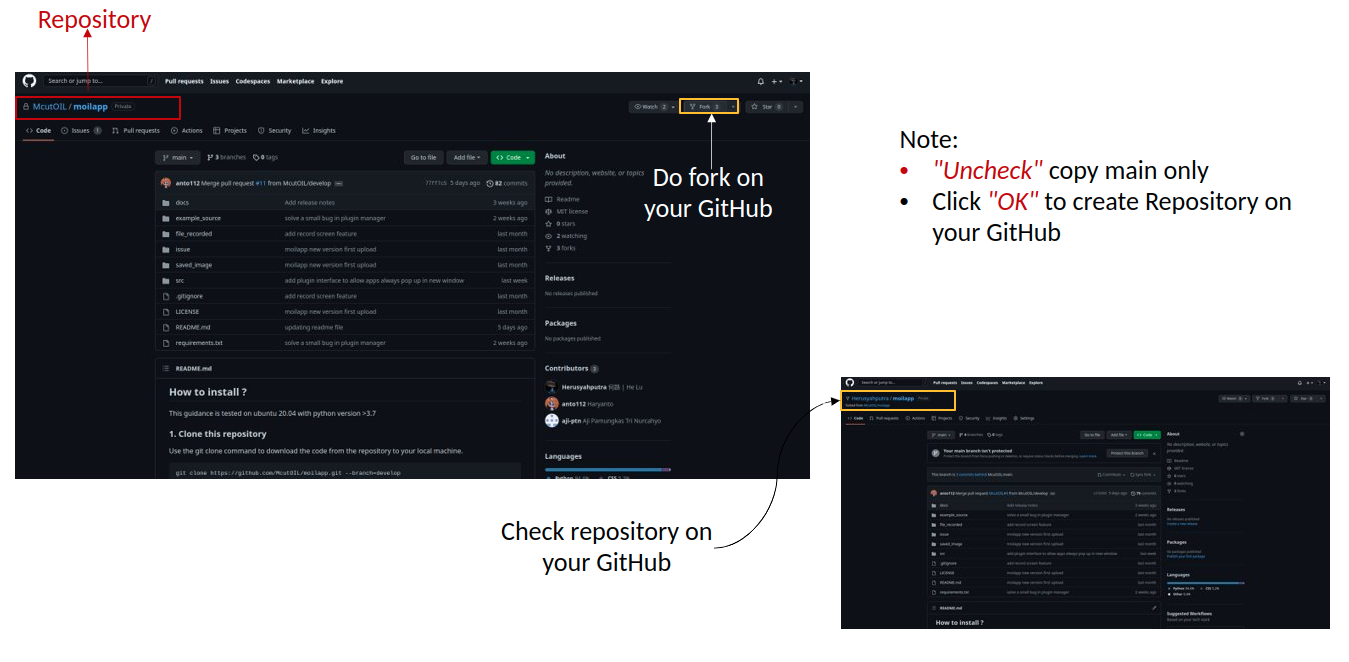
Fork the Repository
Cloning a Repository
It is recommended for the user to create a new branch under the Develop branch of the MoilApp repository after cloning, in order to prevent conflicts between their changes and updates made to the original repository. This is crucial, as it enables the user to work on their modifications separately, without impacting the primary codebase.
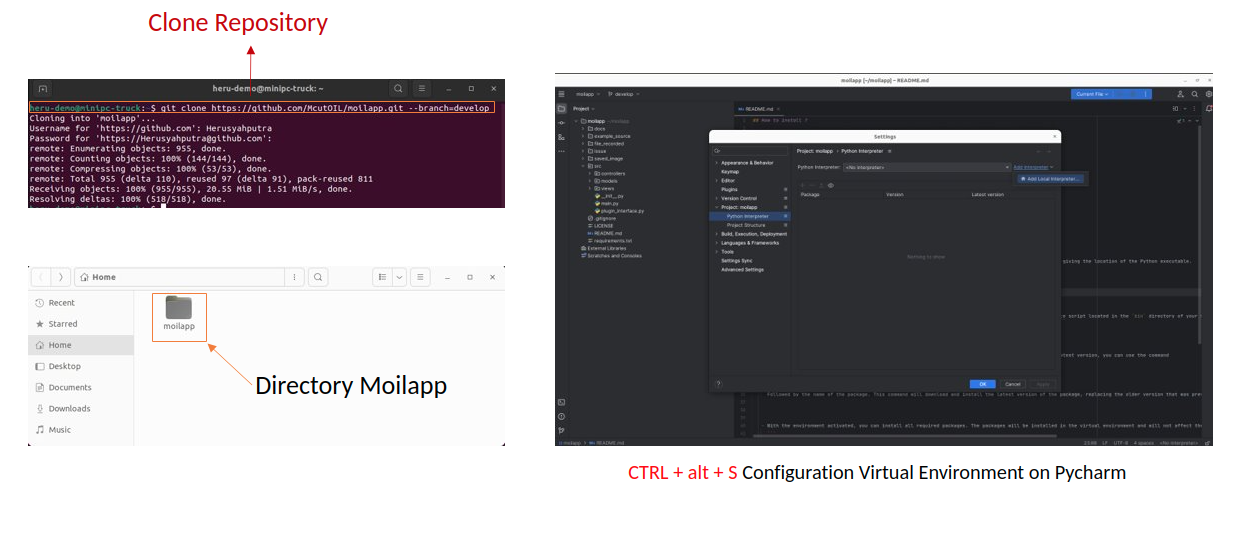
Clone the Repository
Creating the Virtual Environment
Once you have finished cloning the repository, you can open the project folder using PyCharm and create a virtual environment configuration by pressing Ctrl + Alt + S. This step is necessary before installing the required library. It is important to carefully follow each step in order to create a local environment for your project, ensuring that the application runs properly as required.

Setting the virtual environment and installation requirements
By adhering to these instructions, you can guarantee that the application operates as planned and that there are no inconsistencies between its requirements and other projects’ dependencies on your system. Establishing a virtual environment for each project is a recommended approach that can assist you in more efficiently managing dependencies and ensuring that your projects are kept separate from one another.
Guidelines for Pull Requests
Guidelines for Pull Requests (PRs) help ensure that contributions to our project are effectively reviewed and integrated. Here’s a comprehensive guide on how to create PRs following our guidelines:
-
Understand the Contribution: Before creating a PR, ensure that you understand the contribution you’re making. Whether it’s fixing a bug, implementing a new feature, or updating documentation, familiarize yourself with the changes you intend to propose.
-
Create a Descriptive Title: When creating a PR, use a clear and descriptive title that summarizes the purpose of the contribution. A well-written title helps reviewers quickly understand the nature of the changes being proposed.
-
Provide Context: In the PR description, provide context about the problem being addressed or the feature being implemented. Explain the rationale behind the changes and any relevant background information that will help reviewers understand the purpose of the PR.
-
Link Related Issues: If the PR addresses a specific issue or is related to an existing discussion or feature request, be sure to link to the relevant issue(s) in the PR description. This helps provide additional context and ensures that the PR is associated with the appropriate discussion or tracking.
-
Follow Coding Standards: Ensure that your code adheres to the project’s coding standards and style guidelines. Consistent formatting and adherence to best practices make it easier for reviewers to understand and evaluate your changes.
-
Test Your Changes: Before creating a PR, thoroughly test your changes to ensure that they work as intended and don’t introduce any regressions or unintended side effects. Include any necessary test cases or documentation updates to accompany your changes.
-
Keep PRs Small and Focused: Whenever possible, keep PRs small and focused on addressing a single issue or implementing a specific feature. Smaller PRs are easier to review and less likely to introduce conflicts with other changes.
-
Be Responsive to Feedback: After creating a PR, be responsive to feedback from reviewers. Address any comments or suggestions promptly and be open to making further revisions as needed to ensure the quality and completeness of your contribution.
-
Update PR as Necessary: If additional changes or revisions are requested by reviewers, update the PR accordingly. Push new commits to your branch and ensure that your PR remains up-to-date with the latest changes in the project.
-
Celebrate Success: Once your PR has been reviewed and approved, celebrate your contribution to the project! Your efforts help improve the project for everyone, and your contributions are greatly appreciated.
Do Pull Request your Project
After pushing your modifications to the remote repository, you can initiate a pull request, asking the manager to examine and merge the changes into the main branch. To create a pull request, carry out the following steps:
Navigate to the repository on GitHub where you pushed your branch.
-
Click on the “Pull Request” tab.
-
Click on the “New pull request” button.
To merge your changes into the main branch, choose the branch you wish to merge, examine the modifications you have made, and provide a relevant feedback or explanations for your colleagues. Once its done, hit the “Create pull request” options.
Code Review Process
Once you’ve submitted a pull request, it will undergo a code review process. The code review process plays a crucial role in maintaining the quality and consistency of our project’s codebase. It involves a comprehensive examination of proposed changes, where reviewers meticulously analyze aspects such as functionality, readability, performance, and adherence to coding standards. Feedback provided during the review is constructive and specific, aimed at helping contributors enhance their code. This iterative process of collaboration between reviewers and contributors ensures that code changes undergo multiple rounds of refinement until they meet the project’s standards and requirements.