Moil Meeting Of Usage
Moil Meeting of Usage
Operation of The Moil Meeting Application
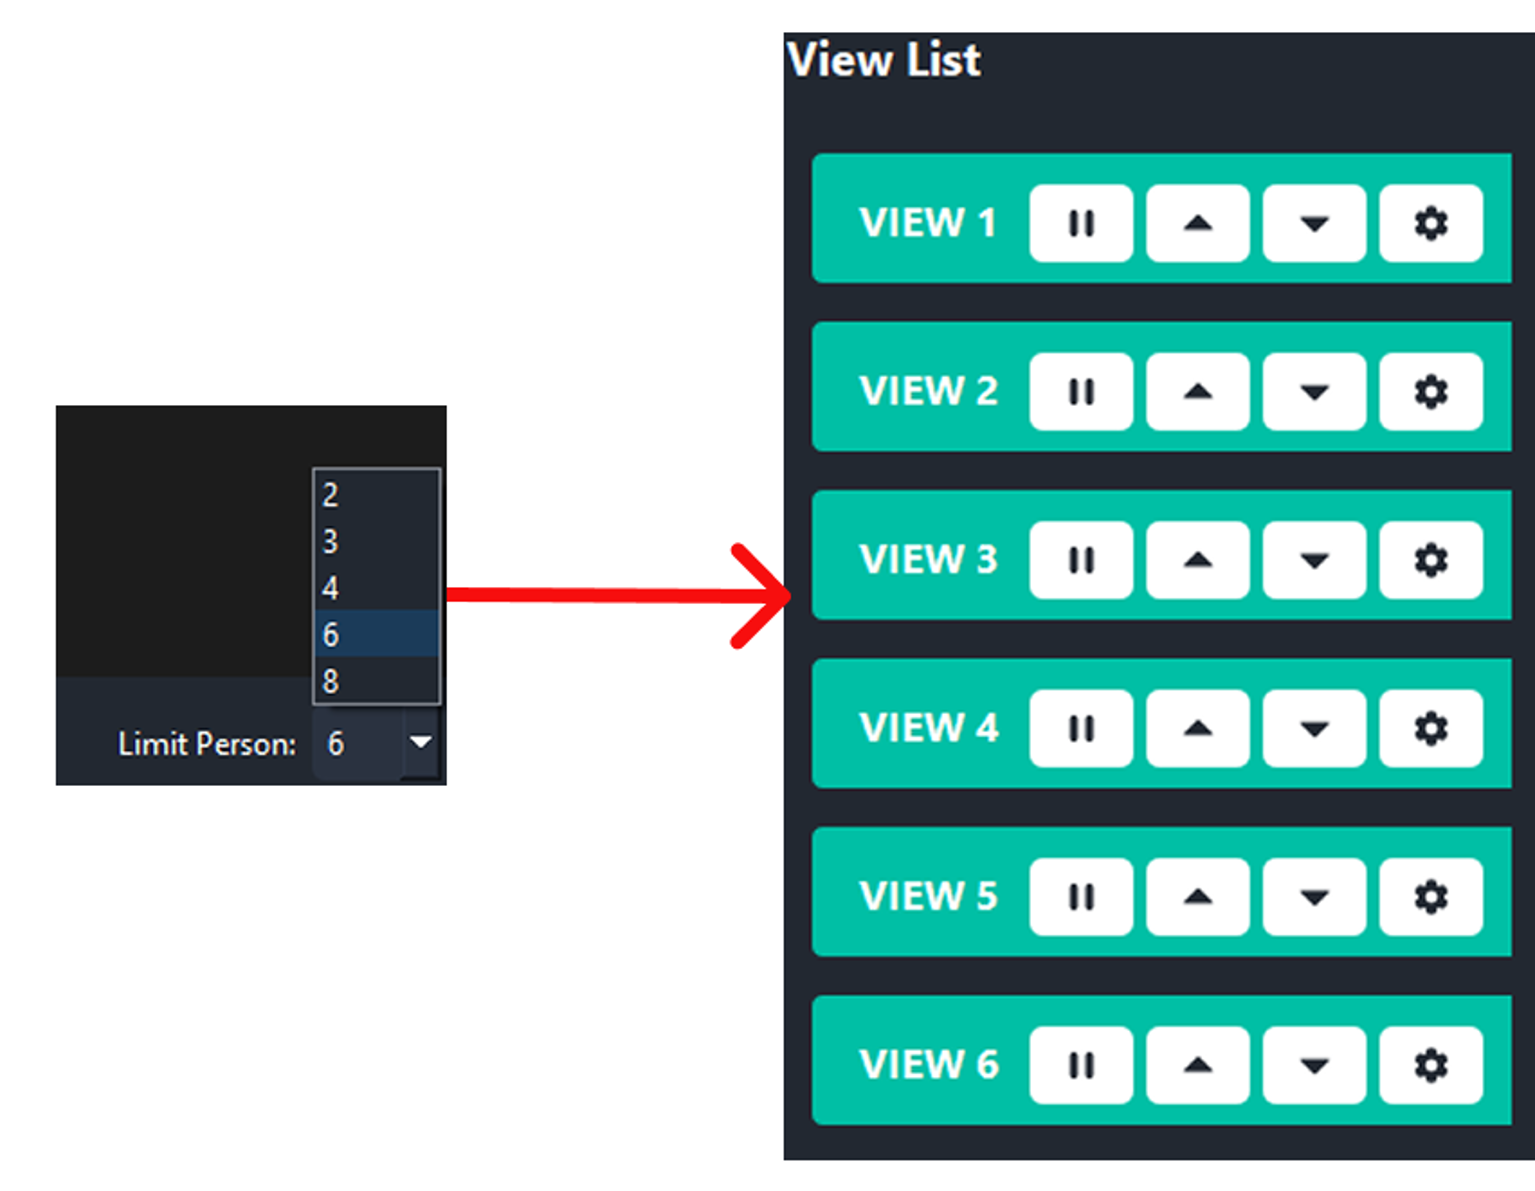
In this section, we will explain the components of the MoilApp application and provide tutorials on how to use the application. Moil Meeting is a software application that users can utilize, and the referred session might be some kind of training session where the instructor will provide an overview of the various parts of the application and teach users how to use them effectively.
Operations of the Moil Meeting
Overview of Apps
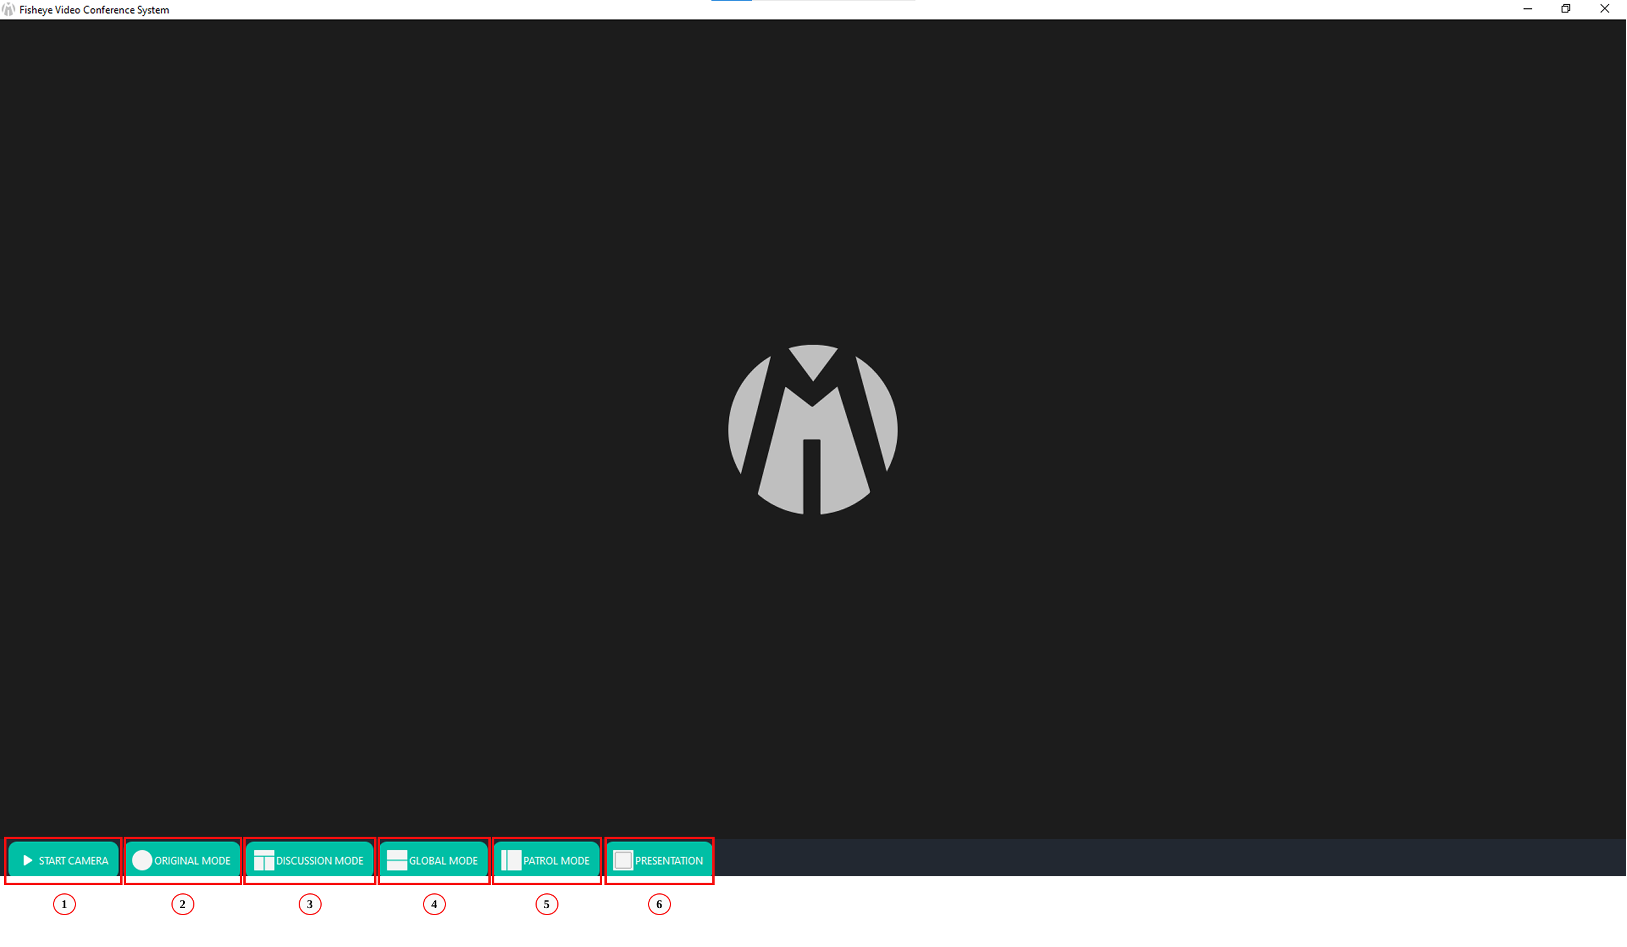
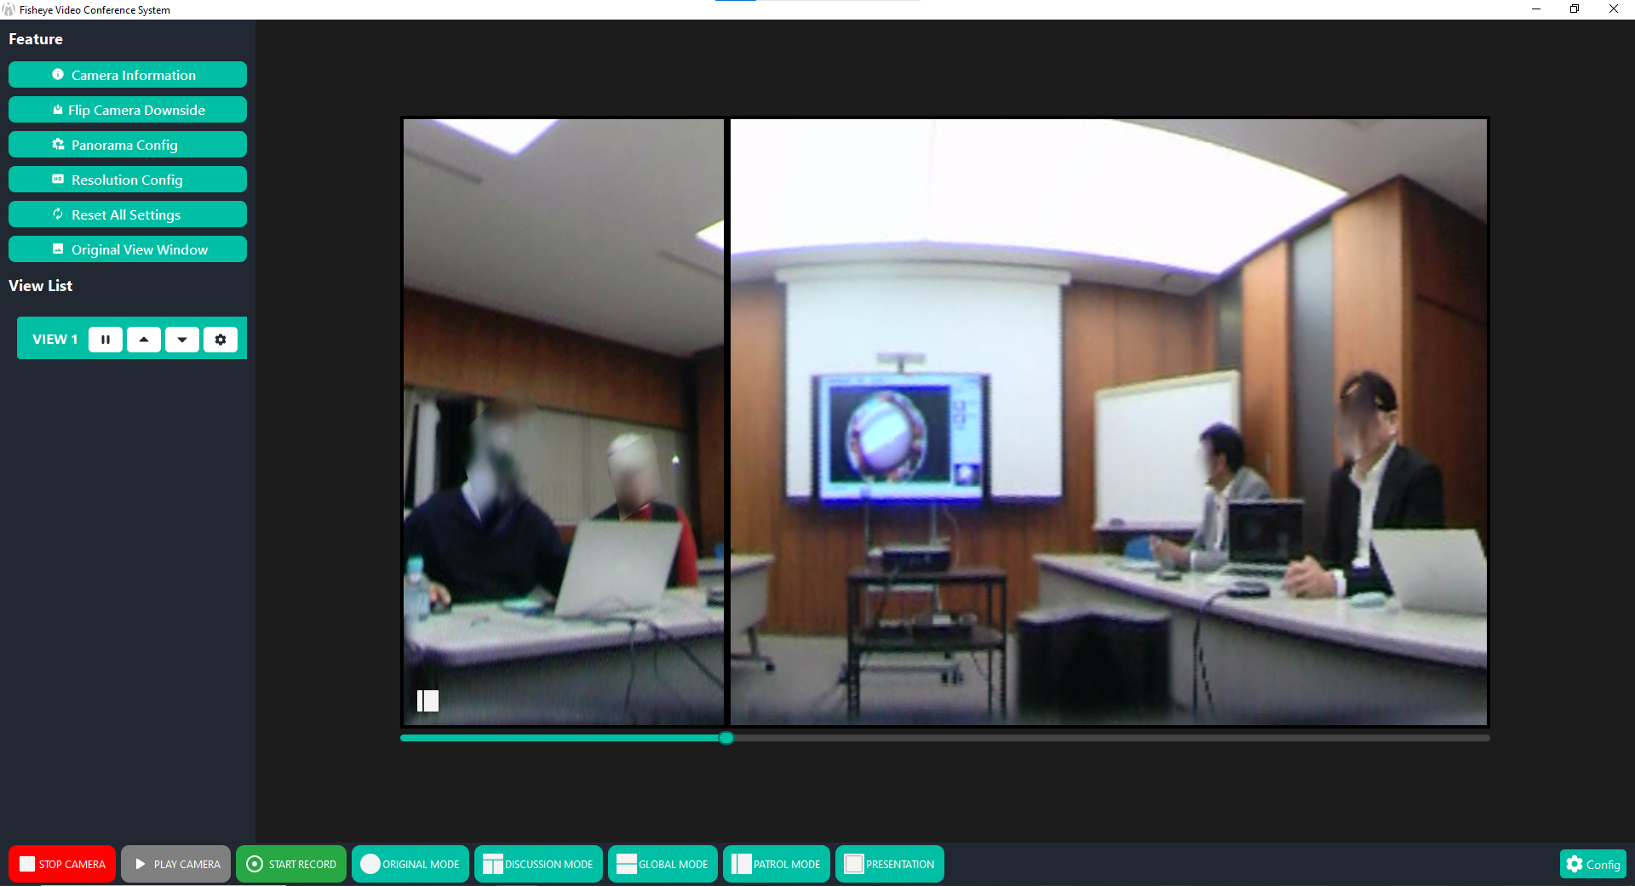
Fisheye Video Conference System is a video conferencing application designed with a simple and modern interface. When the application is launched, the user is immediately taken to the main interface so that access to the main features becomes faster.
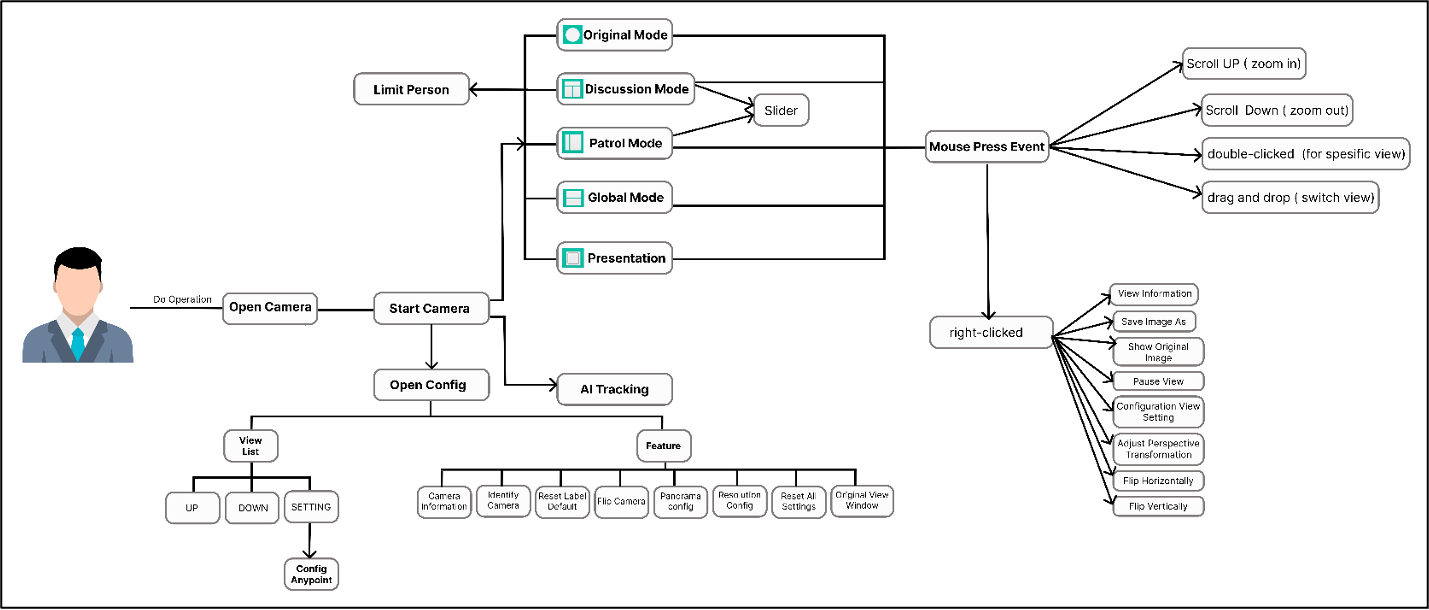
In the main view of the application, there are several working modes that users can select at the bottom of the screen:
Start Camera: Enables the camera to begin video capture for all modes.
Original Mode: The standard mode for video conferencing.
Discussion Mode: A mode that supports interactive discussions between participants.
Global Mode: A mode that may connect participants from different locations globally.
Patrol Mode: A mode designed for active surveillance or monitoring.
Presentation Mode: A mode that focuses on presentations, allowing users to optimally display materials.
The user interface will show the default main window, ready to run.
Operation of The Moil Meeting Application
Quick Start
Welcome to FisheyeVideoConference, a smart and powerful solution designed to enhance your 360° video conferencing and surveillance experience. Whether you’re hosting a remote meeting, monitoring a wide-area space, or giving an interactive presentation, this application provides a flexible and intuitive platform tailored to meet a wide range of visual communication needs. With its support for fisheye camera integration and multiple display modes, you can easily manage video feeds with clarity, precision, and control — all from a single interface.
After launching the FisheyeVideoConference application, you’ll be greeted with a clean and intuitive interface.
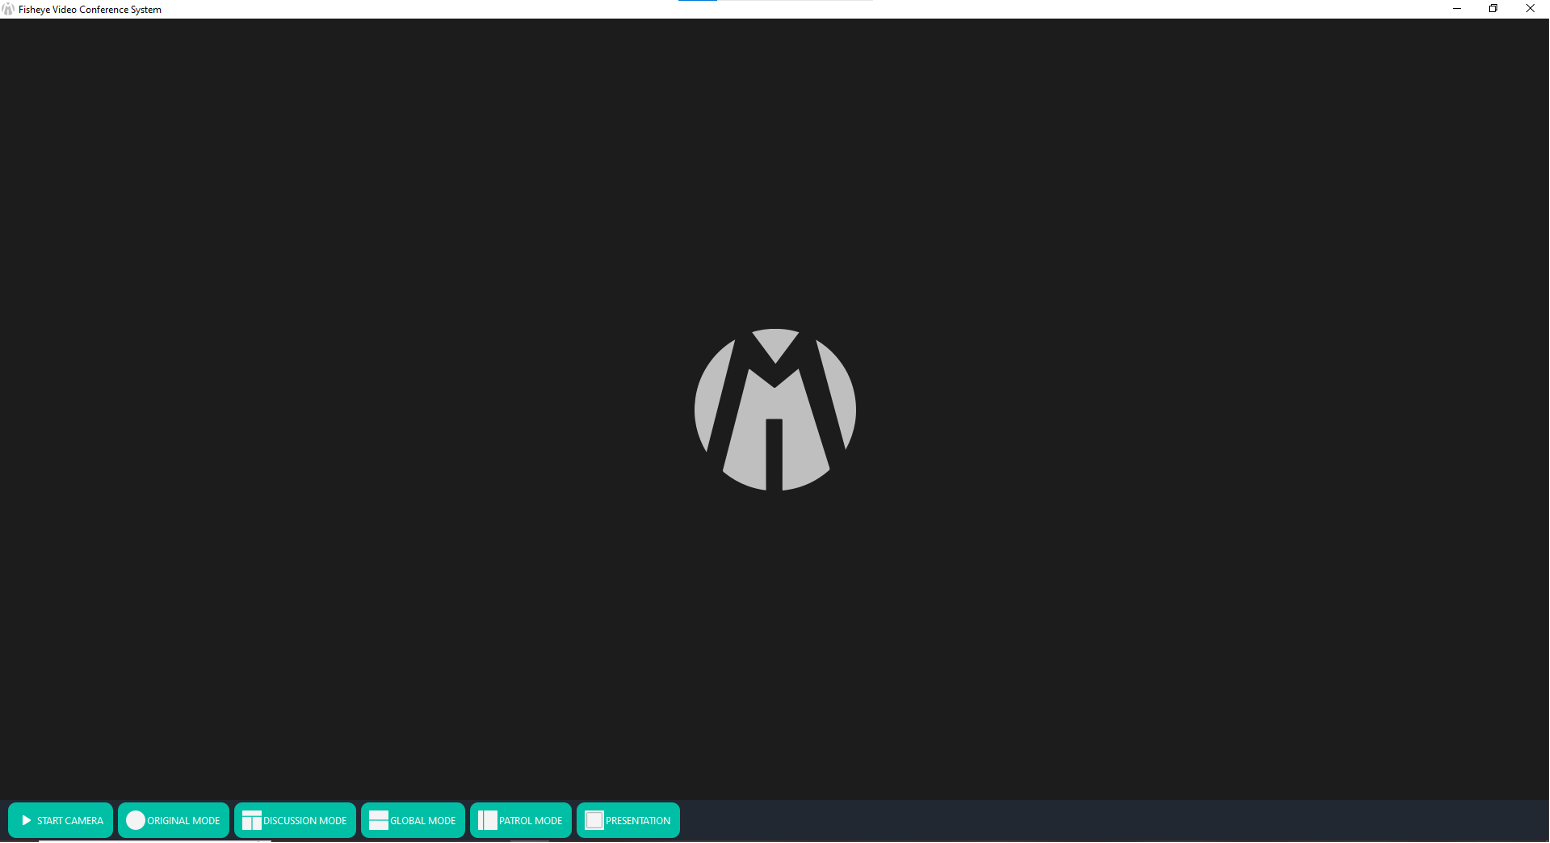
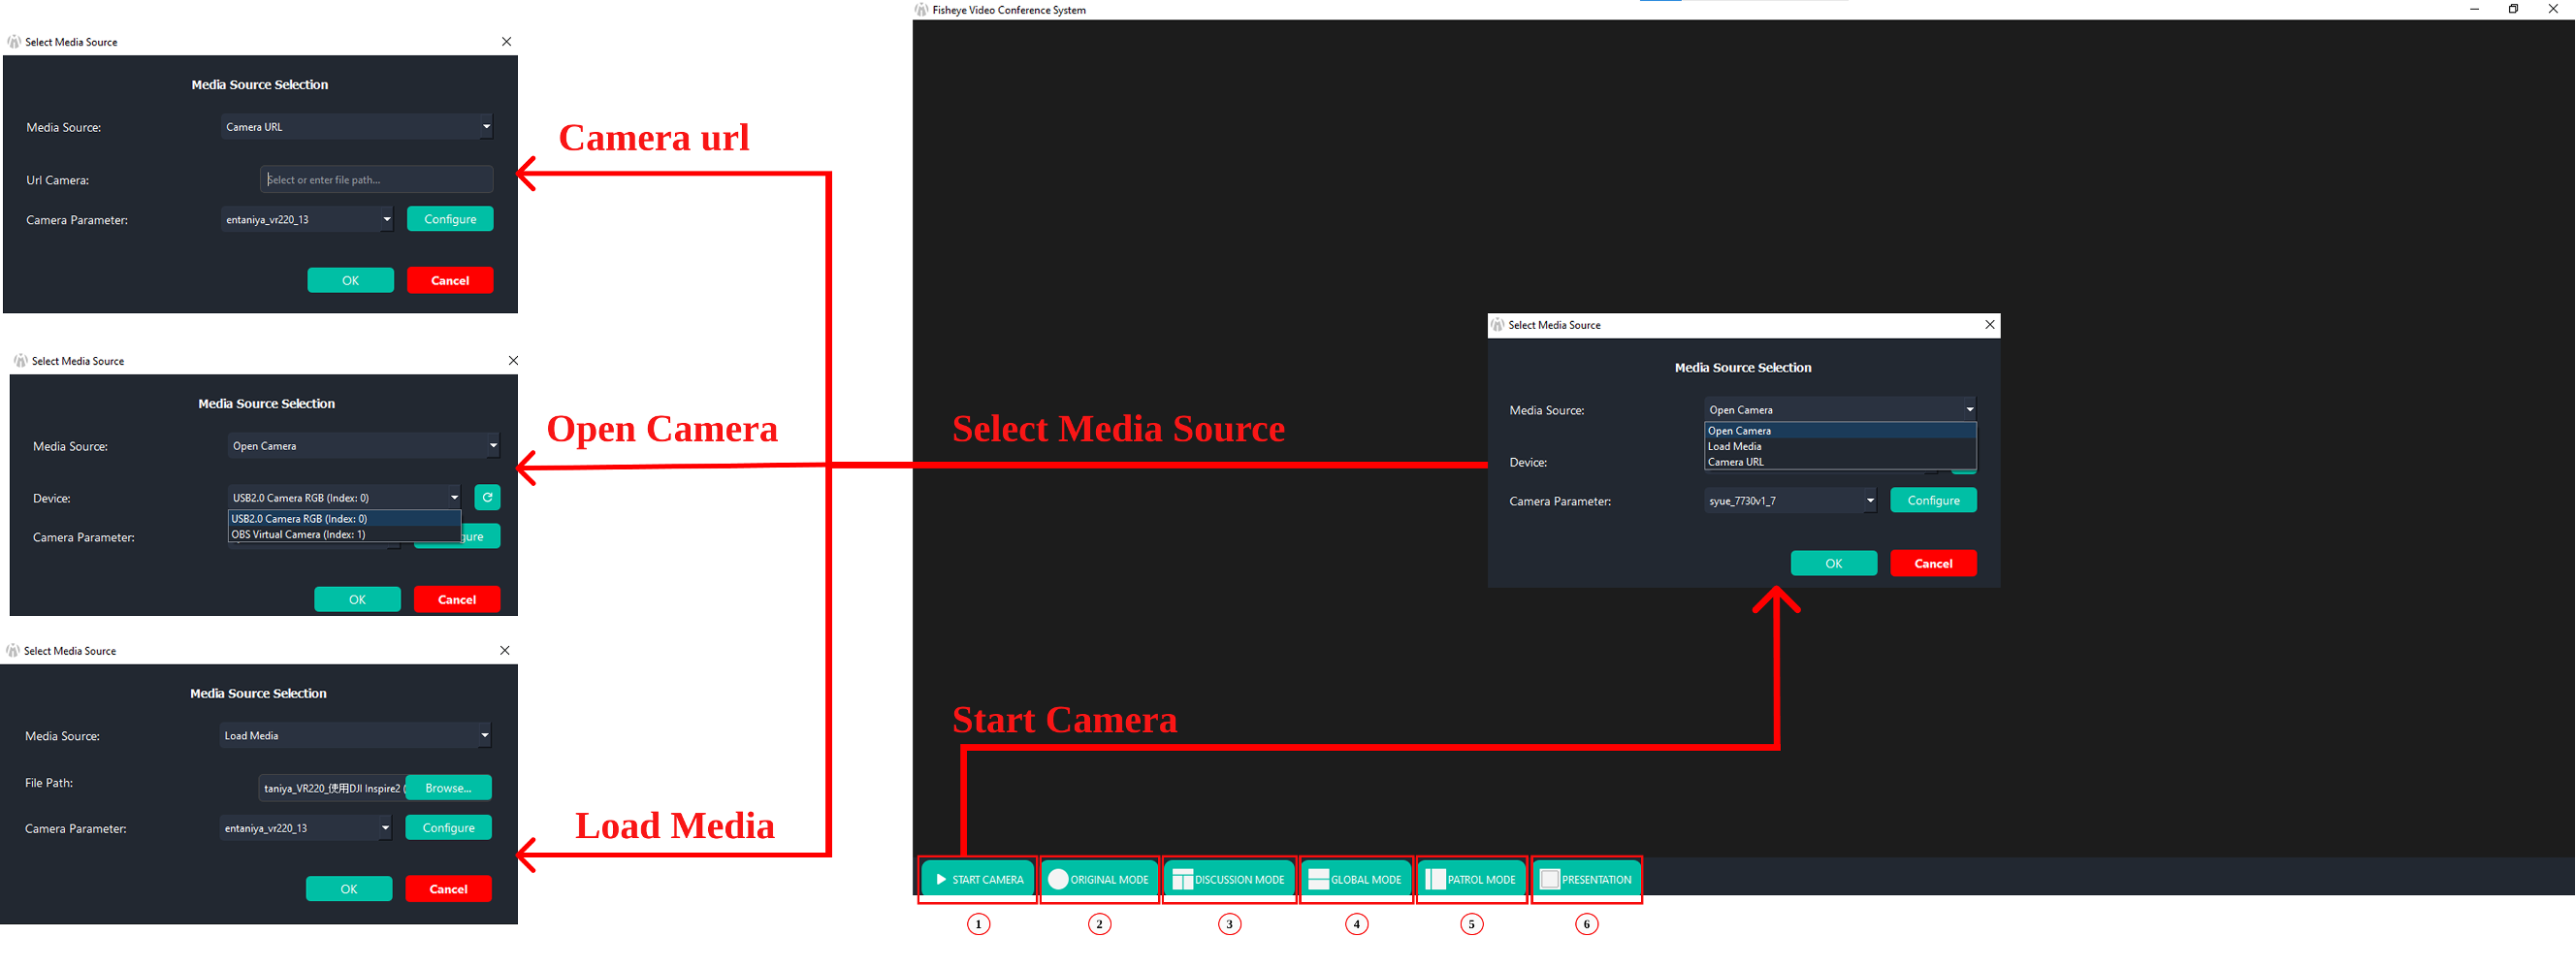
To get started, simply click the Start Camera button. There are three main options: - Open Camera – Use the device’s built-in or connected camera. - Load Media – Load a video from a local file. - Camera URL – Access a camera via path camera URL.
Original Mode
Each option allows you to configure parameters such as resolution, frame rate, and display settings.
Disscusion Mode
Once initialization is successful, you will be directed to the Original Mode, which serves as the default view for your 360° or fisheye video. From here, you can switch between several advanced viewing modes depending on your needs: Discussion Mode – Ideal for meetings or group discussions.
Patrol Mode
Patrol Mode – Perfect for automatic area surveillance.
Presentation Mode
Presentation Mode – Focuses the view on presentations.
Start Camera and Stop Camera
Camera & Select Media Source
Start Camera & Select Media Source Click the START CAMERA button at the bottom of the screen. The Media Source Selection window will appear with options:
Open Camera: Use connected camera devices.
Load Media: Upload a video file from local storage.
Camera URL: Enter a network/IP camera URL.
After selecting your source, click OK to confirm or Cancel to exit.
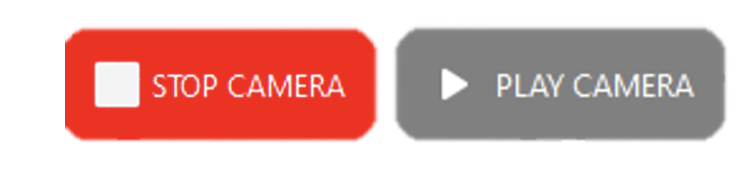
Stop & Play Camera
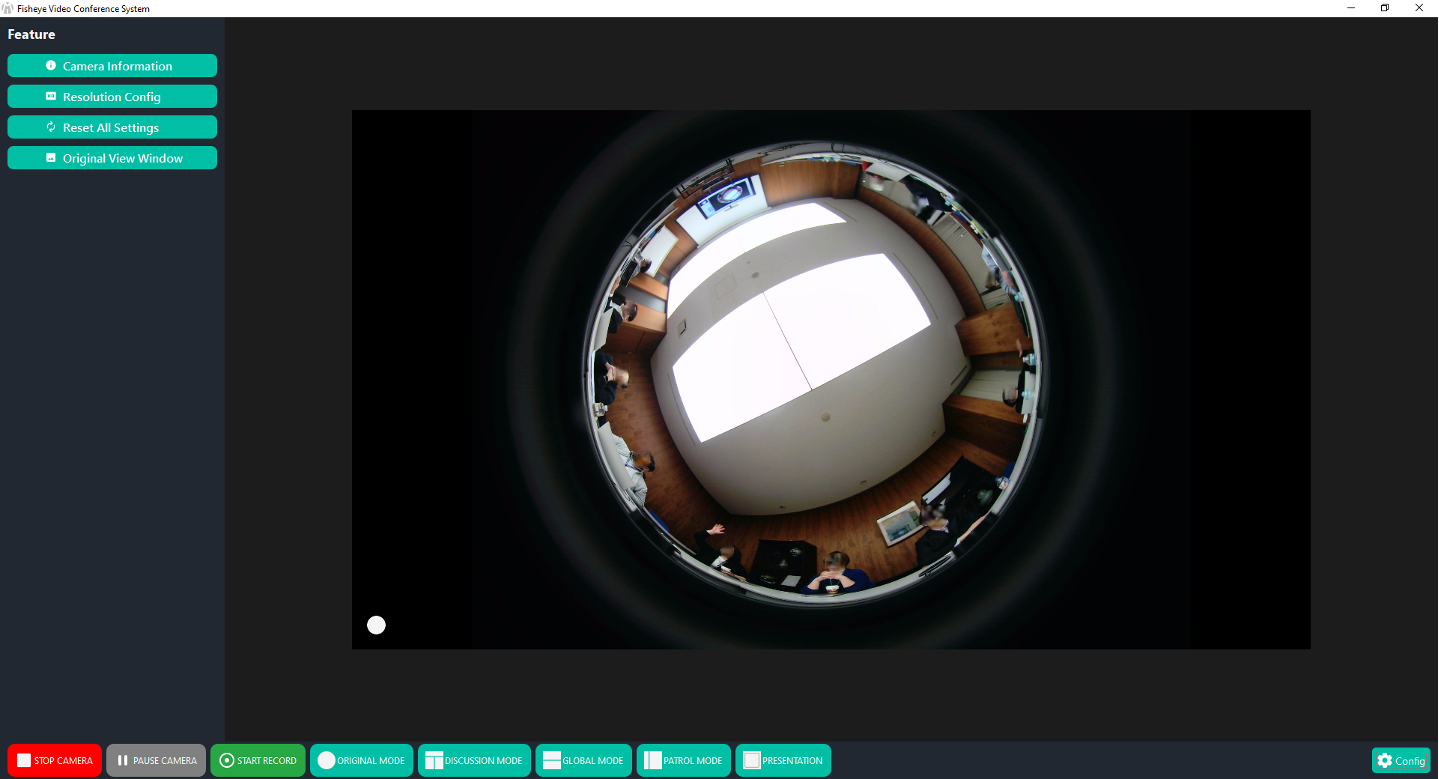
After selecting your preferred media source and configuring the necessary parameters, click the OK button to confirm and proceed. The application will then switch to Original Mode and display the selected media source. Once the camera has started successfully, additional options will become available: - Stop Camera: Stops camera or video playback completely. - Pause Camera: Temporarily pause the video stream. - Play Camera: Resume from paused state.
Start Recording and Stop Recording
Start Record: Click Start Recording. A popup “Recording Started” confirms.

Stop & Play Camera
Stop Record: Click Stop Recording. A popup “Recording Finished” with file path confirms saved file.

Start Record & Recording
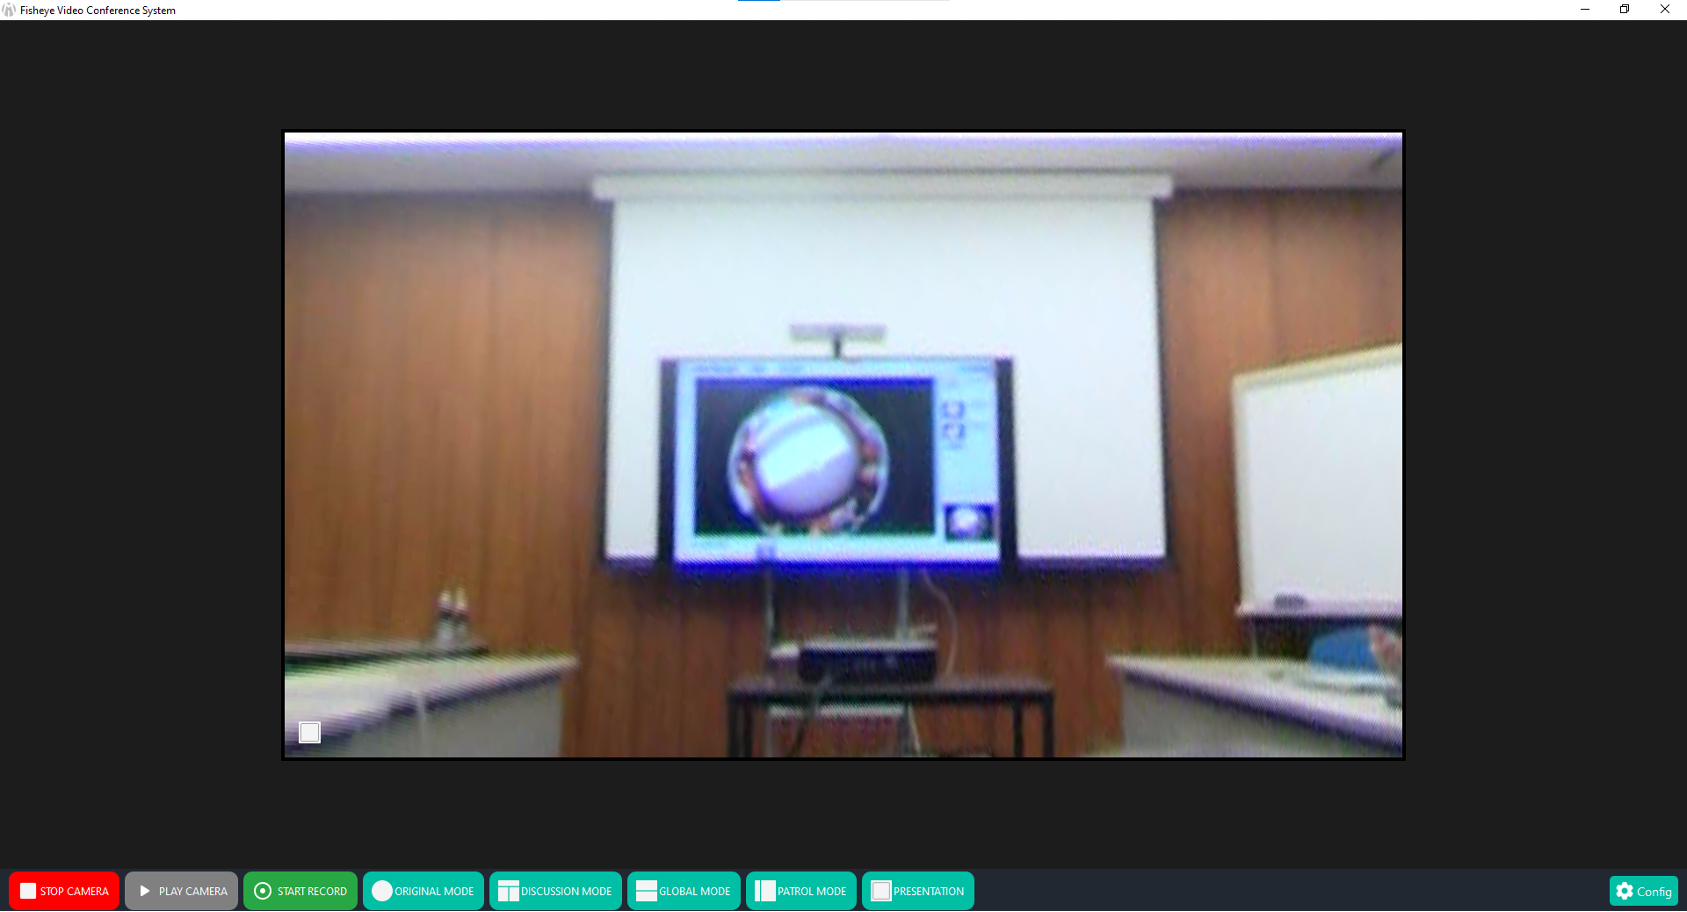
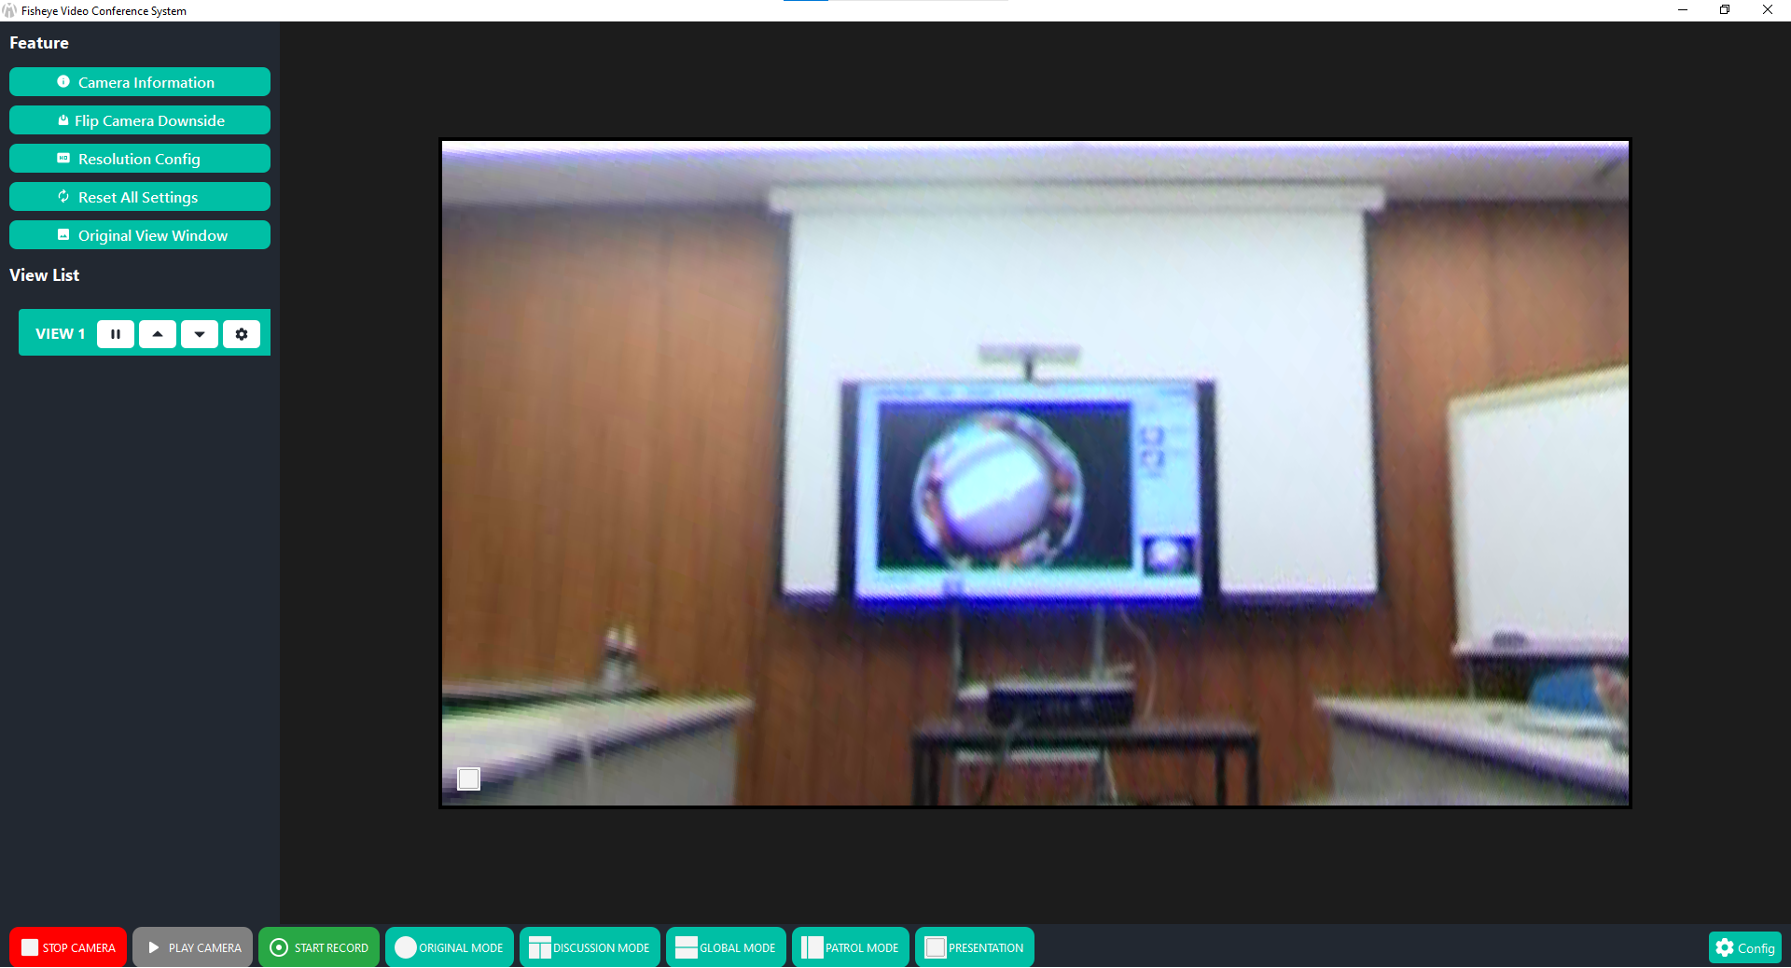
Original Mode
Original Mode provides a complete 360-degree view captured by a fisheye camera, displaying the original, unmodified video feed in a circular layout. This mode is designed to show the entire meeting room in one continuous frame, ensuring that no participant or activity is left out of view. It captures every angle within the space, making it especially useful in hybrid or remote meetings where attendees need full visibility of the physical room and everyone in it. This eliminates the need to manually adjust or switch between multiple cameras during the session. For users, Original Mode enhances situational awareness and supports more inclusive and transparent communication. Whether it’s a team discussion, classroom setting, or boardroom meeting, this mode ensures that all participants—regardless of their position in the room—are visible at all times. It serves as an ideal default view before transitioning into more focused or interactive modes, such as speaker tracking or presentation layouts. By showing the entire environment in real time, Original Mode helps users feel more connected and aware during collaborative sessions.

Original Mode
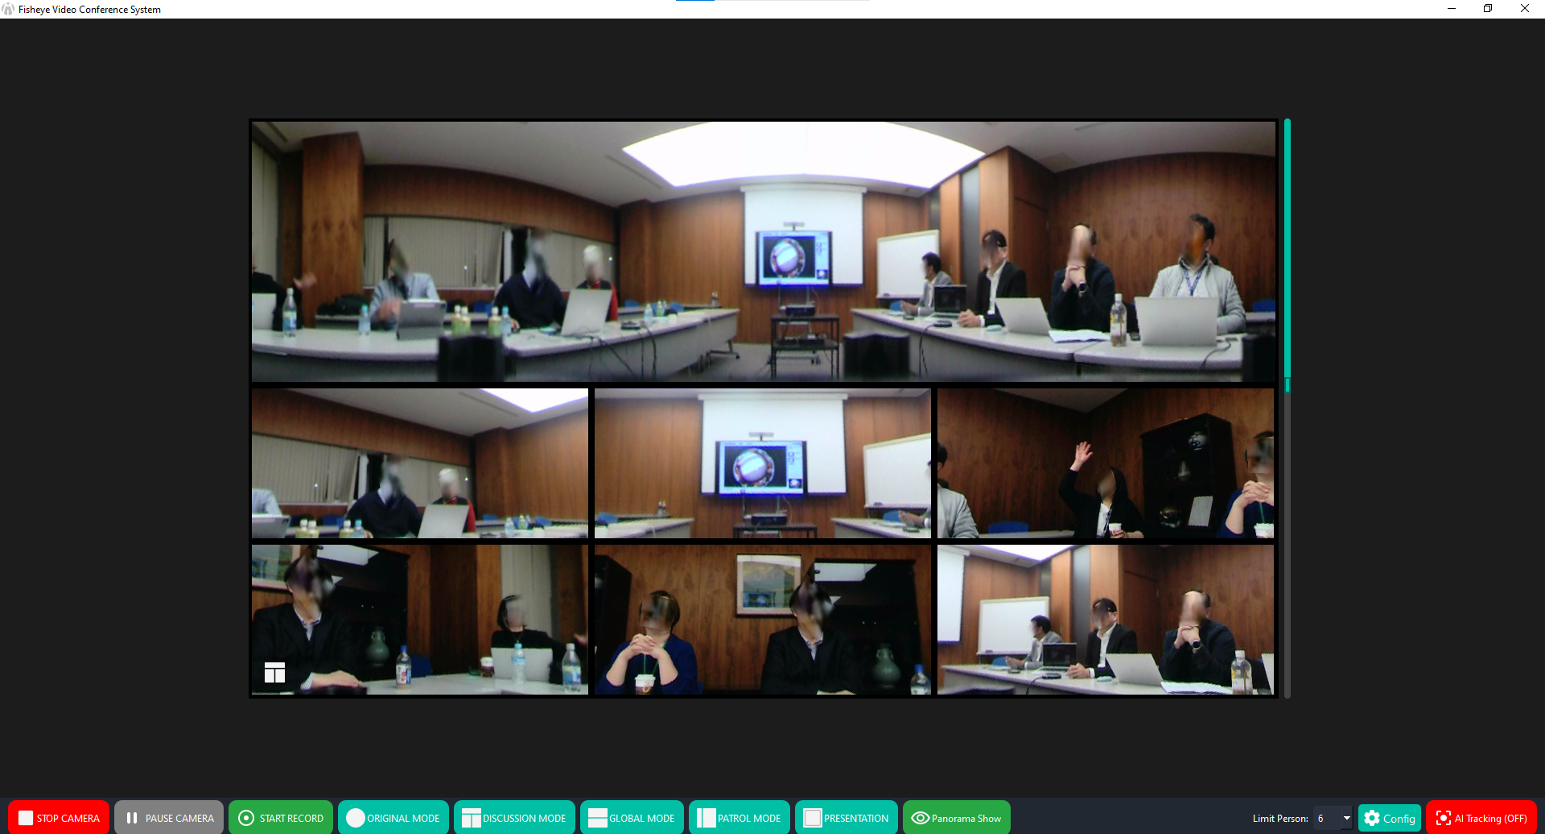
Discussion Mode
Disscusion Mode
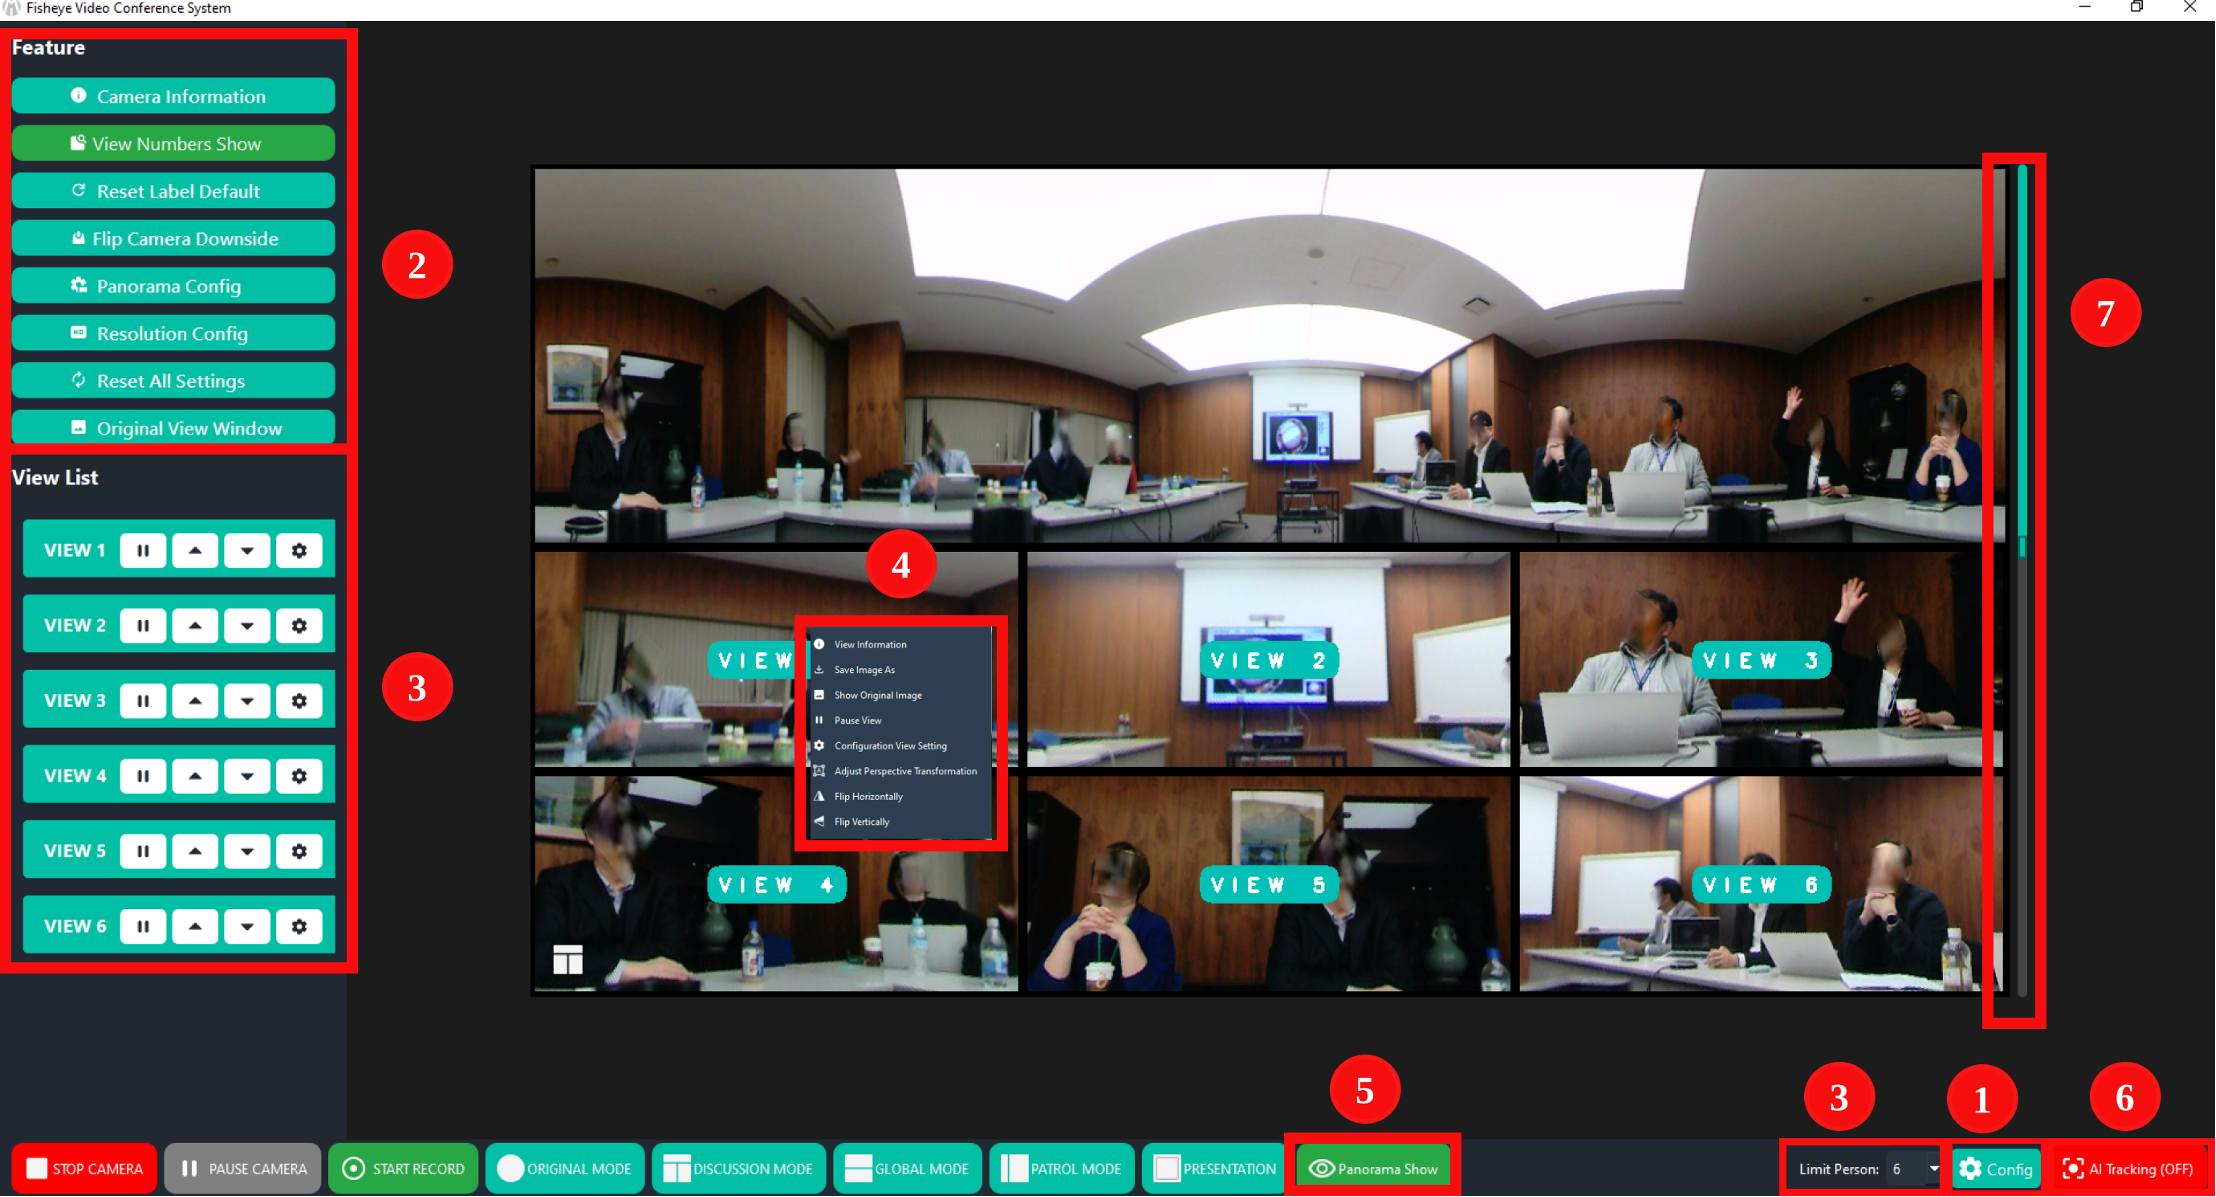
Allows flexible multi-camera management. Features:
Config Button: Access advanced settings (Camera Info, Reset, Panorama, Resolution, Original View).
Config Button
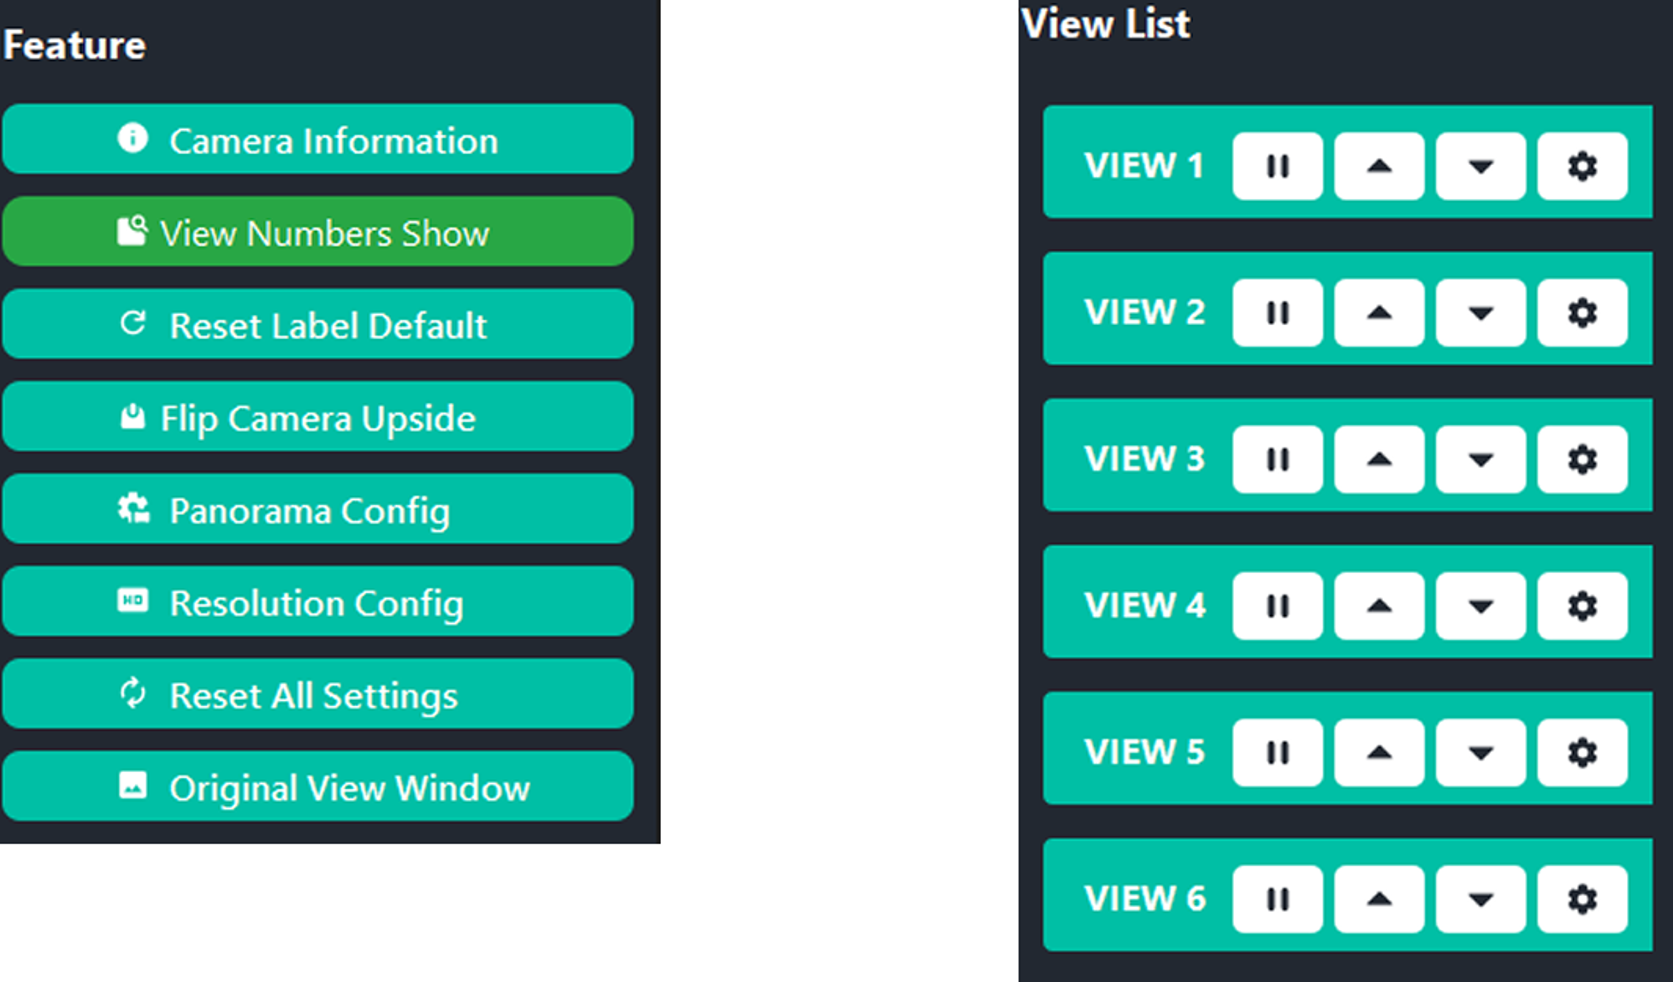
Limit Person: Select 2, 3, 4, 6, or 8 participants. Auto updates View List.
Limit Person and View List
- View List: Each view has pause, reorder, config controls. buttons:
Pause Button: Temporarily pauses the video feed for that specific view.
Up and Down Button: Used to change the order of the views by moving a view up or down the list.
Configuration Button: Opens settings for adjusting the position or other configurations for the selected view.
If the user selects Limit Person: 6, the system will generate 6 views to match the number of participants. Each participant’s video will be displayed in an individual view
Right-click menu: In Discussion View Mode, right-clicking on any individual view will display a contextual menu with multiple options. Each of these options serves a specific purpose and is designed to support advanced view-level operations.
Right-clicked view
These right-click functionalities are extremely useful for users who need more control, customization, or quick access to specific actions within a view. For a detailed explanation of each option available in the right-click menu.
Panorama Show/Hide: Enable or disable panorama overlay.
The panorama feature provides a comprehensive view of the area surrounding the camera, making it easier to monitor the situation more broadly and efficiently during a video conference.
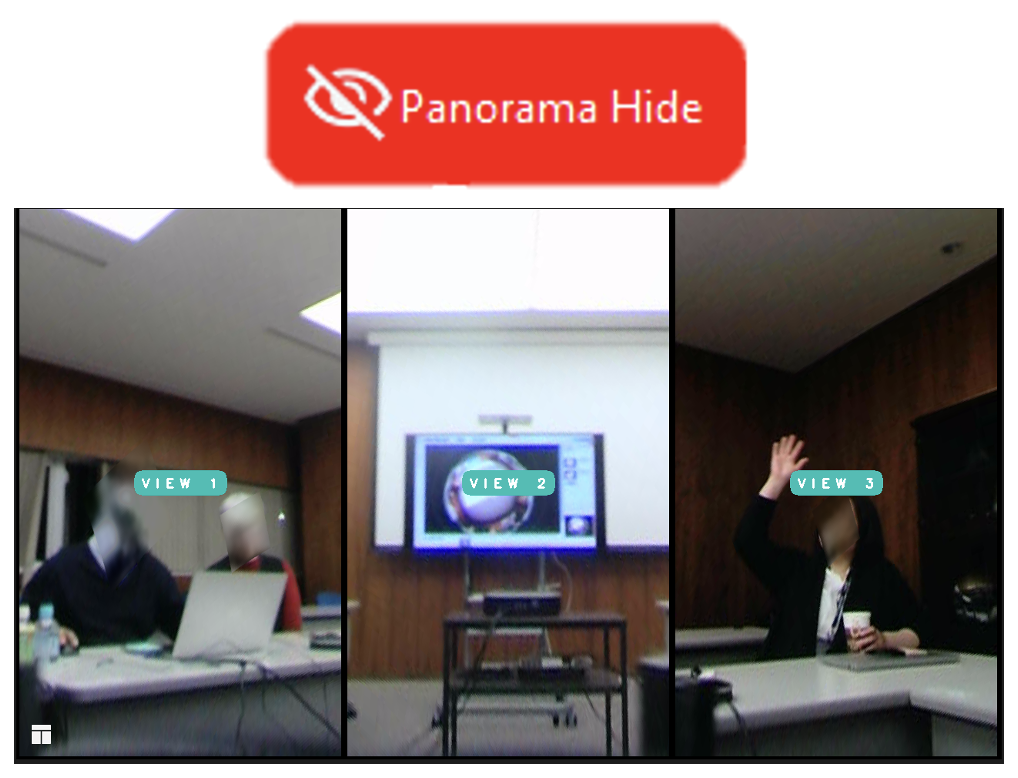
Panorama Hide
If you want to disable the panorama view, click the “Hide Panorama” button. This action will revert the display to the standard individual camera view. Use this option to simplify the layout or to focus more on specific participants without the panorama overlay.
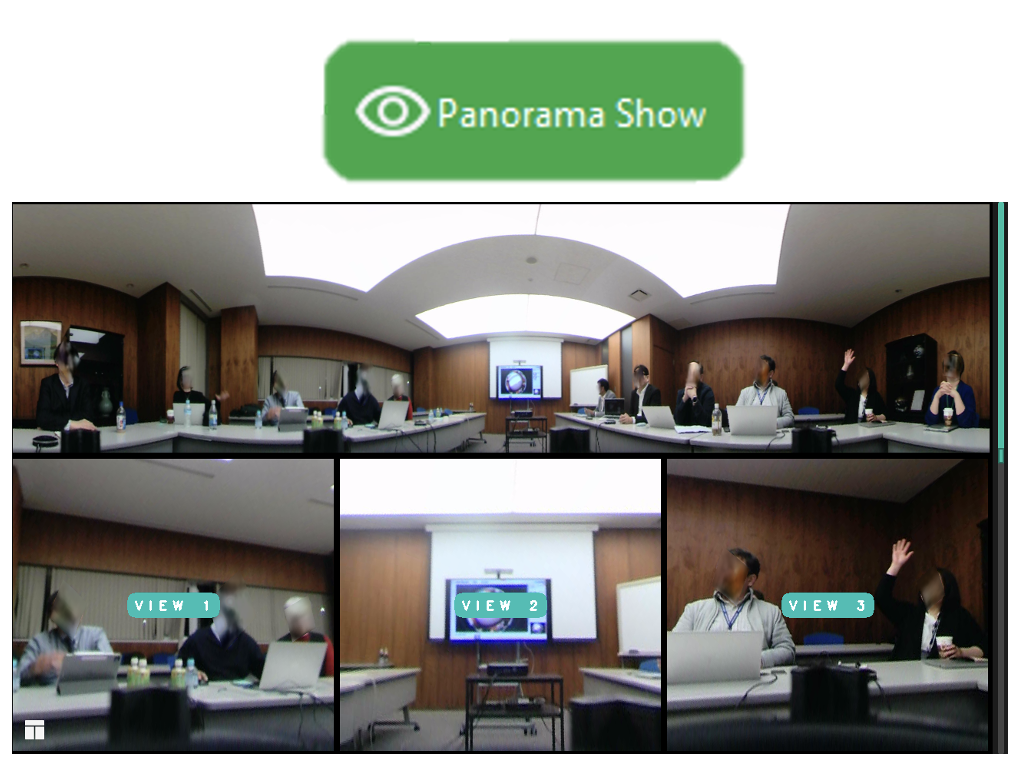
Panorama Show
AI Tracking: Auto track active speaker.
Layout Slider: Adjust size and arrangement of views.

Slider
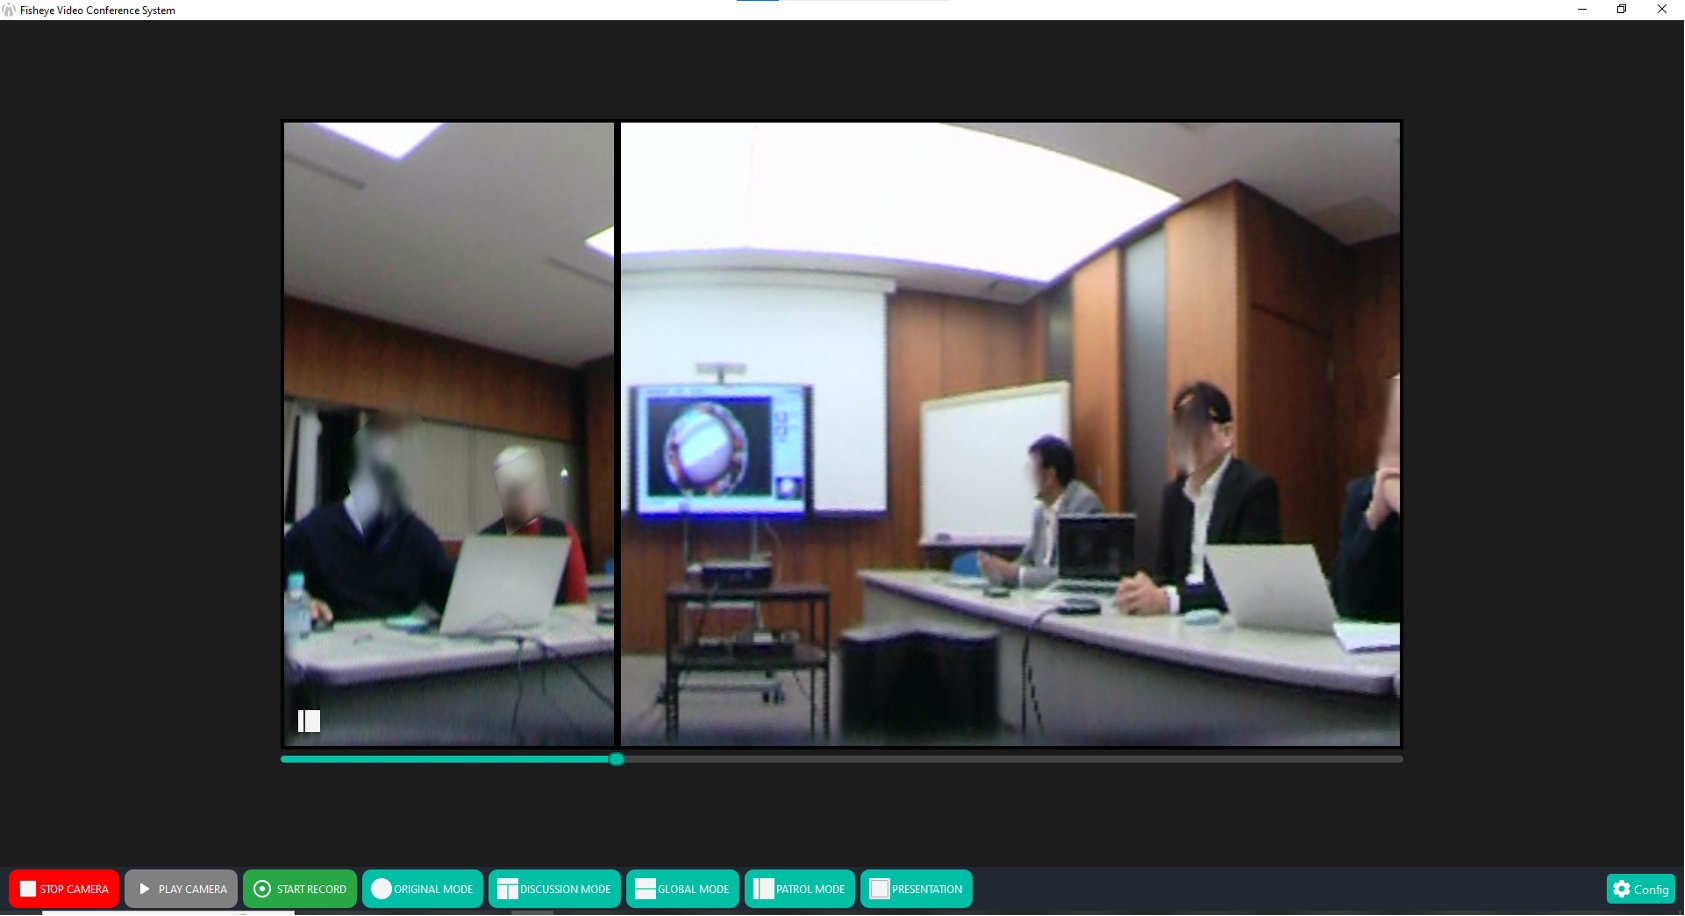
Global Mode
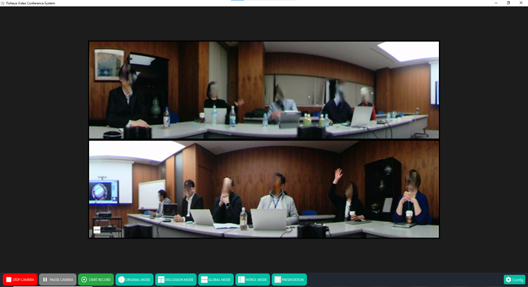
Global Mode
Displays two global views simultaneously:
First view: wide-angle of room.
Second view: alternative angle.
Includes config features: Camera Info, Flip, Panorama, Resolution, Reset, Original View.
Patrol Mode
Patrol Mode
Activated instantly.
Slider allows resizing and repositioning views dynamically.
Includes Global Mode configuration tools.
Presentation Mode
Presentation Mode
Click Presentation.
Right-click → choose Dialog Transformation for clarity.
Includes Global Mode config features and View List.
Configuration Panel
Accessed by Config Button:
Camera Information: Model, parameters, FOV, resolution, open time, user, version.
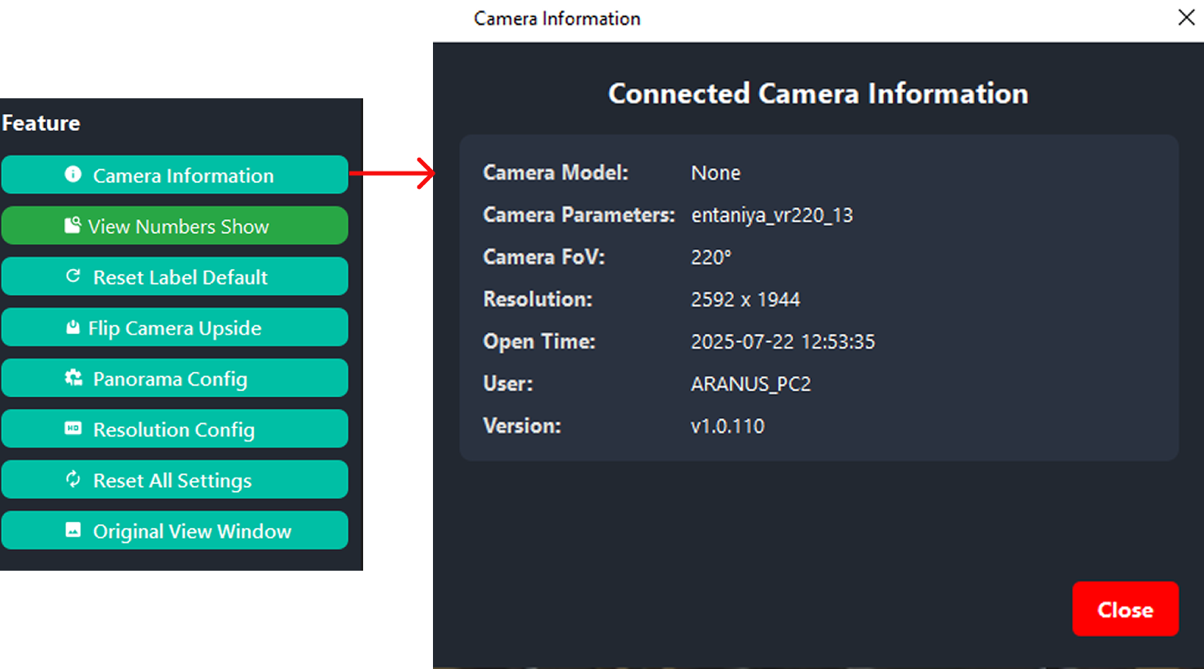
Camera Information
View Number Show/Hide: The ‘View Number’ feature is designed to display labels for each camera view. This feature allows users to show or hide labels across all views.
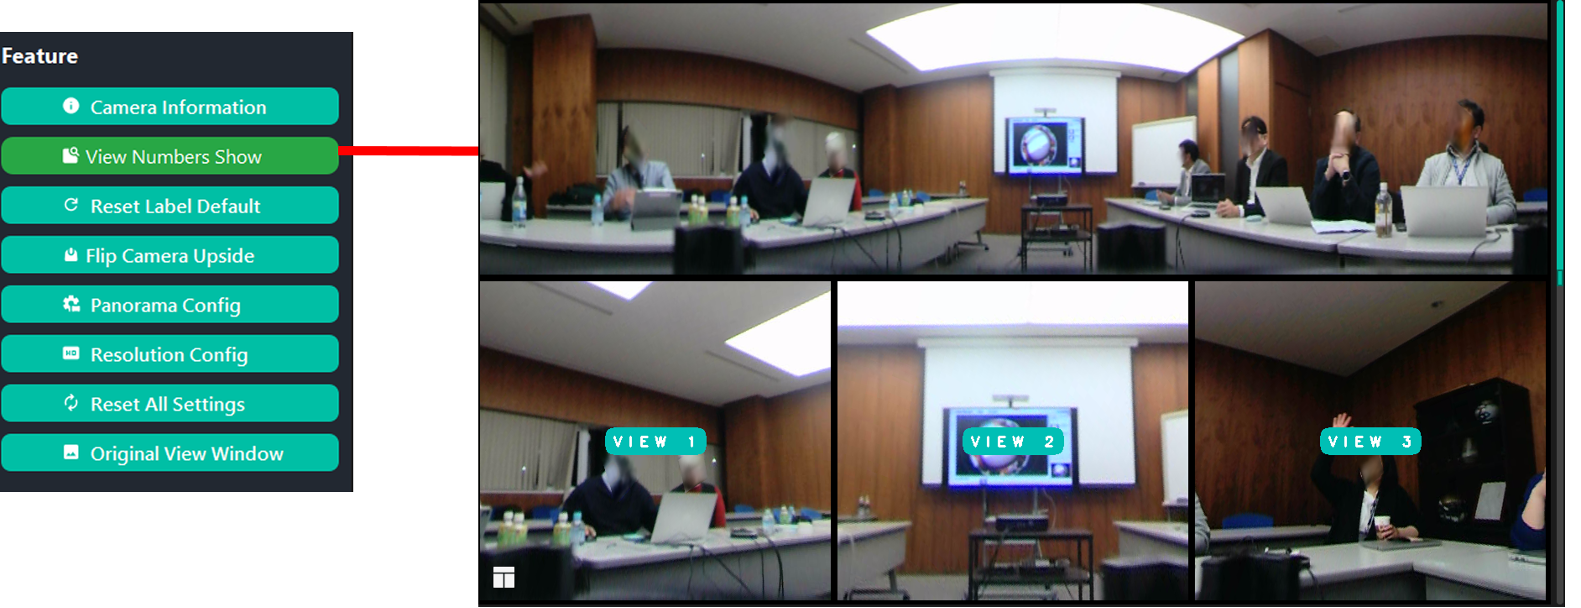
Show View Number
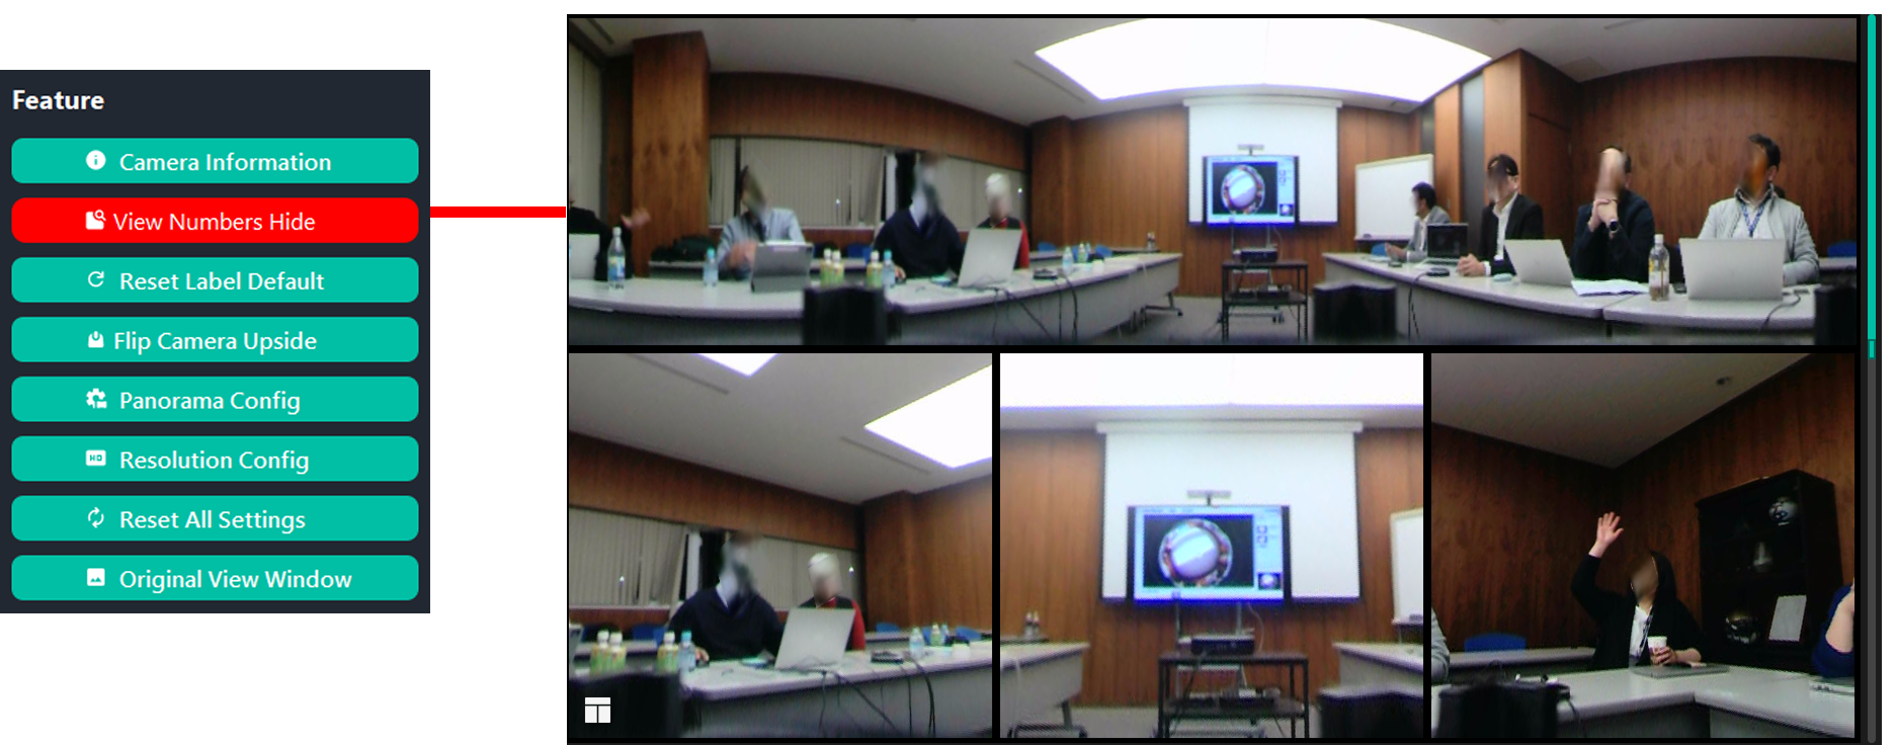
Hide View Number
Reset Label Default: The ‘Reset Label Default’ feature restores all edited labels to their original settings, including the label name, font size, and label position.
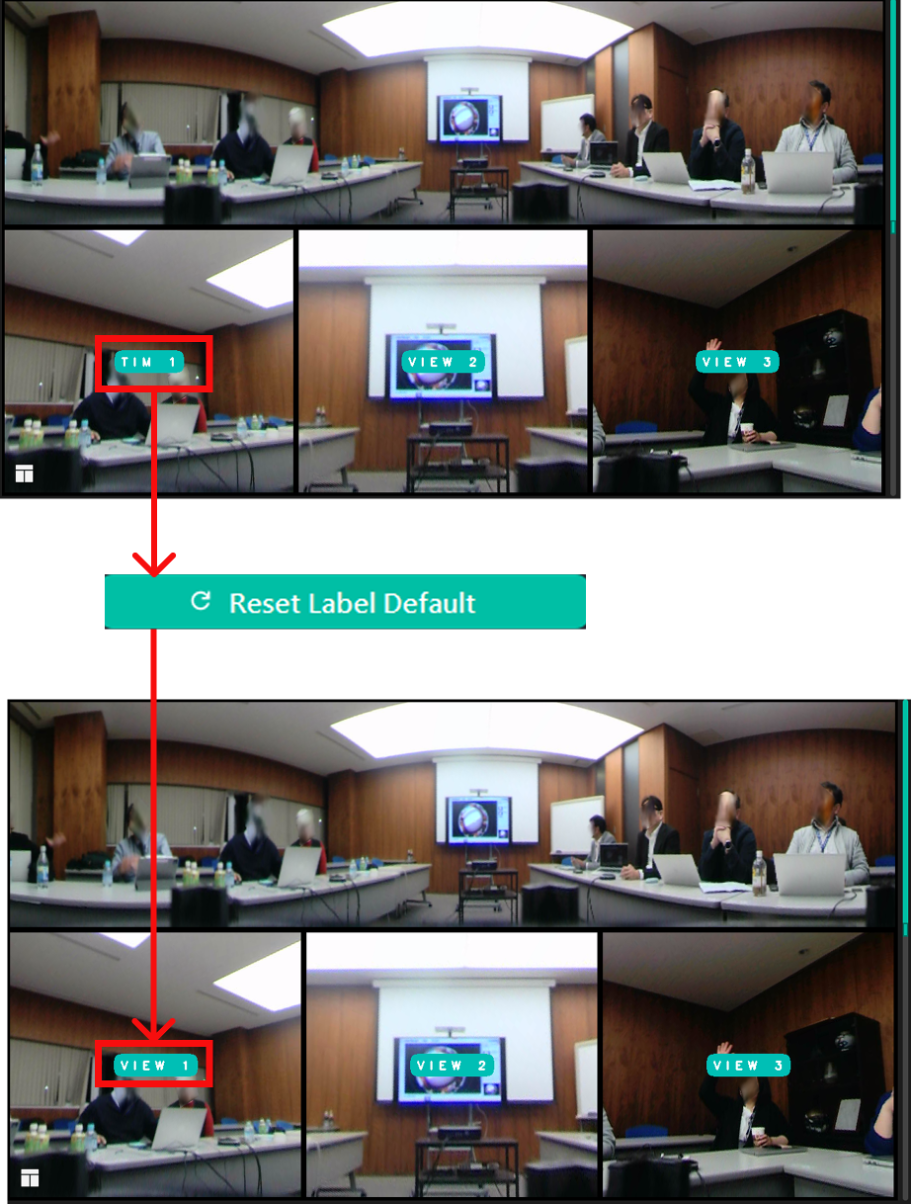
Reset Label Default
Flip Camera (Upside/Downside): The ‘Flip Camera’ feature allows users to adjust the camera view on the system according to the direction of the camera used. This feature offers two camera orientation options: downside and upside.
Panorama Config: The ‘Panorama Config’ feature allows users to adjust the configuration in the panorama view, where users can set values for alpha max, alpha, beta, crop top, crop bottom, crop left, and crop right. Additionally, users can pause, flip horizontally, flip vertically, and reset the flip settings.
- 1. Alpha Max, Alpha, Beta
These three parameters form a group of settings used to control the viewing angle in the panorama.
Alpha Max: Defines the maximum limit of horizontal rotation.
Alpha: Controls the horizontal angle (pan) of the panorama view.
Beta: Controls the vertical angle (tilt) of the panorama view.
These settings are useful for adjusting the position of the virtual camera within the panorama space, allowing users to focus on specific areas of the display.
2. Top, Bottom, Left, Right
These parameters are used to crop certain parts of the panorama display:
Crop Top: Crops the top part of the image.
Crop Bottom: Crops the bottom part of the image.
Crop Left: Crops the left side of the image.
Crop Right: Crops the right side of the image.
The crop feature is especially useful for removing unwanted areas from the panorama or narrowing the focus to a more specific section.
- 3. Pause
This button is used to temporarily stop (pause) the video display. It is useful when users want to adjust the view without the video continuously playing in the background.
- 4. Flip Vertical
This feature flips the view from top to bottom, allowing users to adjust the view orientation based on their preferences.
- 5. Flip Horizontal
This feature flips the view from left to right. It is helpful if the image appears mirrored or needs to be corrected.
- 6. Reset Flip
This button resets any flip settings applied and restores the view to its default (original) orientation.
- a). Resolution Config
The ‘Resolution Config’ feature is used to adjust the resolution for each view in the application. Several resolution options are available, which can be customized to meet the user’s needs.
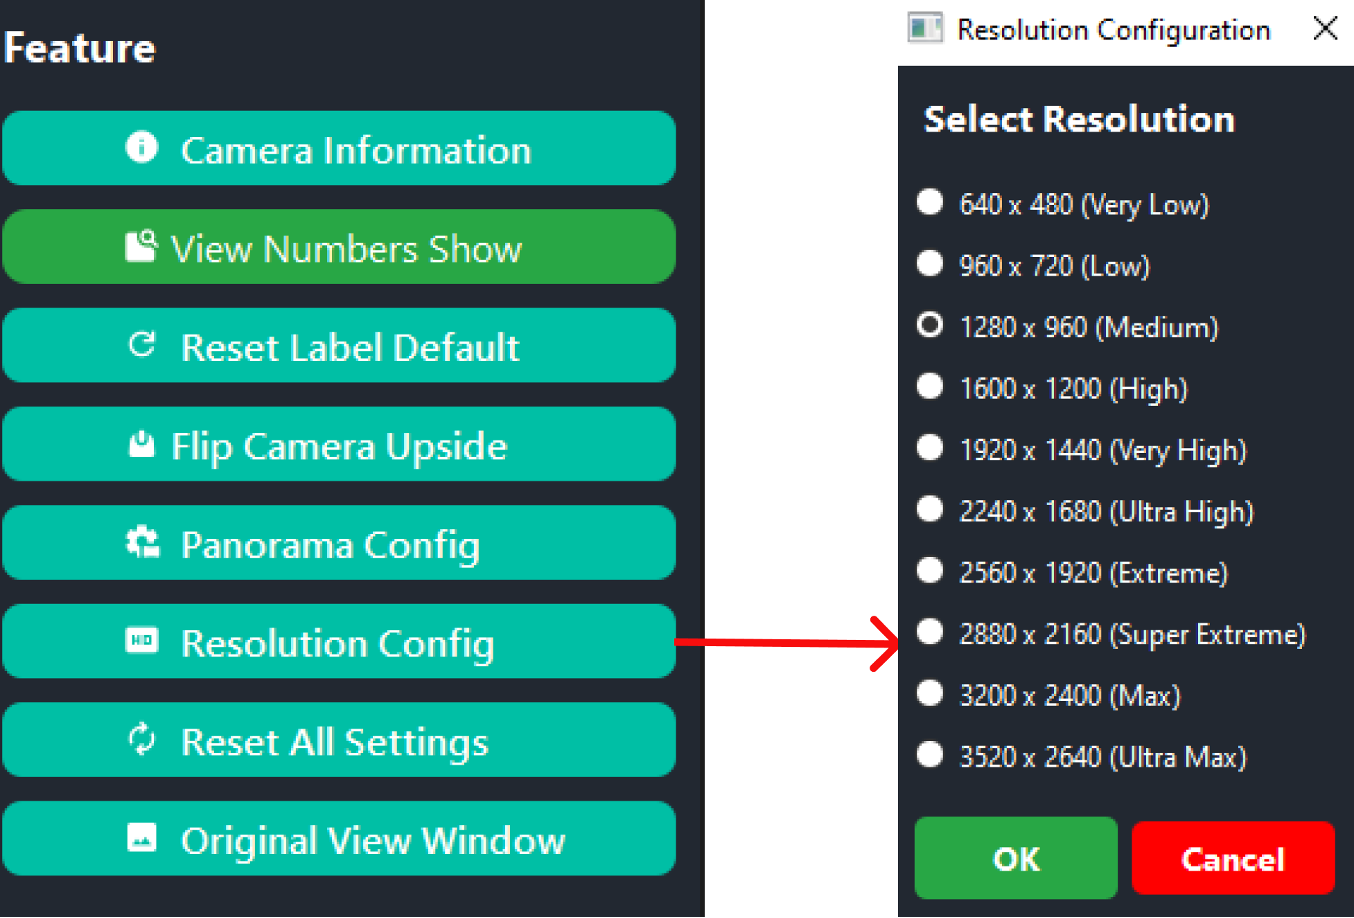
Resolution Configuration
- b).Reset All Settings
The ‘Reset All Settings’ feature restores all configurations made by the user to the application’s default settings.

Reset All Settings
- c). Original View Window
The ‘Original View Window’ feature allows the application to open a new window dedicated to displaying the original video, enabling users to view the original video in a separate window while making configurations in the application.
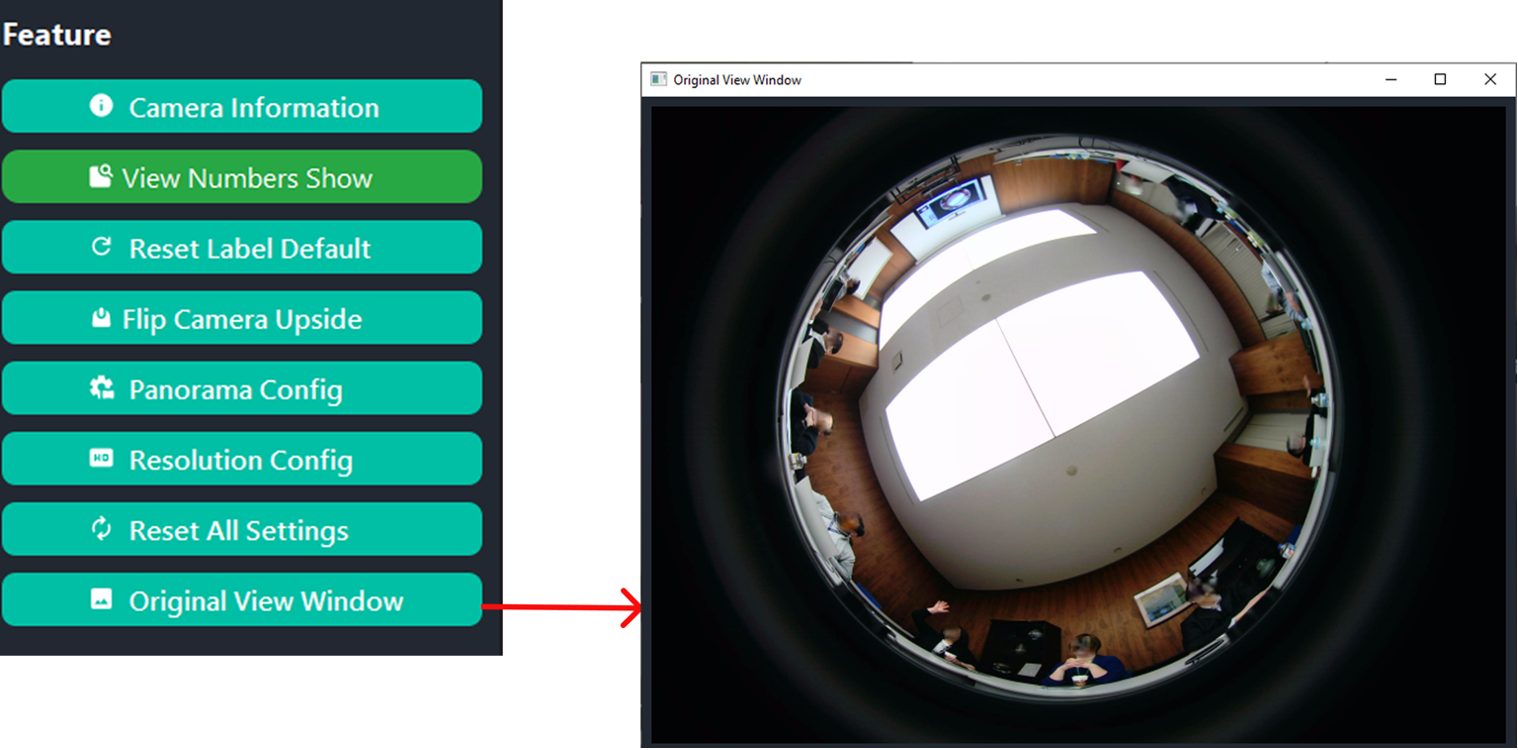
Original Image Window
Mouse Press Events
The Mouse Press Event is a versatile feature available across all modes of the system, including Original Mode, Discussion Mode, Global Mode, Patrol Mode, and Presentation Mode. This feature enhances user interaction by responding to various mouse actions, making navigation and control much easier and more intuitive. The Mouse Press Event supports multiple types of mouse inputs such as right-click, scroll up, scroll down, double click, and drag and drop. Mouse Press Event is an essential interactive feature that works consistently across all modes, providing users with flexible and efficient. Available in all modes:
Right clicked
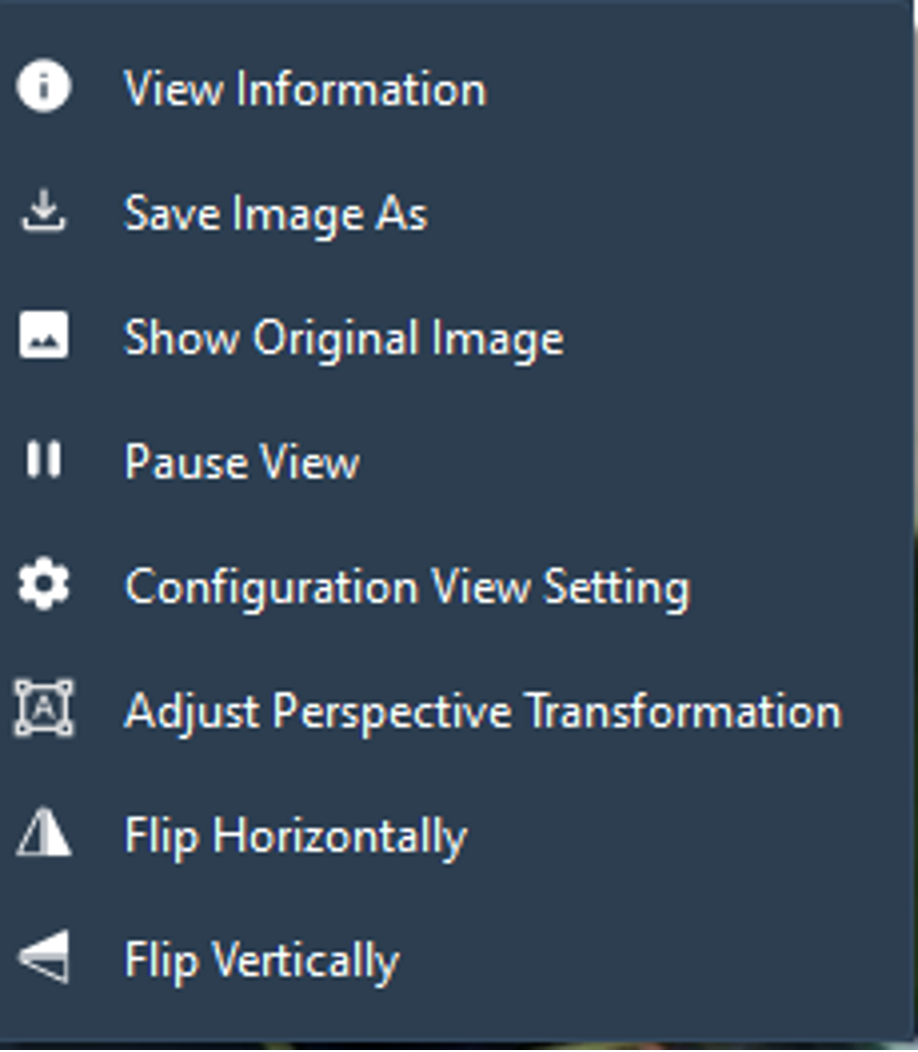
View Information: The ‘View Information’ feature allows users to view details about the selected view, as shown in the image below.
Camera information
Save Image As: The ‘Save Image As’ feature allows users to save the image from the selected view, with the option to choose the desired storage location.
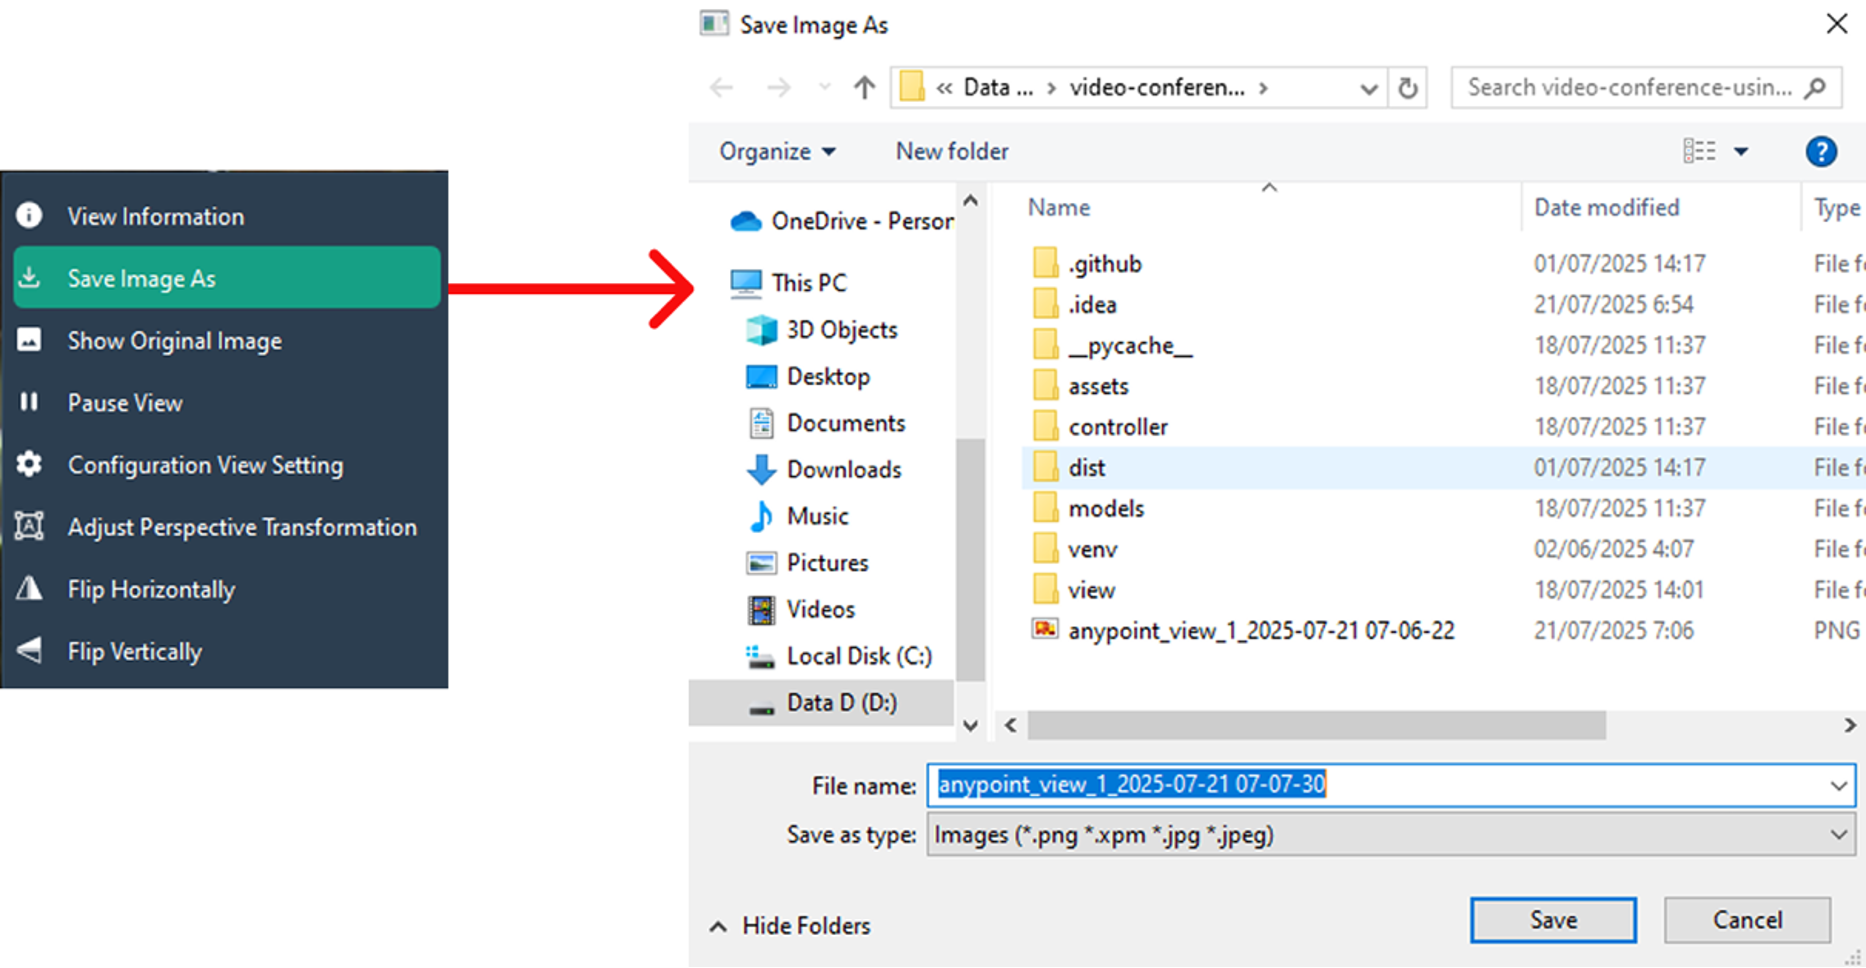
Save Image
Show Original Image: The ‘Show Original Image’ feature displays the original image of the selected view and allows users to return to the previous view.
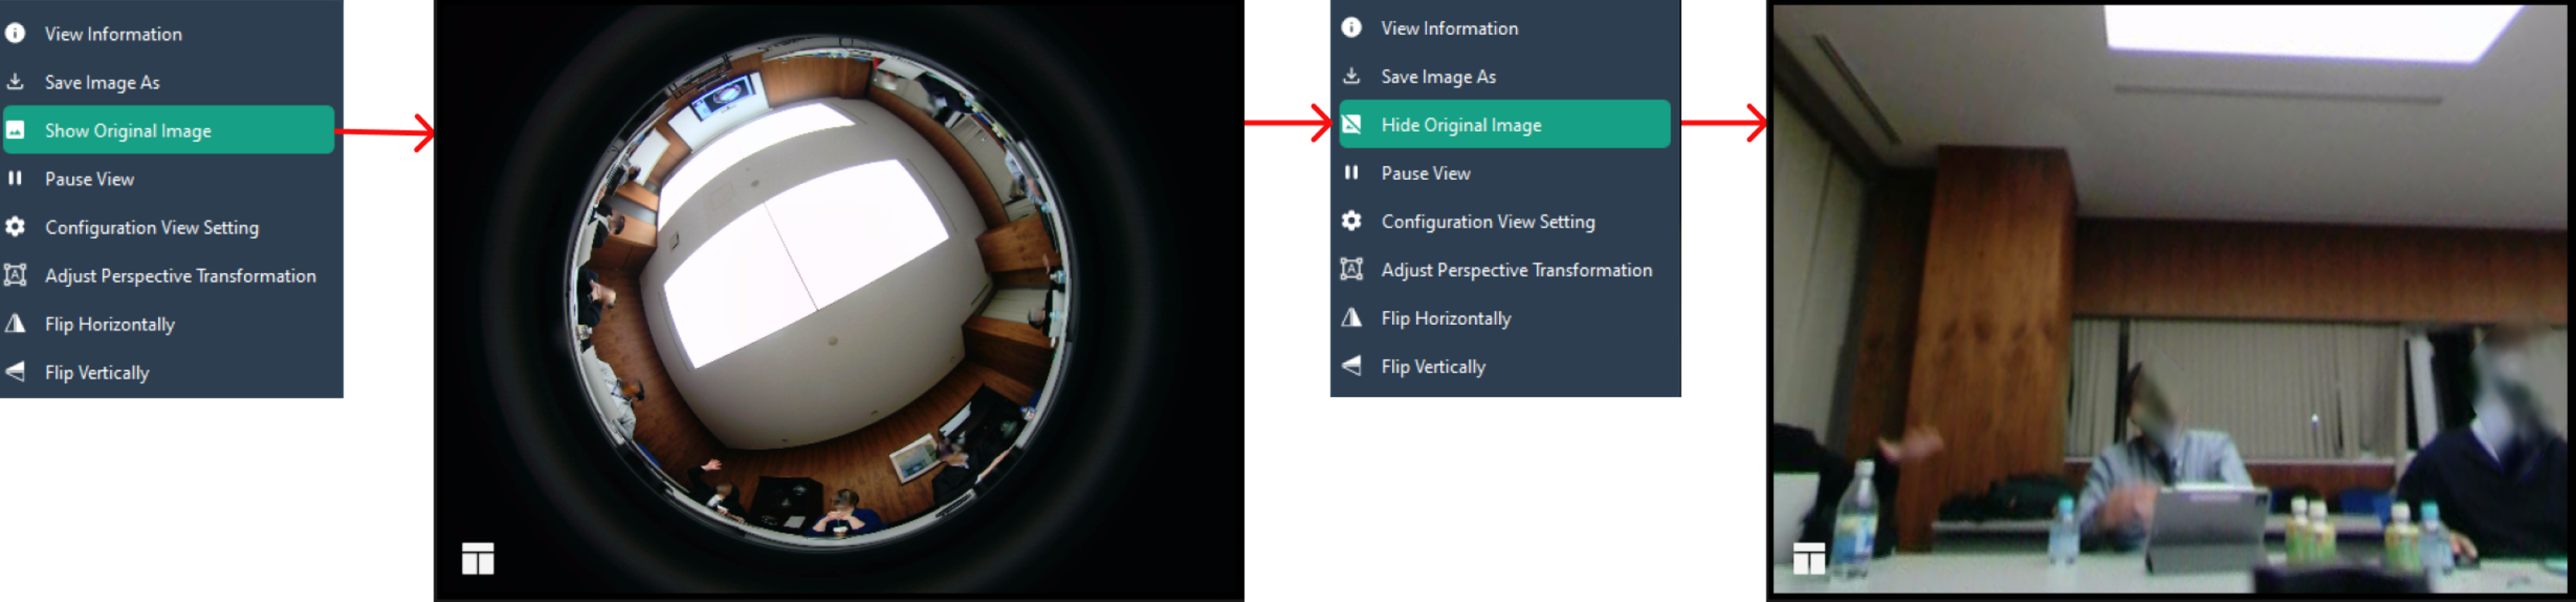
Show and Hide Original Image
Pause View: The ‘Pause View’ feature stops the selected video and allows it to be resumed.
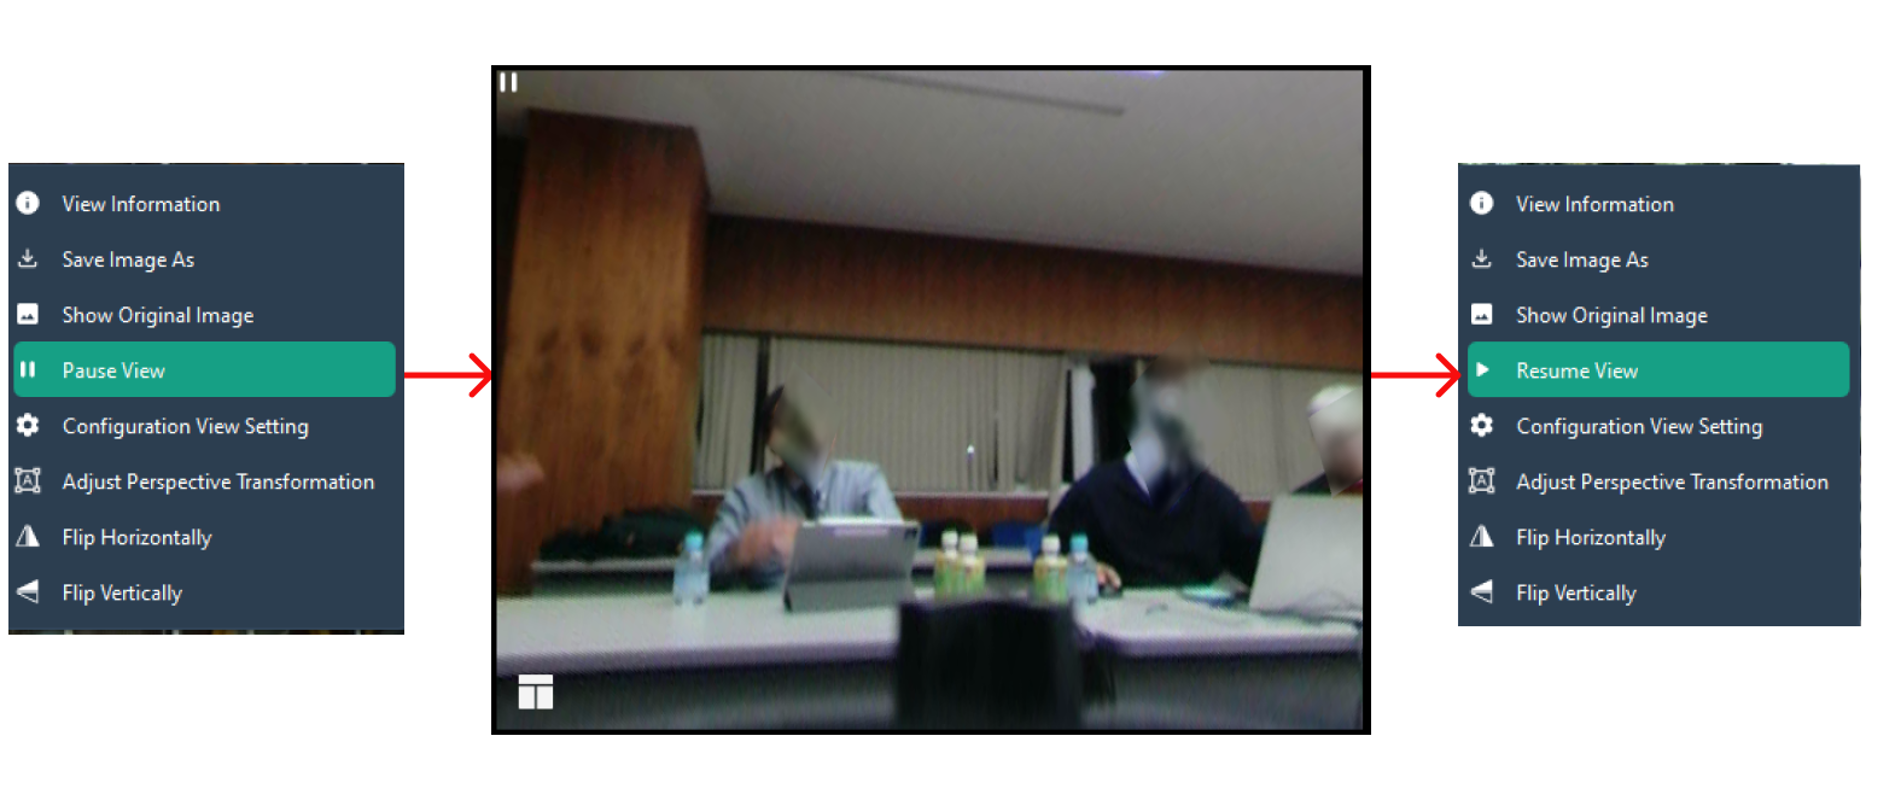
Pause and Resume View
Configuration View Setting: The Configuration View Setting menu is used to adjust the camera view that has been transformed from the Original View (fisheye lens view) into a more readable Anypoint View. This menu provides several essential features:
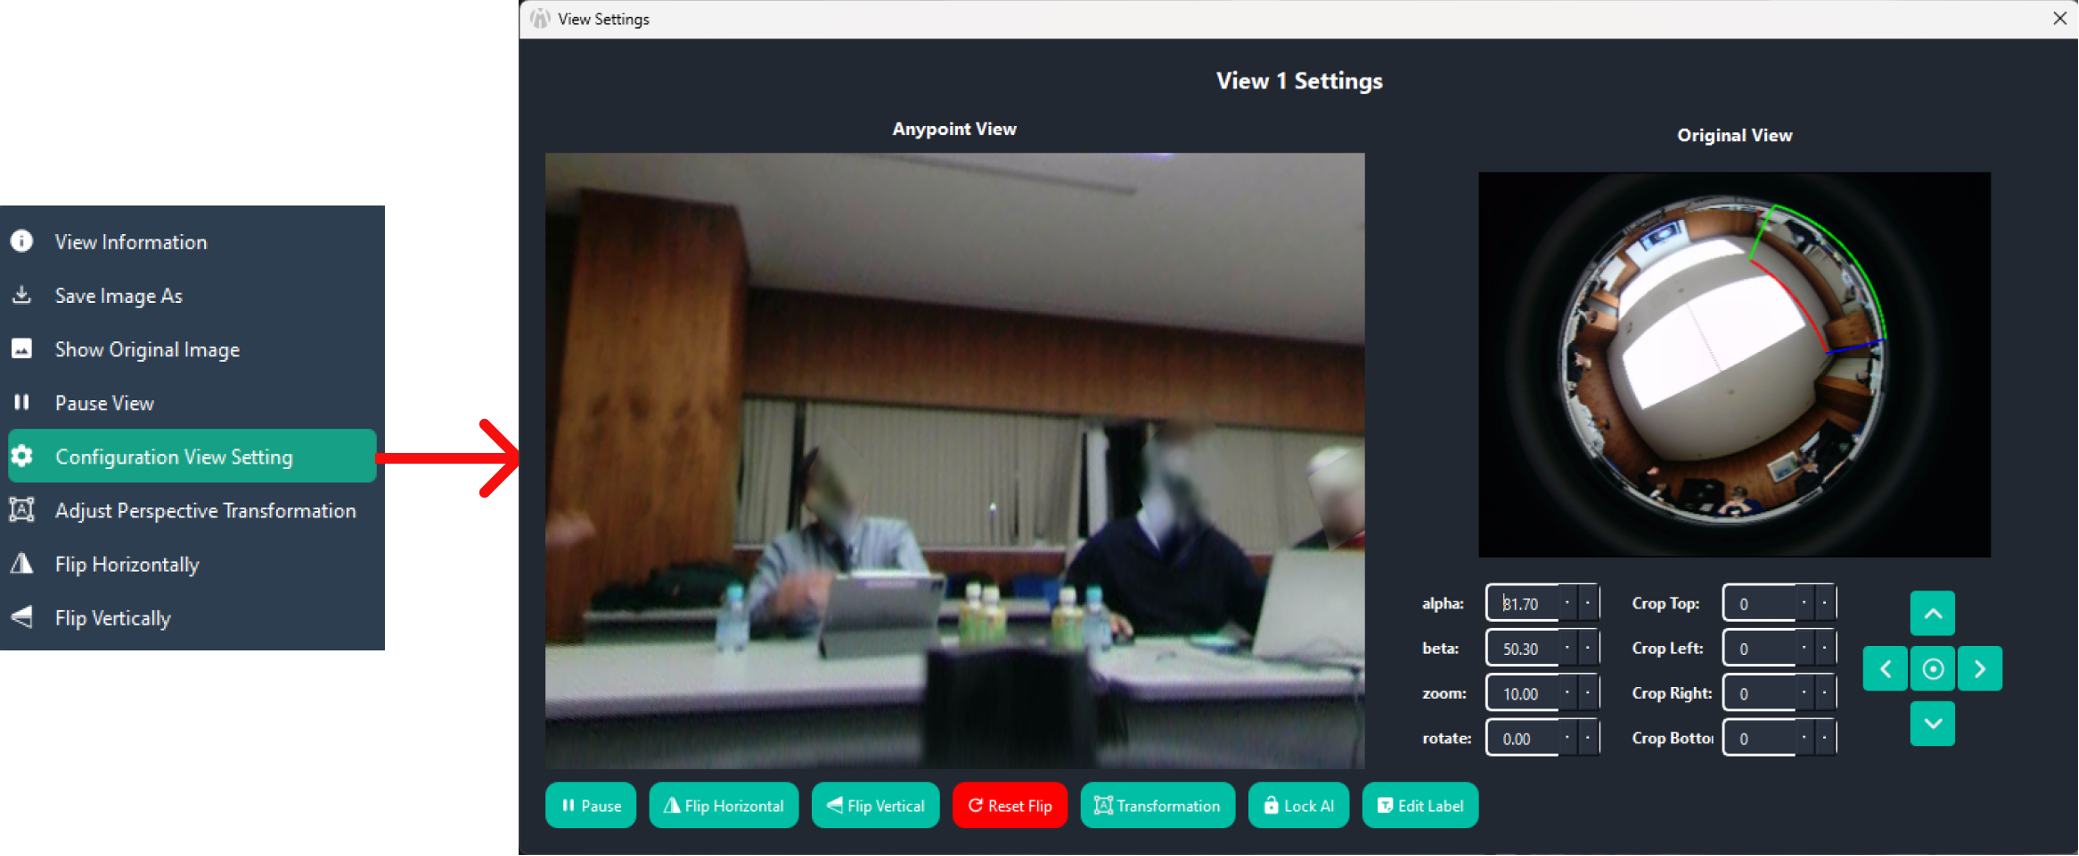
Cofiguration view
- 1. Alpha Max, Alpha, Beta
These three parameters form a group of settings used to control the viewing angle in the panorama.
Alpha Max: Defines the maximum limit of horizontal rotation.
Alpha: Controls the horizontal angle (pan) of the panorama view.
Beta: Controls the vertical angle (tilt) of the panorama view.
These settings are useful for adjusting the position of the virtual camera within the panorama space, allowing users to focus on specific areas of the display.
- 2. Top, Bottom, Left, Right
These parameters are used to crop certain parts of the panorama display:
Crop Top: Crops the top part of the image.
Crop Bottom: Crops the bottom part of the image.
Crop Left: Crops the left side of the image.
Crop Right: Crops the right side of the image.
The crop feature is especially useful for removing unwanted areas from the panorama or narrowing the focus to a more specific section.
- 3. Pause
This button is used to temporarily stop (pause) the video display. It is useful when users want to adjust the view without the video continuously playing in the background.
- 4. Flip Vertical
This feature flips the view from top to bottom, allowing users to adjust the view orientation based on their preferences.
- 5. Flip Horizontal
This feature flips the view from left to right. It is helpful if the image appears mirrored or needs to be corrected.
- 6. Reset Flip
This button resets any flip settings applied and restores the view to its default (original) orientation.
- 7. Transformation
The ‘Transformation’ feature allows users to adjust the view of the fisheye lens to a more readable Anypoint View. This feature is particularly useful for transforming the fisheye lens view into a more standard perspective, making it easier to read and understand the content.
- 8. Lock AI
The ‘Lock AI’ feature allows users to lock the AI focus on a specific area of the view. This is particularly useful when users want to keep a certain area in focus while adjusting other settings or views.
- 9. Edit Label
This feature allows users to edit or add labels to the view, making it easier to identify.
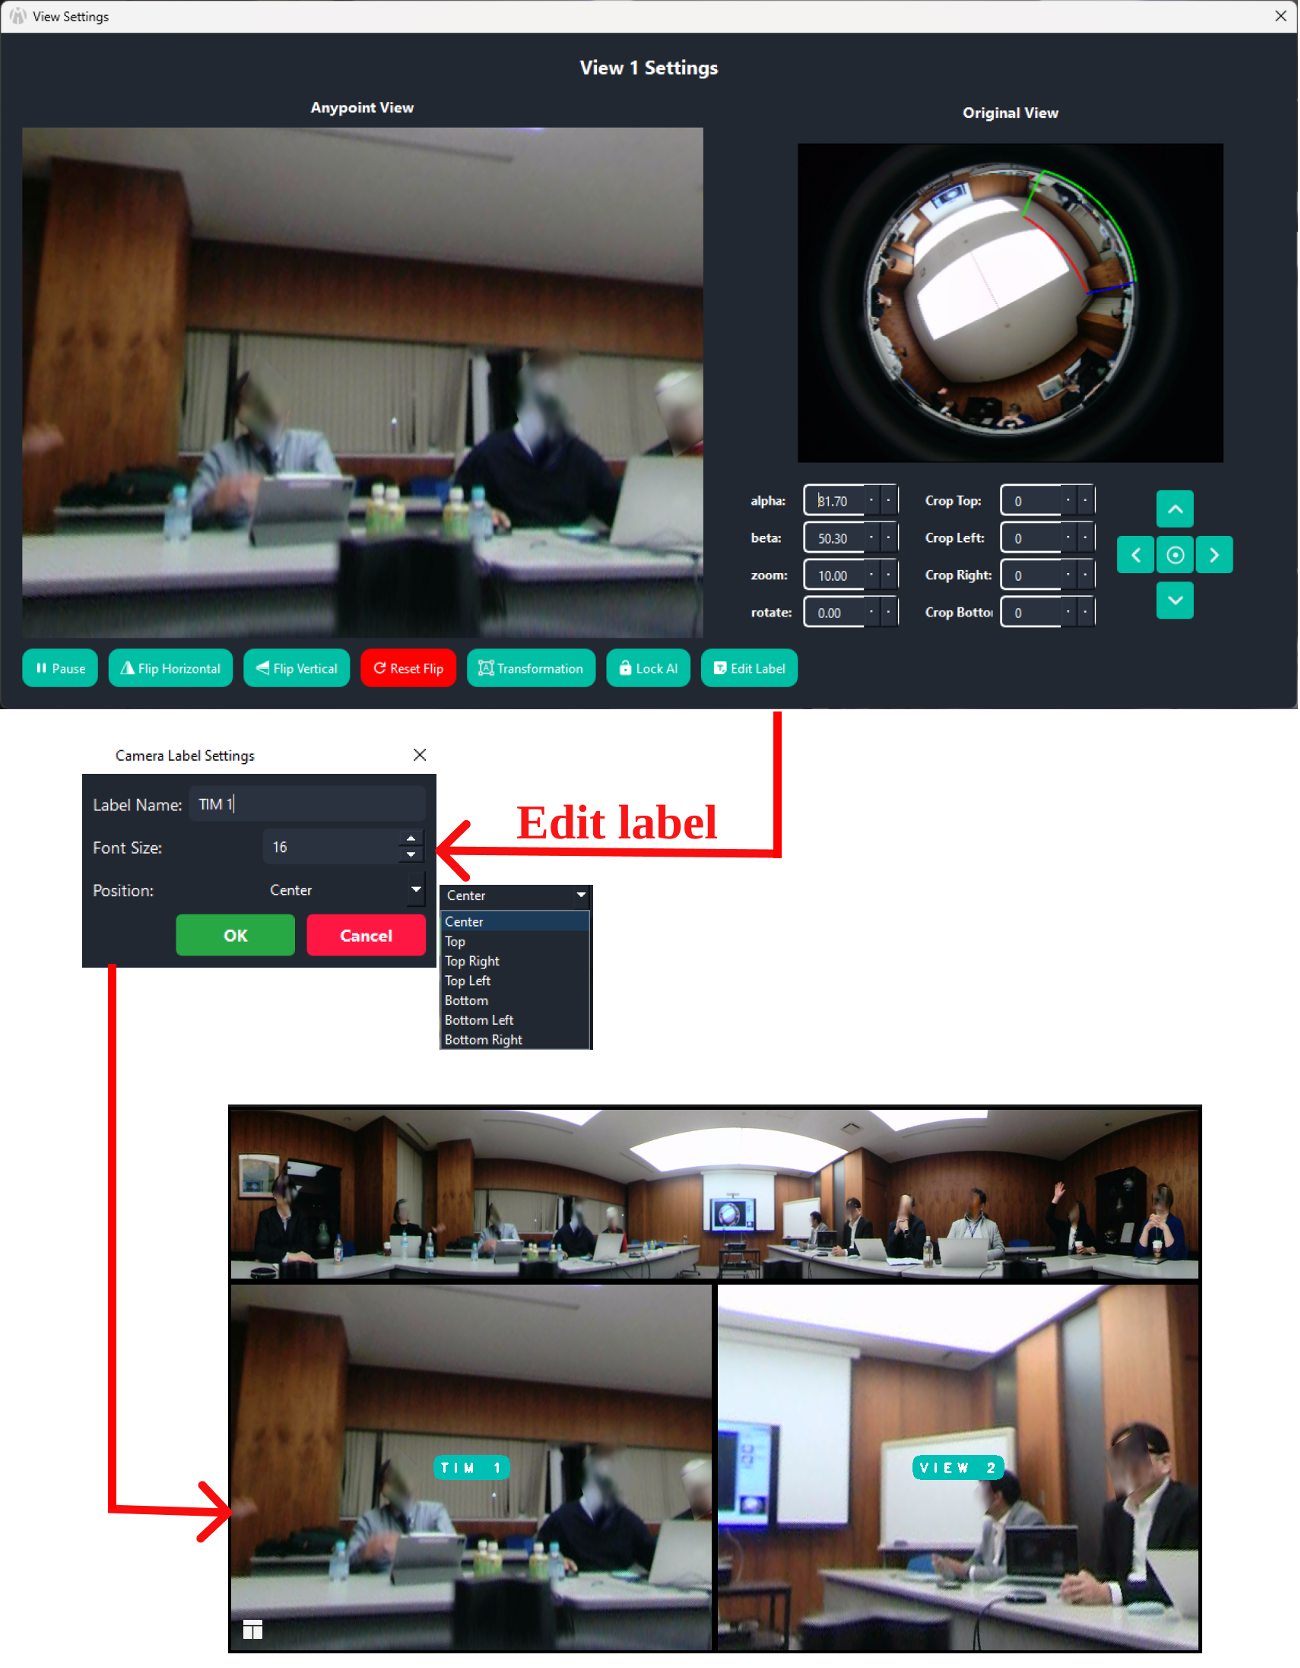
Edit label
- 10. Adjusted Transform
This feature is designed to help you focus more easily on a specific object by allowing customized transformation adjustments as needed. When you activate the transform, the original appearance of the object (before any transformation) will appear in the corner as a reference, allowing you to compare the changes with the original version. If you wish to revert back to the initial state, simply press the Reset button to discard all adjustments and restore the object to its original form.
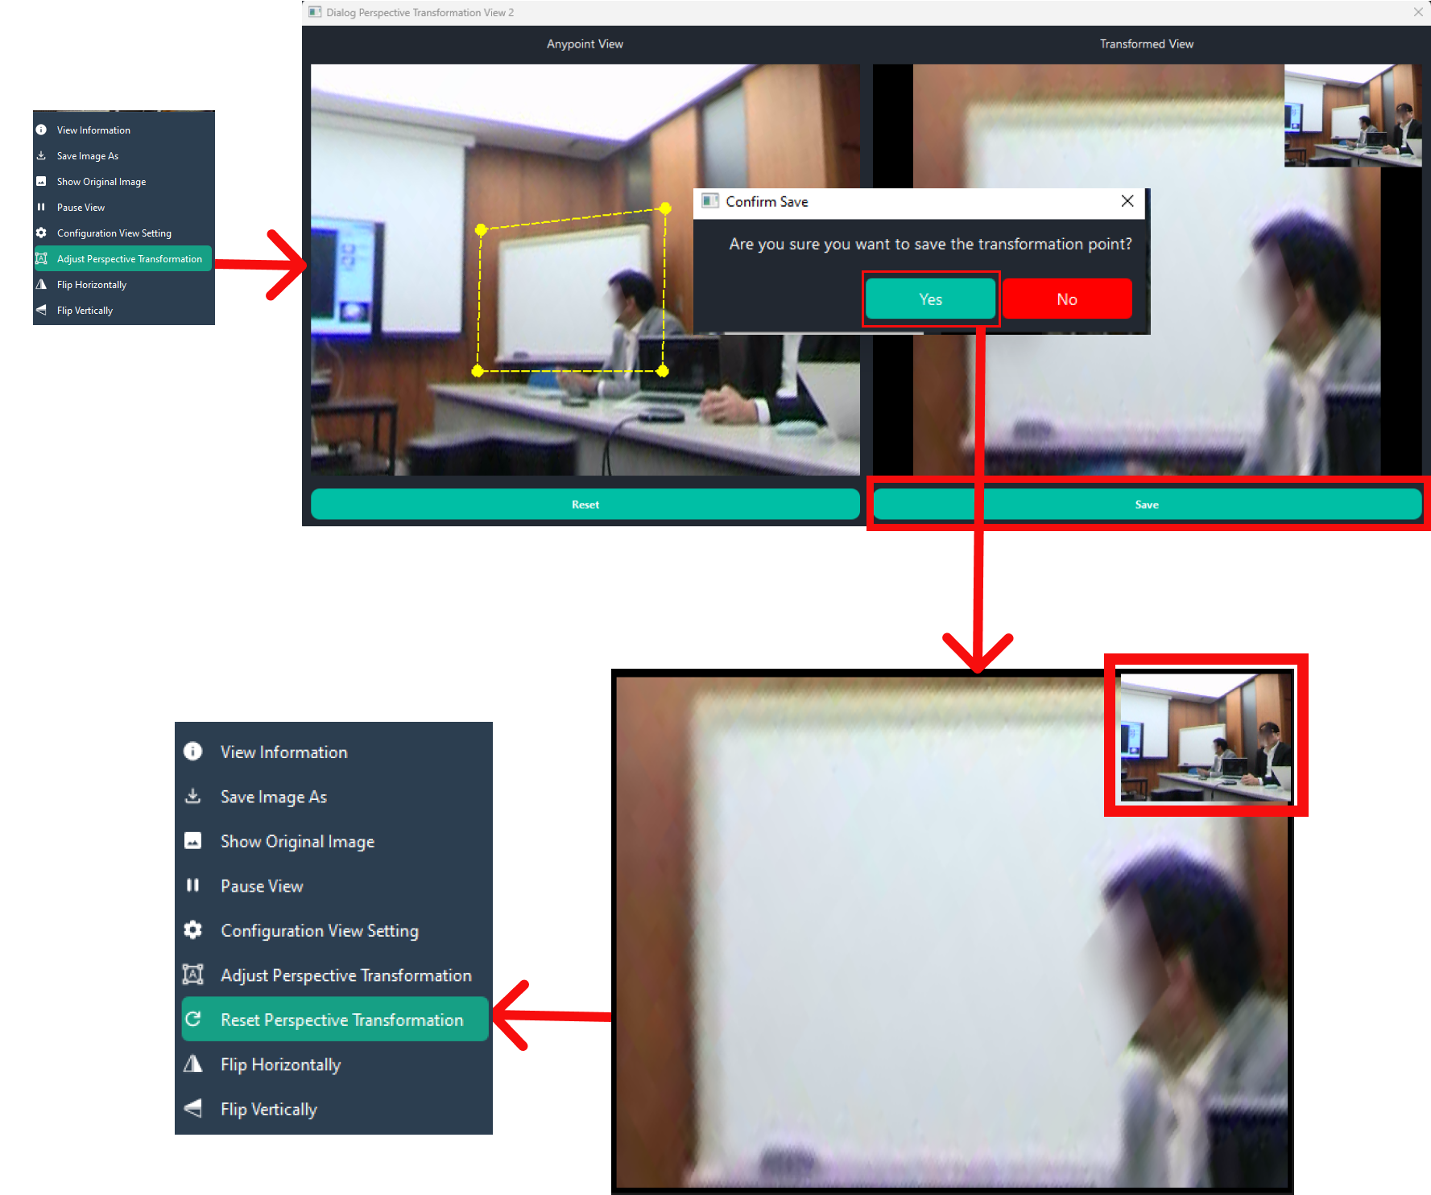
adjust_transform
Note
Mouse Press Event enhances navigation and control across all modes.
Right-Clicked Features
Mouse Drag: The feature allows users to drag the mouse to select a desired region easily and switch between maps seamlessly, enhancing navigation and interaction within the application.
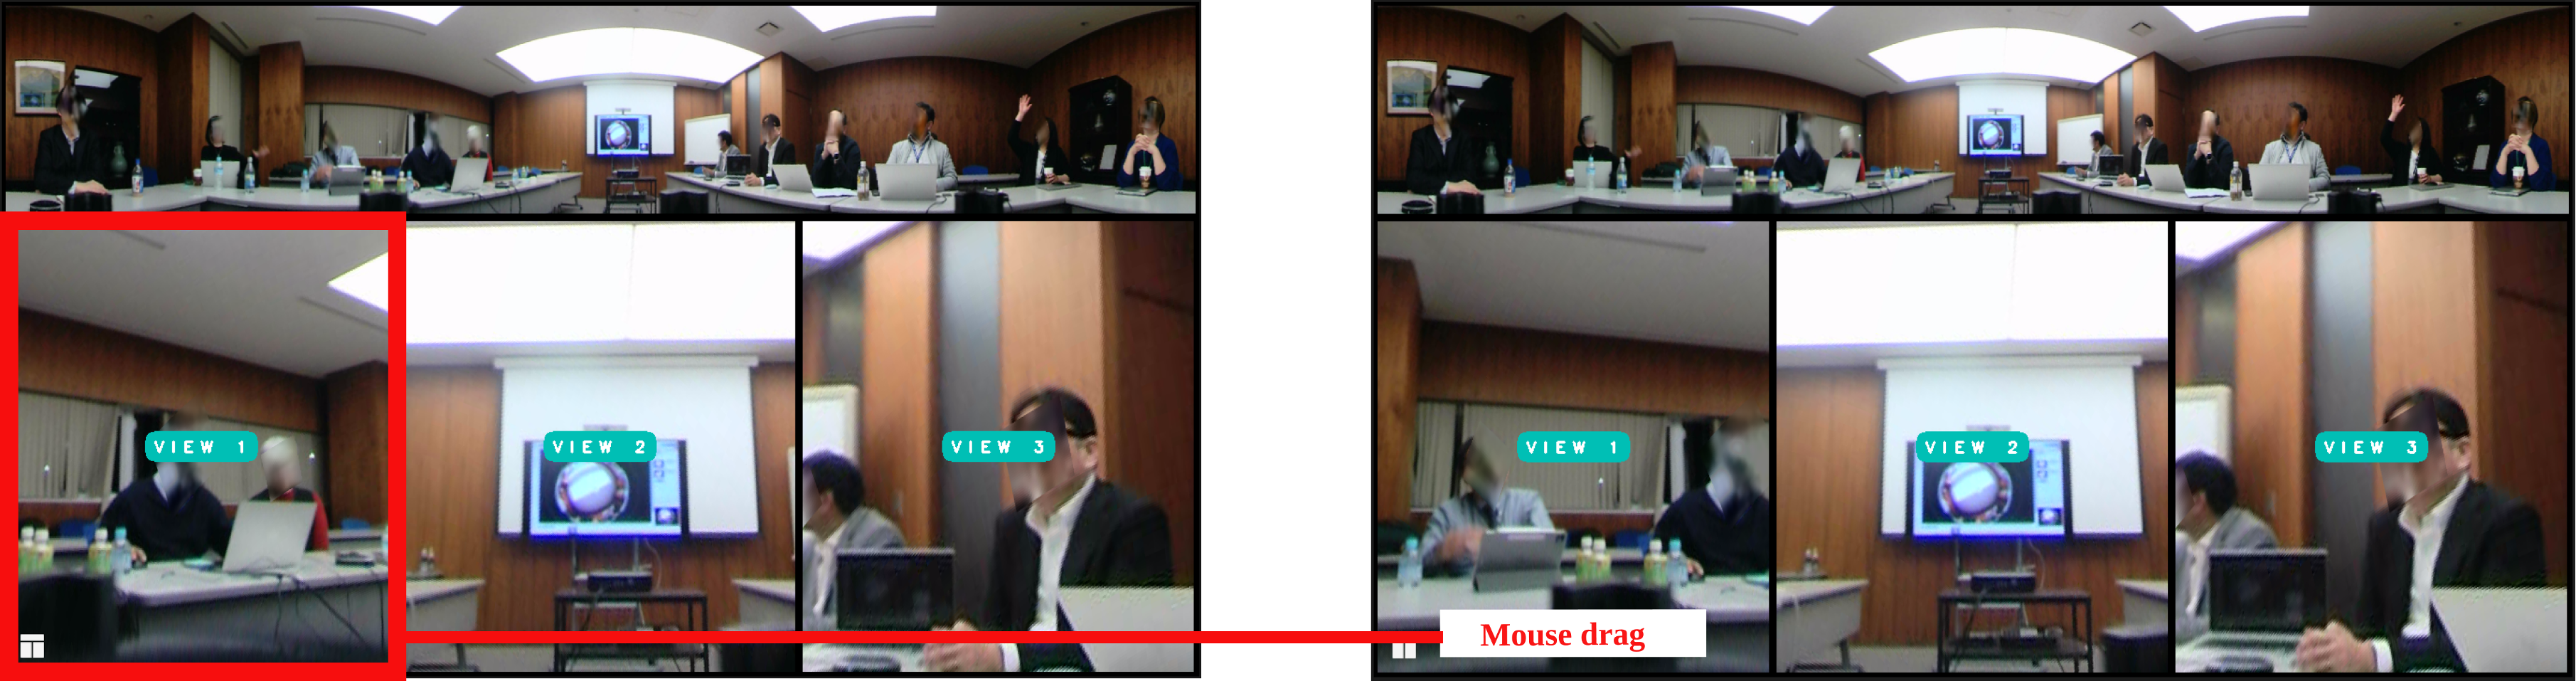
Mouse drag
Double-clicked: When the selection view is double-clicked, the view will expand to display the selected area in full-screen mode, allowing users to focus entirely on the chosen content.
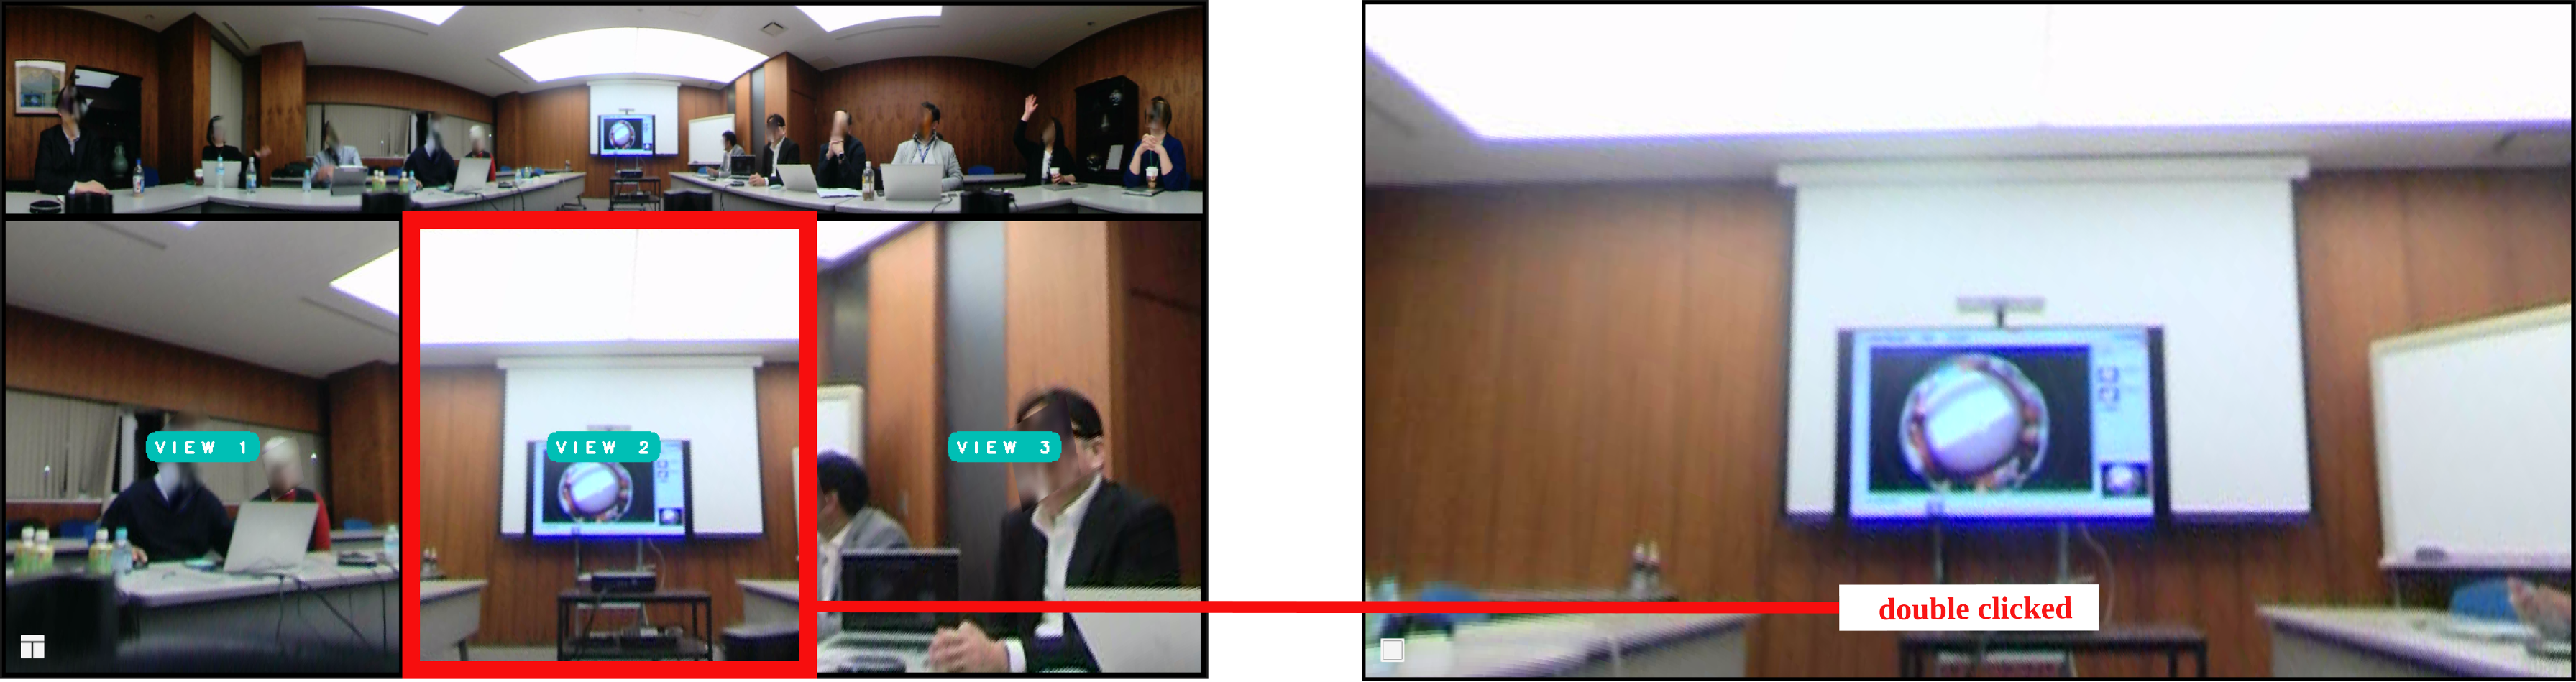
Double-clicked
Scroll Up/Down: The zoom in and zoom out feature allows users to easily control the view by using the mouse scroll wheel, enabling precise adjustments to the zoom level. By simply scrolling the mouse while pointing at the desired area, users can quickly zoom in to get a closer look or zoom out to see a broader perspective. This intuitive control enhances the overall user experience by making navigation smoother and more efficient, allowing users to focus on specific details or get an overview without needing additional buttons or controls.
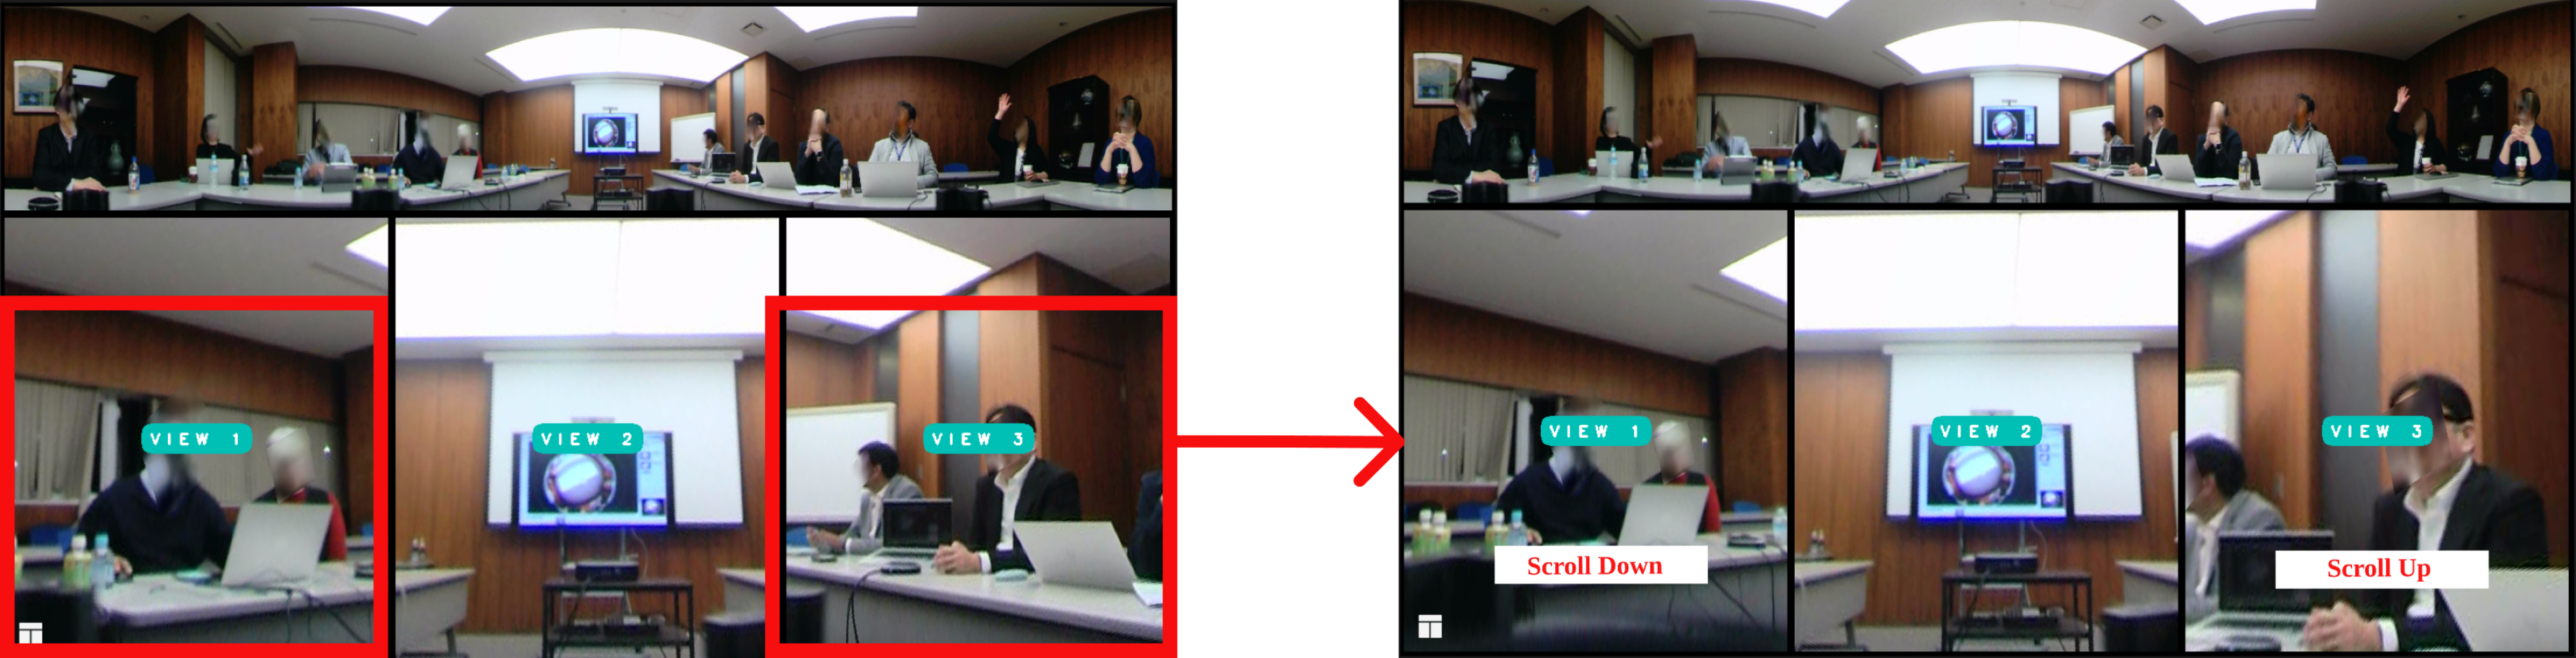
Scroll Up and Down
Tip
Use Transformation and Adjusted Transform to focus on specific objects while still referencing the original image.