Plugin Extention
Introduction
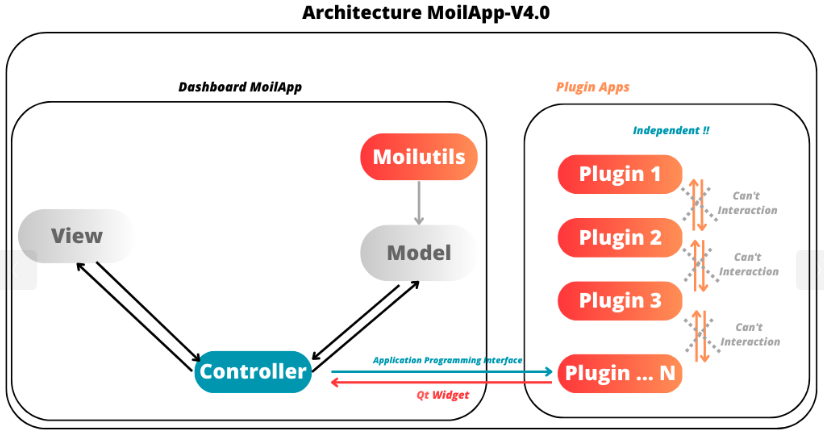
MoilApp uses a plugin framework to allow users to choose apps based on their needs. A plugin is a software component. That adds specific features to an existing program, providing customization. The plugin architecture consists of a core system and plugin modules that provide extensibility, flexibility, and isolation to the application features. This makes the code modular and extensible, allowing for easy addition, removal, and modification of features without affecting the core system or other plugin modules.
Design the MoilApp plugin
Prerequisites
Before proceeding with this guide, make sure that:
You have a basic understanding of Python and PyQt.
You have installed the Qt Designer tool.
You have installed the PyQt5 library.
You have cloned the MoilApp repository from GitHub.
Action Plugin
The MoilApp program includes a plugin notion that is integrated into its design, featuring a menu bar and a button. Containers that are dedicated to managing the plugin application. The interface is depicted in the following illustration:
- Adding a plugin app
To include your own plugin application, access the app's folder from the controller in the plugin and add your app.
If your app adheres to the specified format and is successfully added, it will be accessible through the plugin and can be executed.
- Installing the app
You can use the plugin store icon to install the provided application.
- Opening the plugin application
You can open the plugin you have installed by selecting it in the combo box and pressing the Open Plugins button.
- Deleting a plugin app
To remove a plugin application from the MoilApp program, you need to access the plugin controller container and
Click on the "delete" button. This action will prompt a confirmation dialog to ensure that you want to proceed with
the deletion. If you confirm the deletion, the plugin application will be removed from the list of available applications in the combo box.
GitHub Operation
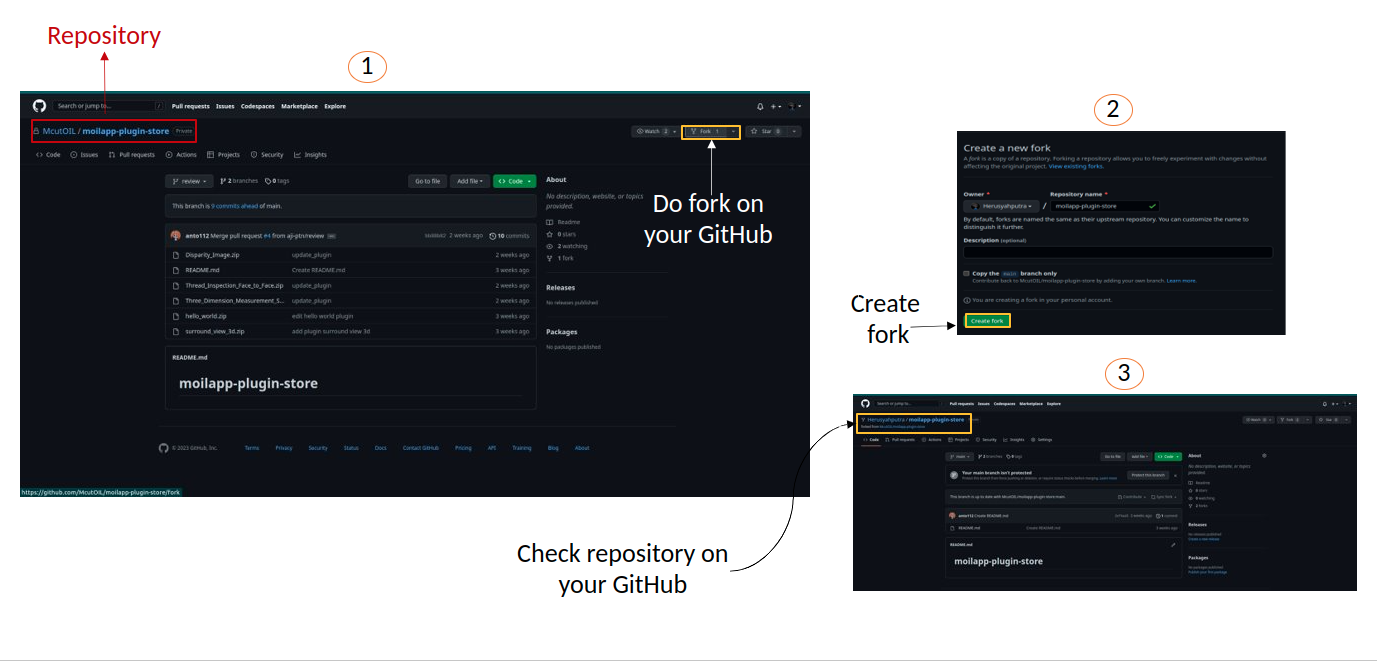
To publish the new application from the local branch to the repository group, the user must first create a fork on their own GitHub account. After that, they can use the MoilApp plugin to create a new application.
Do Fork Repository
Making a note of the name of the repository you wish to share on your GitHub account is the first step.
You can click the "Fork" button in the top right corner of the screen once you have arrived at the repository's
GitHub page. The repository will be duplicated in your personal GitHub account as a result.
To make sure that just the main branch of the repository is cloned, it is crucial to select "Copy Main Only."
option when creating the fork. The confirmation window that opens when you click the "Fork" button typically has
this option. You may be sure that any alterations or updates you make to the repository will take effect by simply
duplicating the main branch.
Fork the repository
Do Create New Branch
To avoid conflicts between your changes and the updates made to the original MoilApp repository, it is recommended that You create a new branch under the "develop" branch after cloning the MoilApp repository. This way, you can work on your changes in isolation without affecting the original codebase or interfering with updates to the develop branch in the original repository.
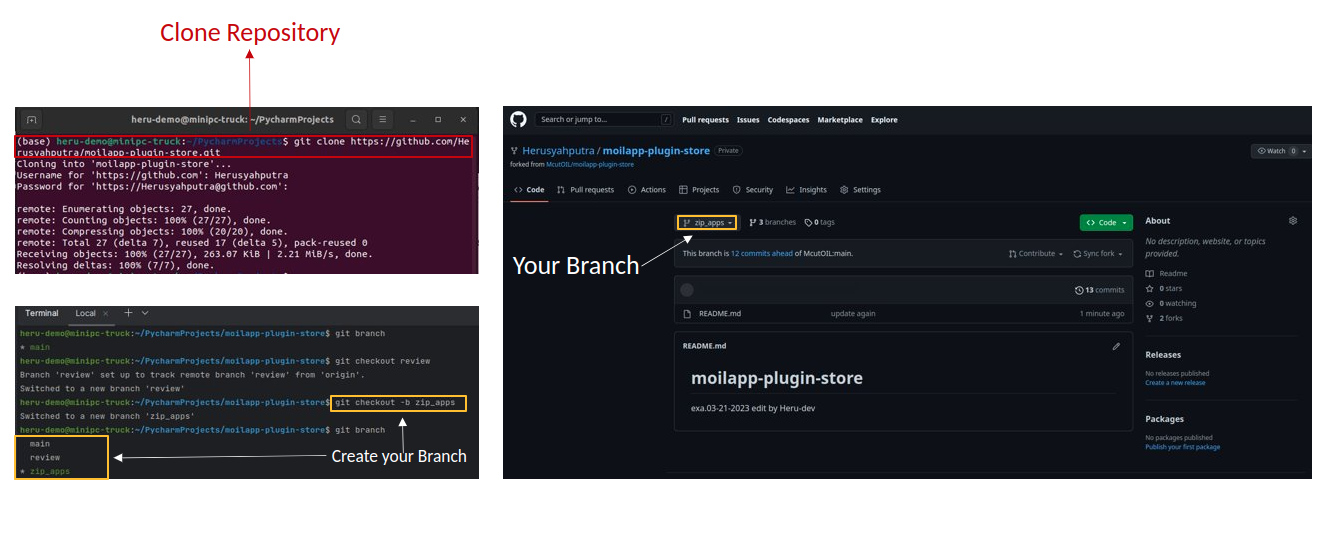
Create new branch on your branch
Create Plugin Application
To build an application with an API, you need to create a program that can interact with the API to exchange data and perform functions. APIs provide protocols and tools that enable different software applications to communicate with each other.
Design User Interface
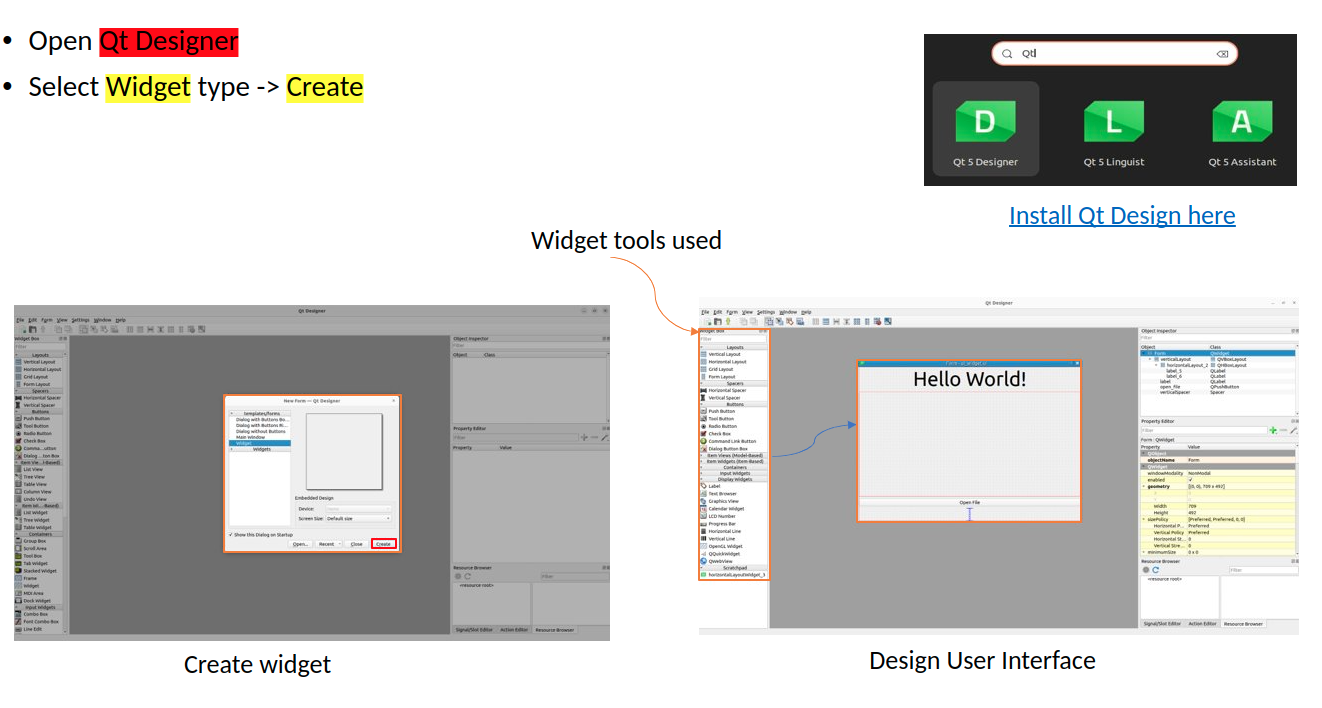
To develop an application, you start by designing the user interface using Qt Designer. If you don't have this tool, installed on your computer, please install it first. Once you have designed the interface, you need to convert the *.ui file to a *.py file, which can be done as follows:
Create User Interface
Plugin Interface (API)
A plugin interface is an API that connects the main application with the plugin widget. It allows you to create custom user interfaces and use models from the main app without starting from scratch.
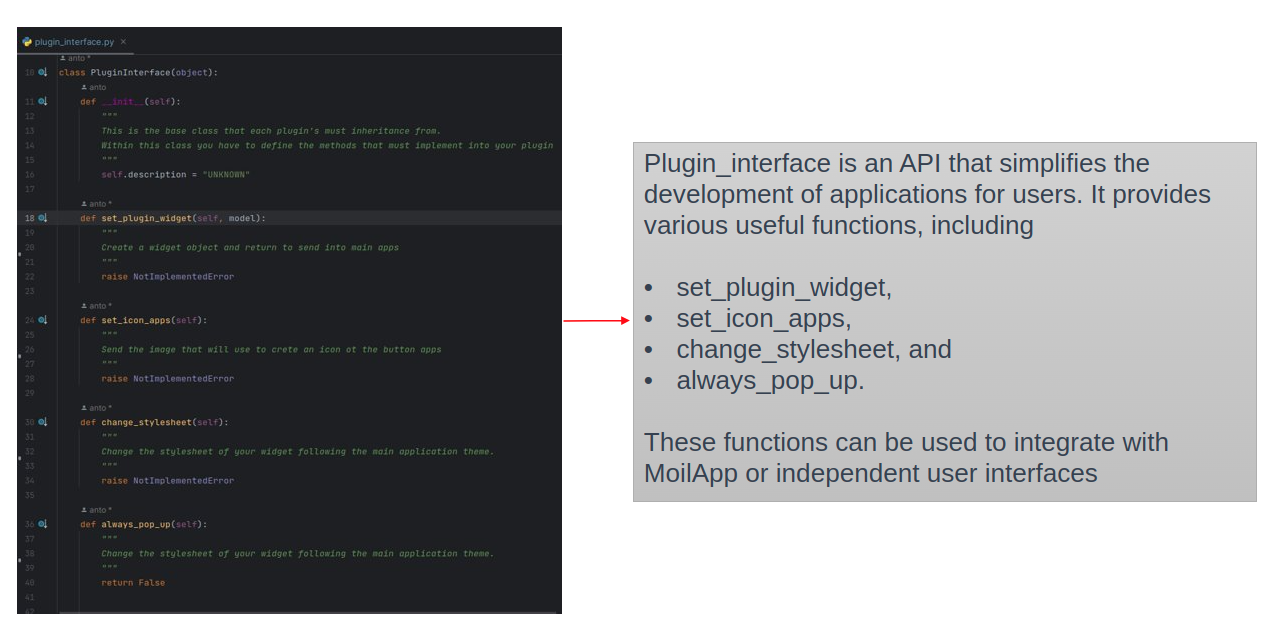
Plugin Interface (API)
The purpose of this class is to define an interface that can be implemented by plugins in various applications. By default, the "description" attribute of the object's init method is set to "UNKNOWN." These are the methods that concrete subclasses of the "Plugin" class should implement:
Set_plugin_widget: This method should establish a plugin widget based on a Model object that is passed in as input.
Set_icon_apps: This method should determine the plugin application’s icon.
Change_stylesheet: This method should modify the plugin applications’s CSS.
By default, the always_pop_up method of the Plugin class returns the boolean value False, meaning that the plugin does not always pop up.
How to Add an Icon on MoilApp Plugin
In the code, we import the PluginInterface and define a class MyPlugin that inherits from PluginInterface. We then define the set_icon_apps function, which simply returns the name of the icon file that we want to use. You can replace "my_icon_file.png" with the name of your own icon file.
Add icon on MoilApp
How to Open Image on User Interface
Import Ui_form so that the Python file that you have converted from *.ui to *.py can be integrated into a Python function such as the class attribute integrated in the Python function below.
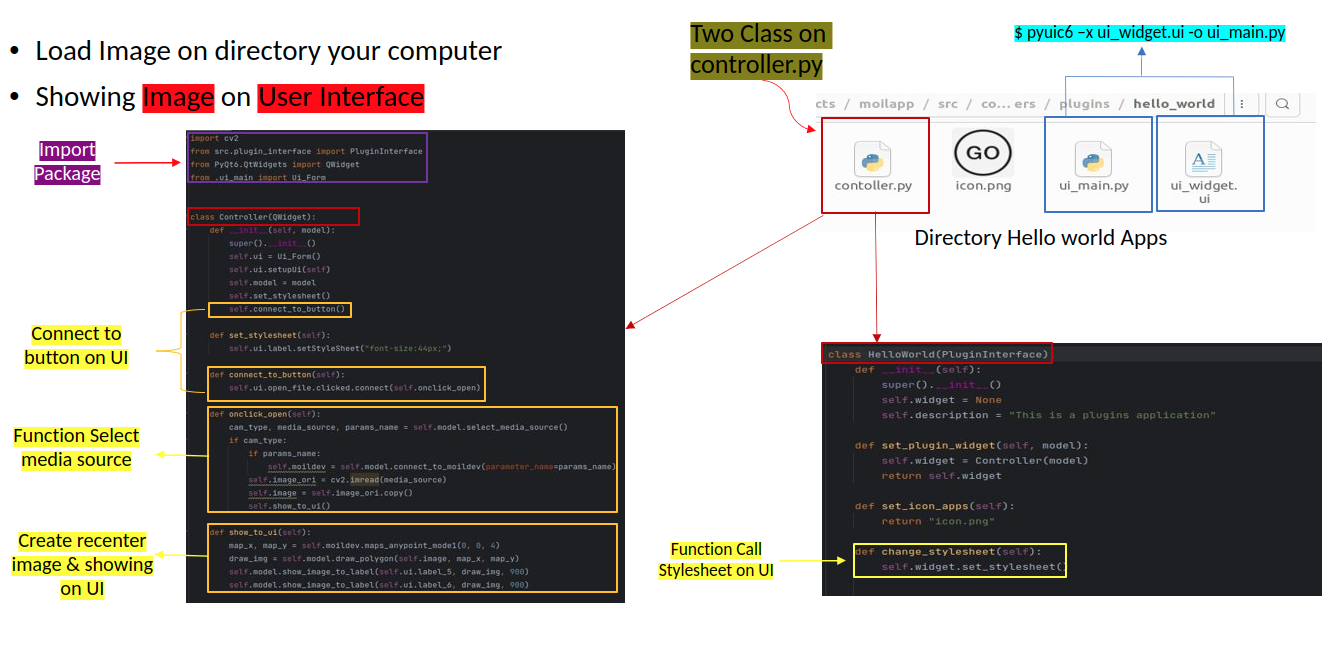
Add action push button to load image
Showing on User Interface (Hello World)
Once the program is running, you should be able to interact with the user interface as designed and test its functionality. if any issued or errors arise, you may need to review the code and make adjustments as necessary, as shown in the user interface below.
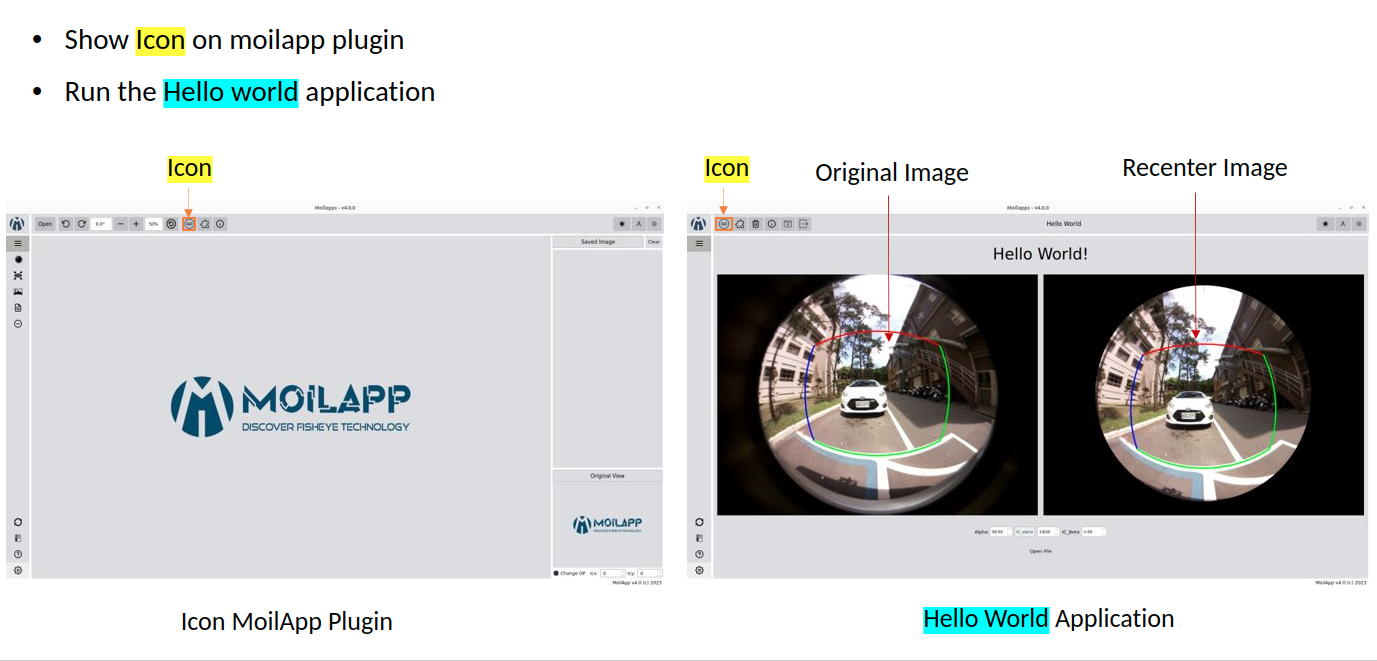
Show in user interface
Publish Your Project
Refer to the User Operation section to understand more details about the repository project.
Push your Project to GitHub
To upload your project, you need to first convert it to "*.zip" format and ensure that it does not contain unwanted files like PyCache, Ideas, etc. The User also execute a few terminal commands to complete the upload process.
git add .
git commit -m "commit your project"
git push -u origin "your branch"
After completing the changes, you can submit a pull request to merge your changes into the original repository.
The project management team will then review your changes and decide whether to approve them for merging or request further revisions.
Push your project on repository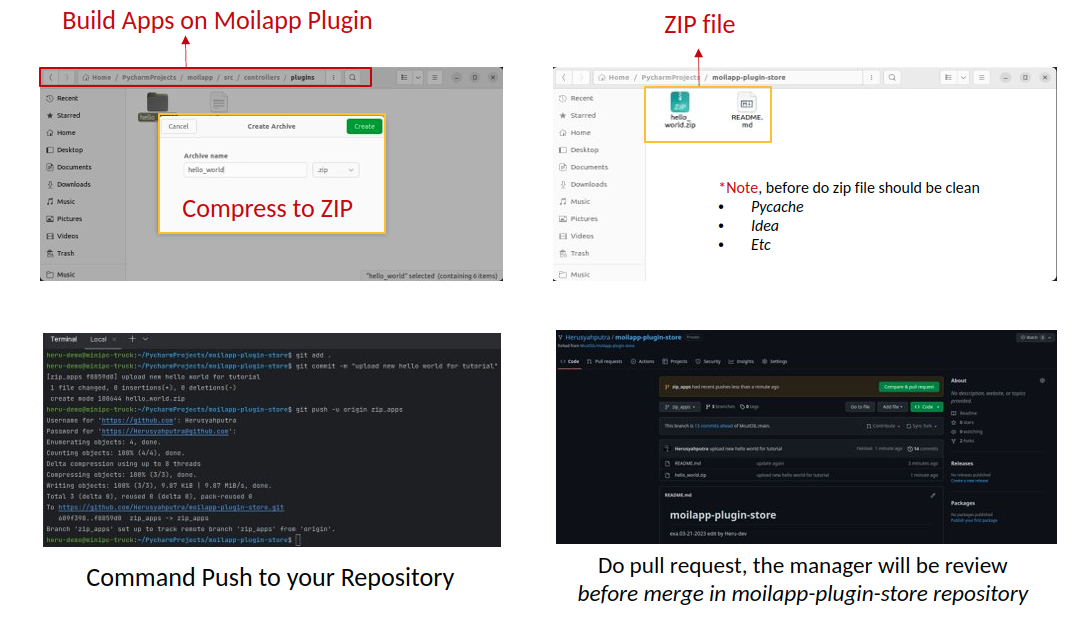
Tutorial Develop Apps use MoilApp
MoilApp is an open-source software that is designed to develop applications using the Python programming language. It provides a set of tools and libraries that allow developers to create desktop applications with graphical user interface (GUIs) quickly and easily. Here's tutorial on how to develop apps using MoilApp:
Note Information
If you want to create your own plugin application, you can follow the tutorial in section 6.2.
Tutorial how to operate MoilApp can watch here: https://youtu.be/ExeY8Q6QNf8
Suppose you have any issue or want to contribute to this project, you can open issue in GitHub repository and you can ask for pull request.