MoilApp of Usage
In this session we will explains the components in the MoilApp Application and Provides Tutorials on how to use the application. MoilApp is a software application that users can use, and the referred session might be some kind of training session where the instructor will provide an overview of the various parts of the application and teach users how to use them effectively.
Operations of the MoilApp
Overview Apps
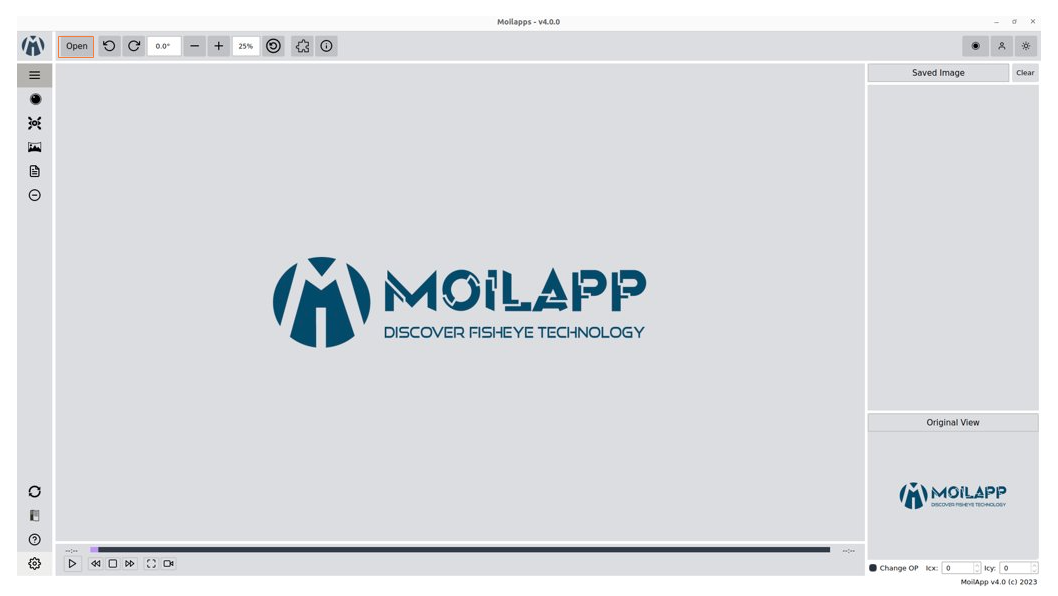
When you open a project in PyCharm, the user interface will show the default main window ready to run looks as follows:
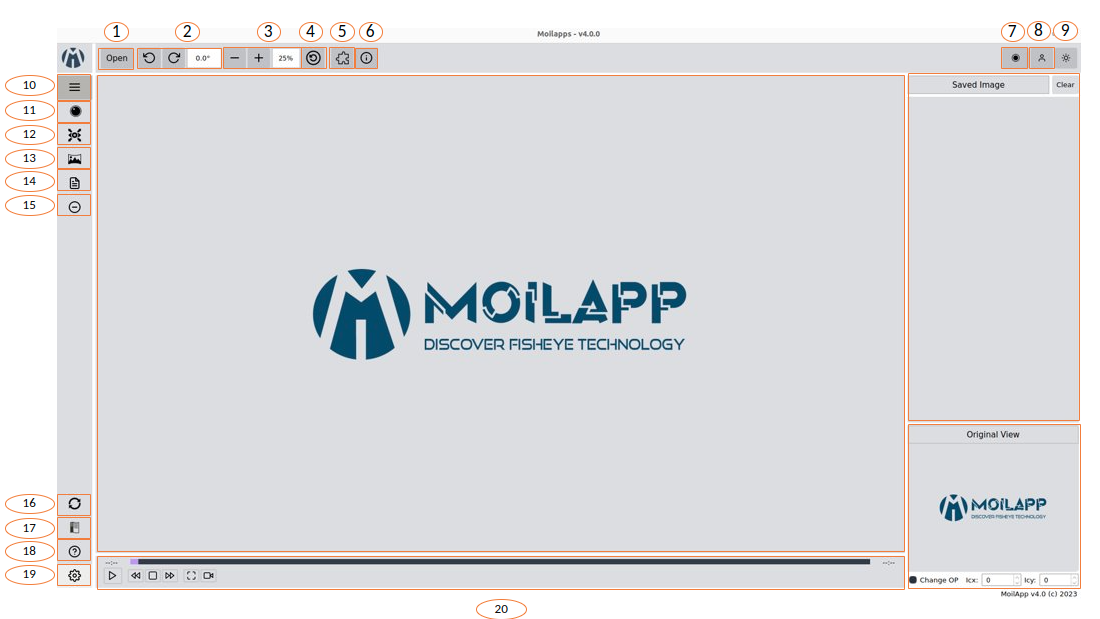
Main window MoilApp
Here is detail explanation
1. Open media source
The inputs offered by MoilApp include picture files, video files, and cameras—USB cameras, web cameras, and streaming cameras from Raspberry Pis—all of which can be used for processing. Simply tap the appropriate button for the media source you want to process, and the software will open a file explorer popup similar to the one below.
Open Media Source
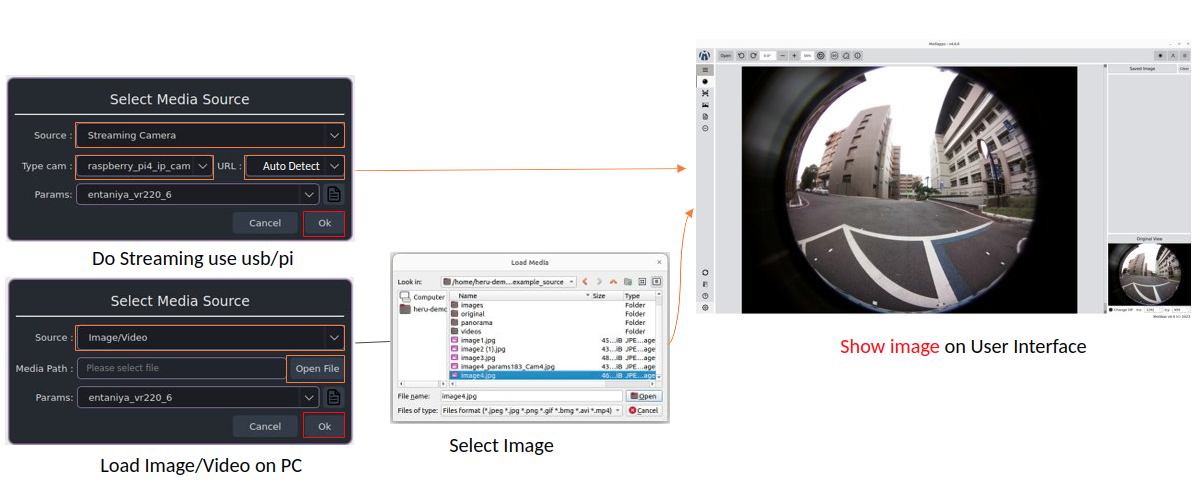
Select Media Source
- After selecting the file to open, a combo box prompt will appear asking you to select the type of camera that was used. The camera parameters can be loaded from the database using this.
- There are two ways to open the camera: through USB or via streaming. You can use the combo box to pick the USB port that is being used for a camera, click "OK," and you will be prompted to select the type of camera that is being used. As depicted in the picture below.
- The streaming cam option allows you to access the raspberry-pi camera using the stream server URL. You merely need to enter the camera's URL and push the "oke" button, as seen in the example below. In the combo box prompt, you will be prompted to select the type of camera being utilized.
2. Rotate Image
MoilApp has two rotate functions: rotate the left image and rotate the right image. Each rotate image can be operated by entering a value on the rotate scale; this is so that users can rotate with less scale.
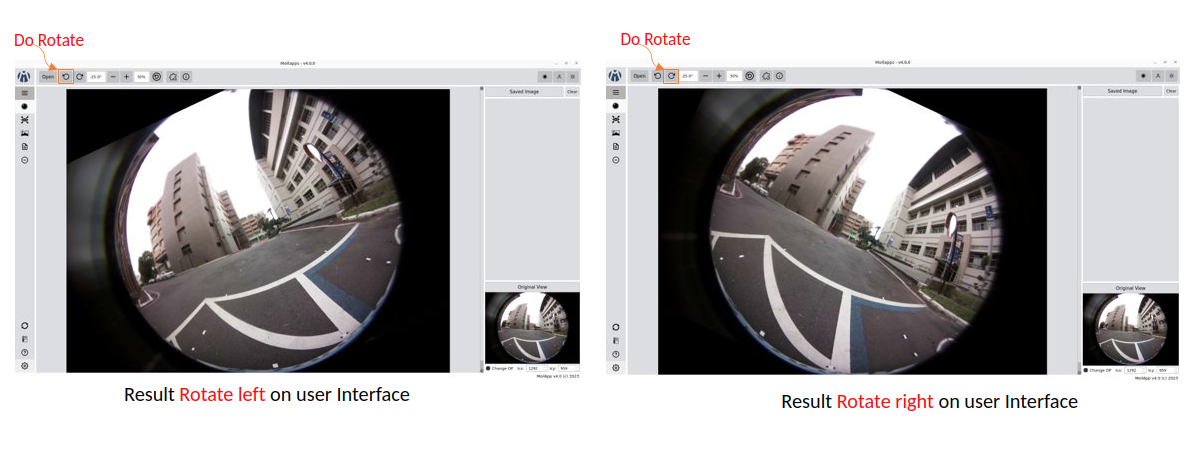
Processing Rotate left & Rotate right Image
3. Zoom Image
The user can zoom in and out using the plus and minus buttons, respectively, in this program. In addition, the user can select the zoom scale to be smaller by a minimum of 25 degrees and above. to make the final image clearer.
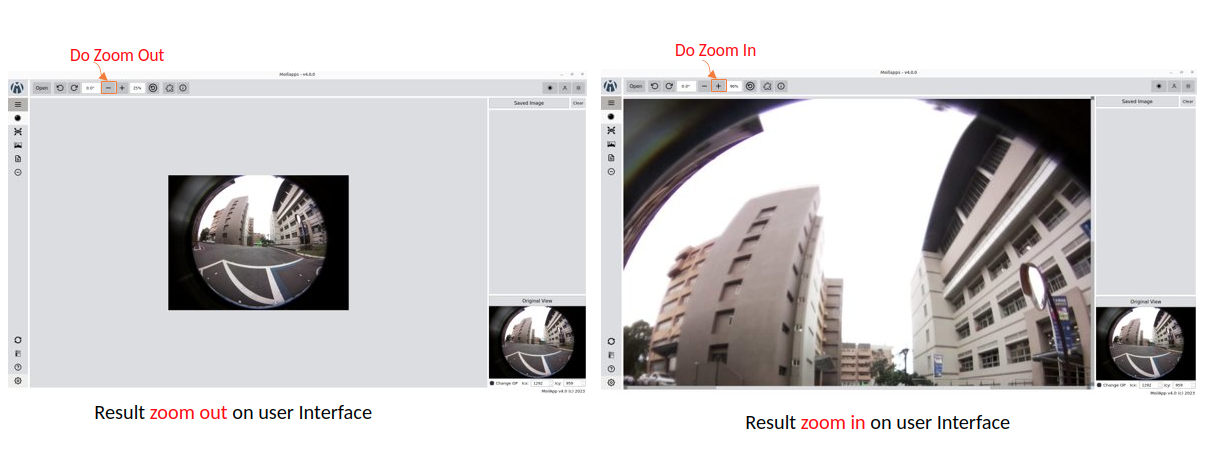
Processing Zoom in & Zoom out Image
4. Default Application
The application will automatically return to the original image when the default button is clicked when the user is processing an image, for instance when the user is processing an image to any point and then decides they want to go back to the original image, where this position is the position when the user loads the image when opening the application.
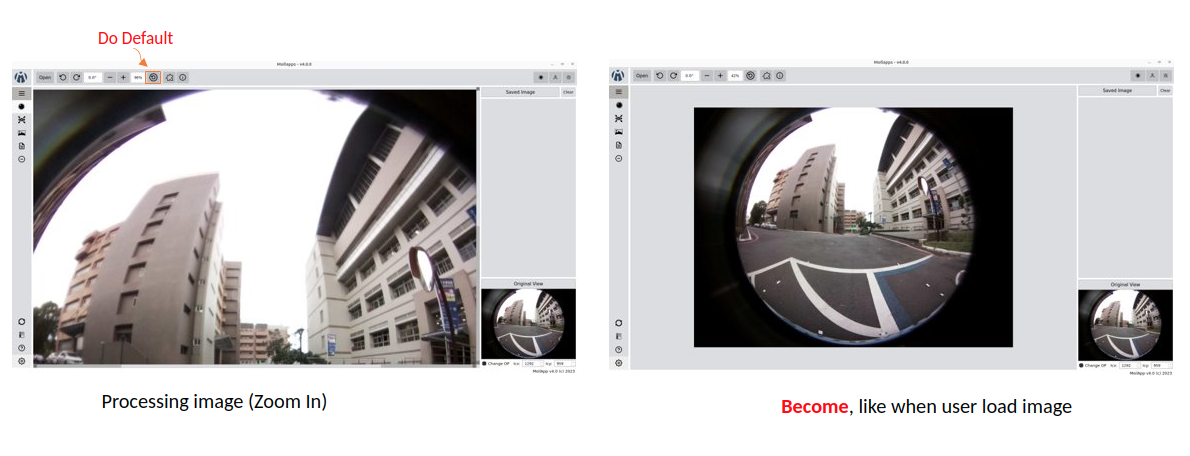
Processing default image to original
5. Add Plugin Applications
When the user wants to create an application integrated with MoilApp or the user wants to open the application, the user can add the application to MoilApps by clicking the Add button at the top of the application, provided that the user creates the application using MoilDev or MoilUtils-Templates.
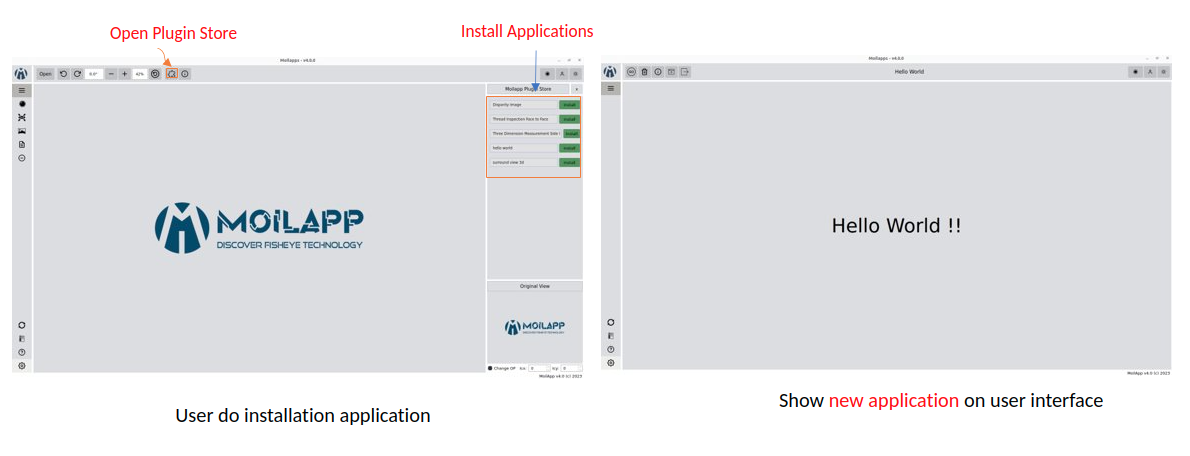
Add application
6. Information Applications
The users can view related information on MoilApp by accessing further information.
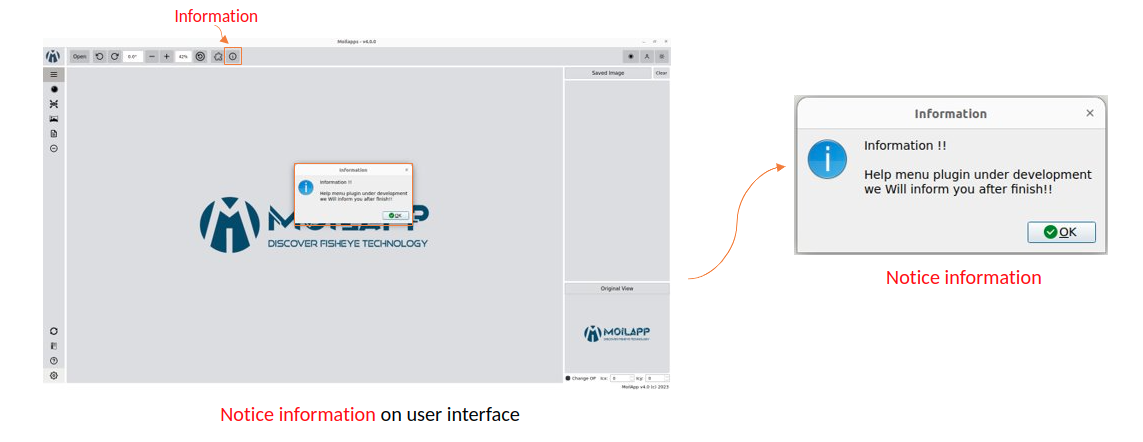
Notice Application
7. Recording Screen
A new feature offered by MoilApp is screen recording, which makes it simpler for users to do so. This tool is also a helpful way to record and share videos of what is happening on your desktop.
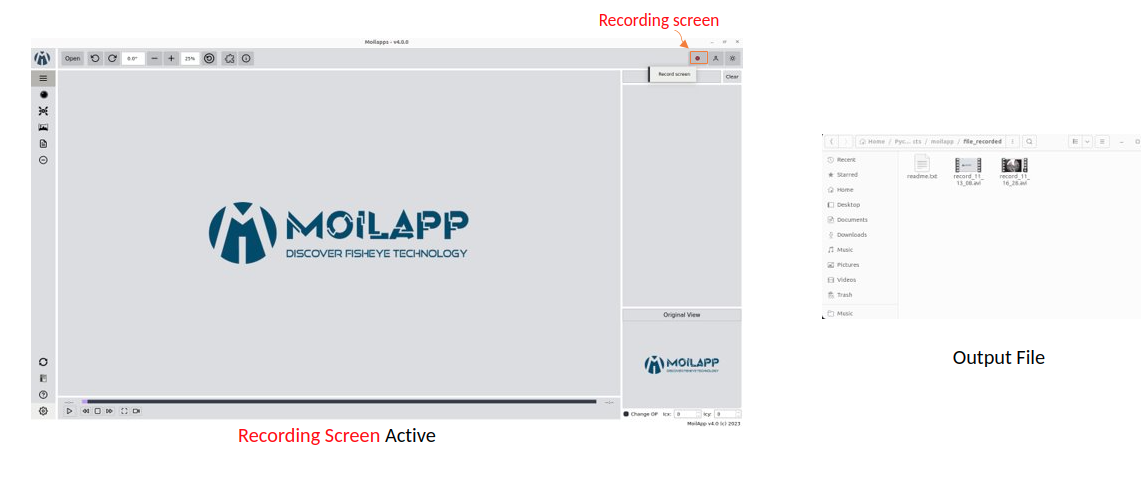
When using a desktop application to record your screen, you'll typically have a few options to choose from. First, you'll need to select the area of your screen that you want to record. Some applications allow you to record your desktop, while others let you region of your screen.
8. About US
The application's "About Us" section contains details about our work in the field of fisheye image processing.
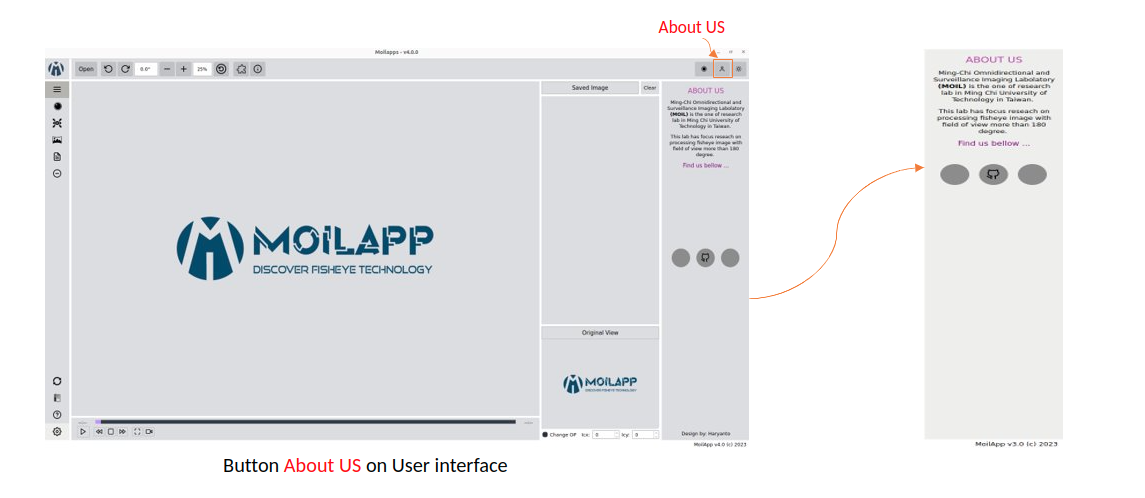
Information About US
9. Theme Application
In order to assist users adjust to their eyes and avoid seeming monotonous while using this software, MoilApp offers two themes for use: one in bright mode and the other in dark mode.
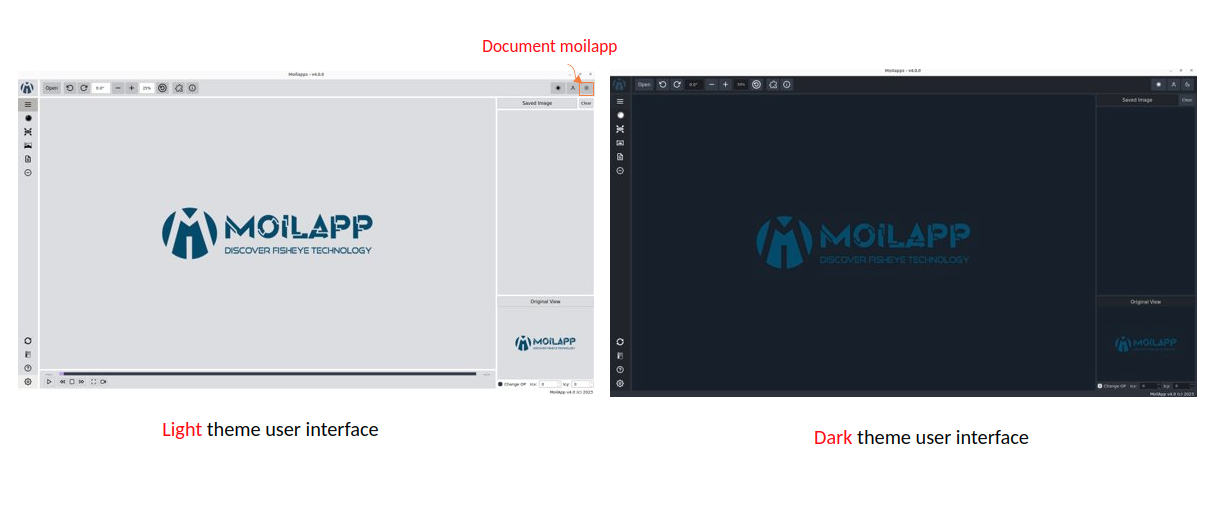
Light theme & Dark Theme application
10. Hide Button Application
By using the "ESC" key on the keyboard, users can also conceal or reveal the title of the button or view the button's functionality in the application.
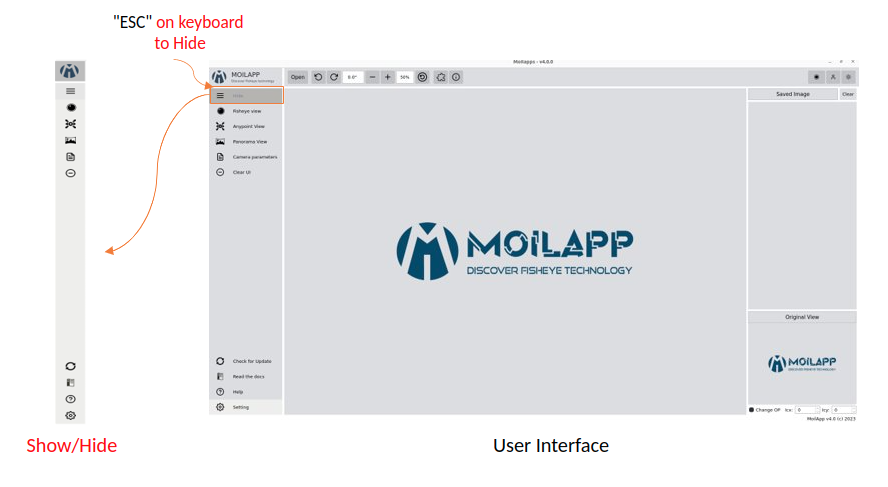
Show/Hide button application
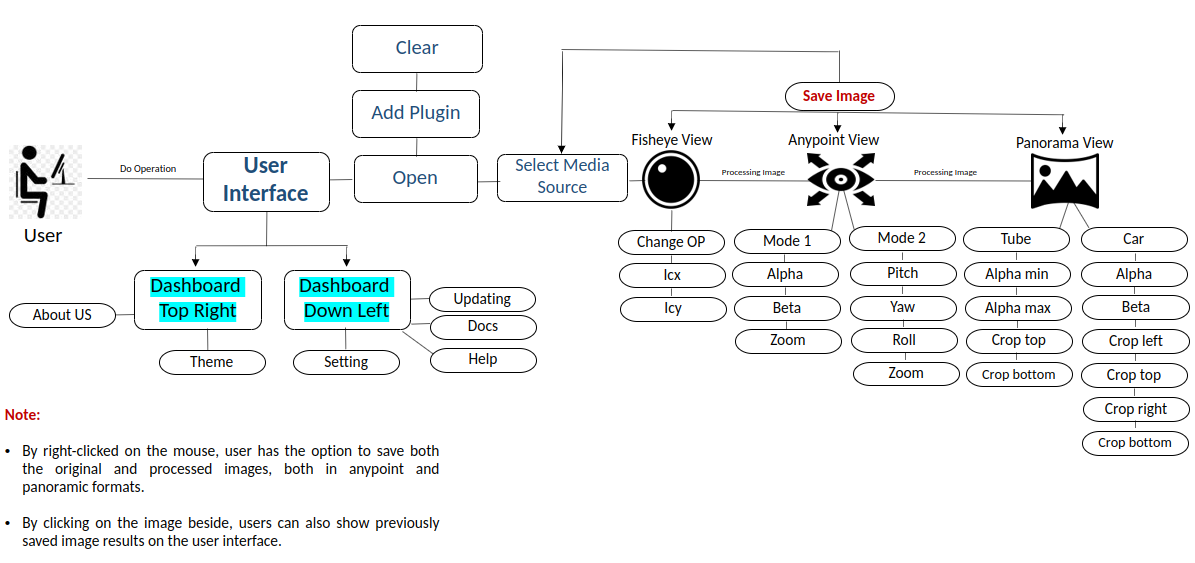
11. Fisheye View
The user interface will display the Anypoint image or Panorama image as shown below when the user chooses to process the original fisheye image by using the Anypoint or Panorama button on the user interface.
Show Image from Directory Computer
We offer controls for video and camera media, including play, pause, stop, forward, backward, and a slider timer. Where image processing can be facilitated by the use of this controller.
12. Anypoint View
Sometimes we only want to look at places where there is a lot of information in order to improve the outcomes of observations. As a result, we can apply the approach of the undistortion rectilinear selected image. This approach shifts the optical axis to the specified zenithal (alpha) and azimuthal (beta) angles, then converts the image plane coordinate to hemispherical coordinates. Anypoint view has two modes, with mode 1 being the result of alphaOffset degree rotation followed by betaOffset degree rotation around the Z-axis (roll) (pitch). In contrast, mode-2 produces a thetaY degree rotation around the Y axis (yaw) following a thetaX degree rotation around the X axis (pitch).
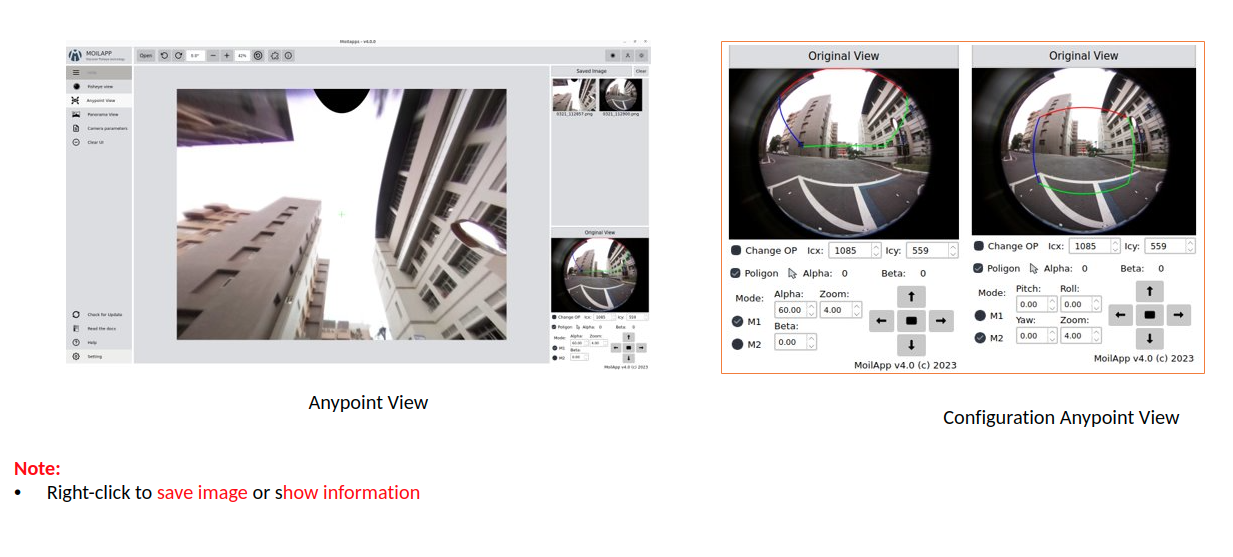
Processing Anypoint Image
You can switch from mode 1 to mode 2 or vice versa by pressing the help button when in Anypoint view mode. The help button can also be used to view Anypoint results coming from a certain angle. An overview of the additional button in Anypoint view mode may be found below.
13. Panorama view
As explained earlier, the panorama view may present a horizontal view in a specific immersed environment to meet common human visual perception. The figure below shows a diagram of transforming a fisheye image into a panoramic view.

Diagram processing Original View to Panorama View
The image below is the result of image processing panorama view.
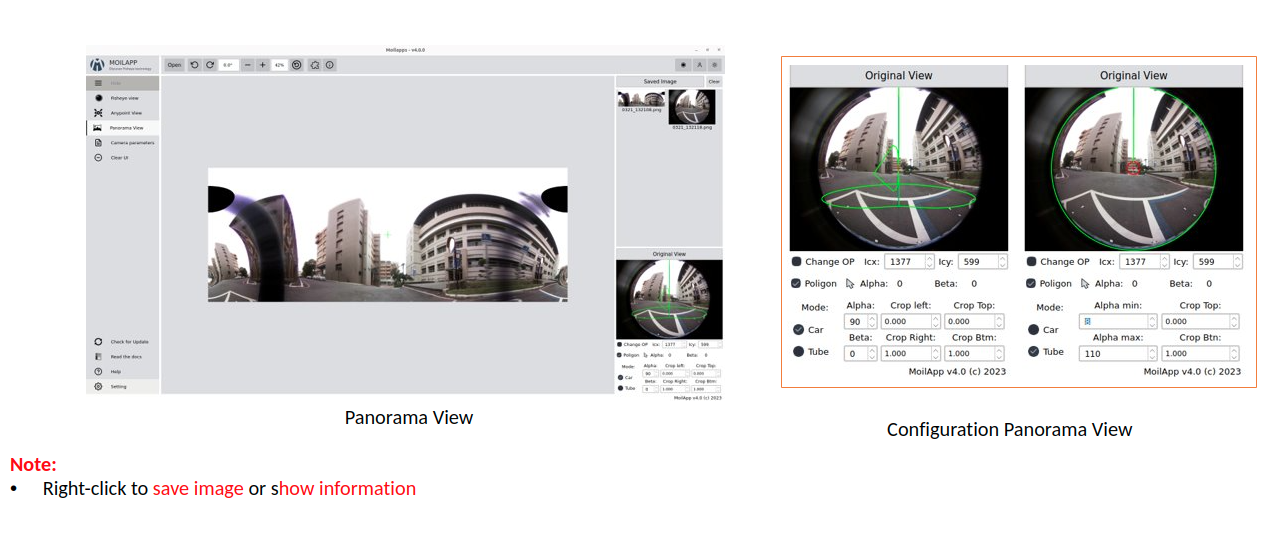
Processing Panorama View
- The maximum and lowest FoV values can also be changed using the lineedit feature, which is only available in this mode.
- By clicking the save image button or selecting save image from the context menu when you right-click on the result image, you can save the original image or the result image. When you save an image for the first time, the application will open a dialog box asking you to select the directory you want to utilize as storage.
- Use the record button to start recording a video; it works almost just like storing an image.You will be asked to select a directory before you can begin recording, and the video files will be saved there.
14. Camera parameters
The camera parameter is a very important component in fisheye image processing. Each fisheye camera can be calibrated. and derives a set of parameters by the MOIL laboratory before the successive functions can work correctly, configuration is necessary at the beginning of the program. MoilApp provides a form dialog that can add, modify, and delete parameters that will be stored in the database. To be able to use this feature, please click on File >>.Camera Parameters. The overview of this form is shown in the picture below:
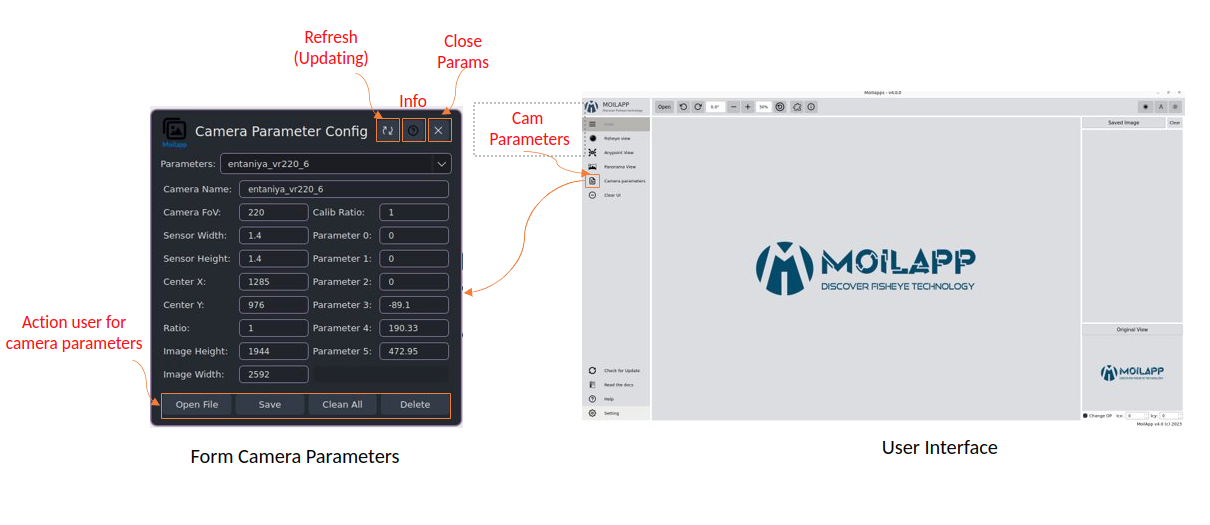
Camera Parameters
- If you want to see the parameter, you can list the camera type from comboBox list parameter If you are using a camera whose parameters are not yet available in the database, you can add them. You just need to write all the parameters on the form, then click the "new" button. after that the data will be saved and you can use the camera parameters.
- Modify camera parameters If you want to change the value of the parameter, you can modify it. select the camera type in the list parameter combobox, then you enter the new parameter value. click the update button and the modified parameters will be saved in the database.
- You can also delete parameters by pressing the delete button on the selected parameter list.
15. Clear User Interface (UI)
Clear UI is the latest feature from MoilApp. This feature is used to clean images on the user interface, Usually, if you don't use Clear UI, when the user opens the application again, the user is faced with the previous task when processing images; therefore, this feature is used to clear data on the user interface.
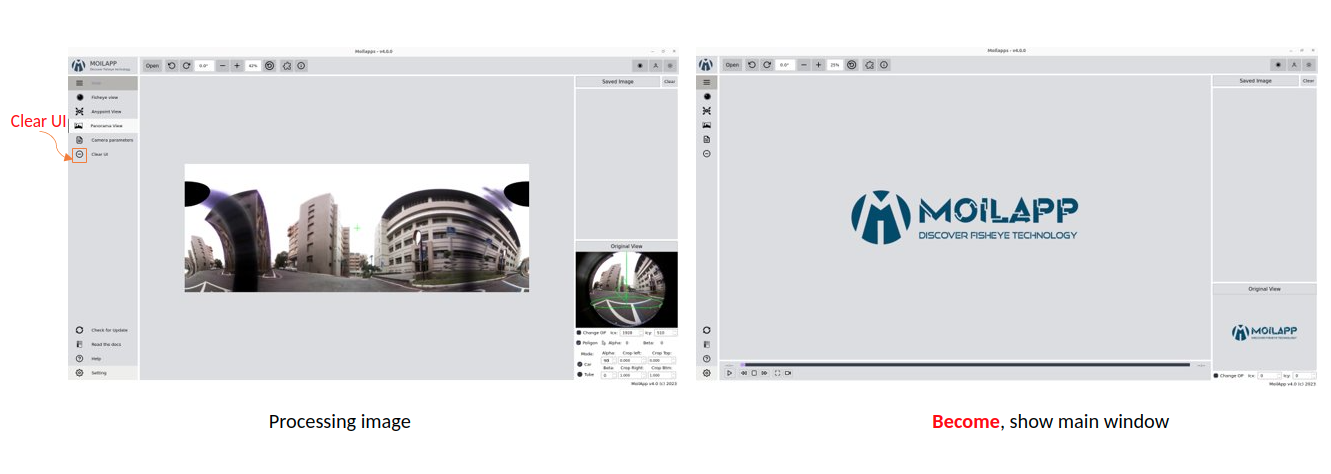
Clear data on application
16. Check for Updating
Checking for updates is an additional feature of the MoilApp update; this feature is used if the user wants to update the application from the developer server. The use of this feature greatly facilitates the user without having to open a terminal to do the installation or update manually.
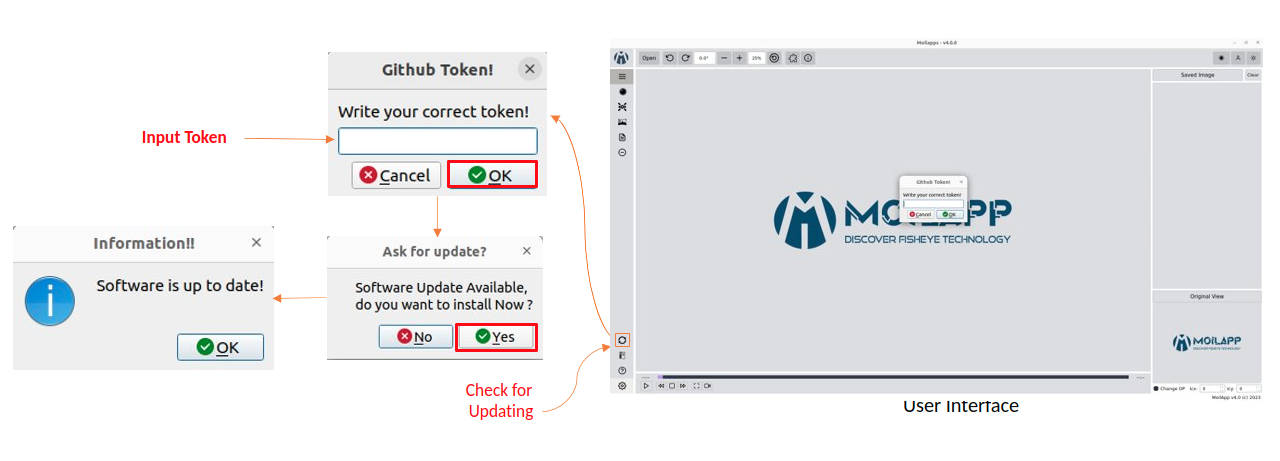
Check updating application from main server
17. Read the Docs Application
The Read the Docs feature makes it simple for users to open documents without having to launch a terminal and create HTML files from RST files. By simply clicking on this feature, the application will automatically create a document and display it in the user's browser. Read the Docs is application documentation that aids users in understanding every feature of MoilApp.

Generate documents to html
18. Help Information
The help information in the desktop application refers to a user guide or set of instructions that provide guidance on how to use the MoilApp plugin software effectively. This information can be accessed in a number of ways, including through menus or a dedicated Help button within the app.
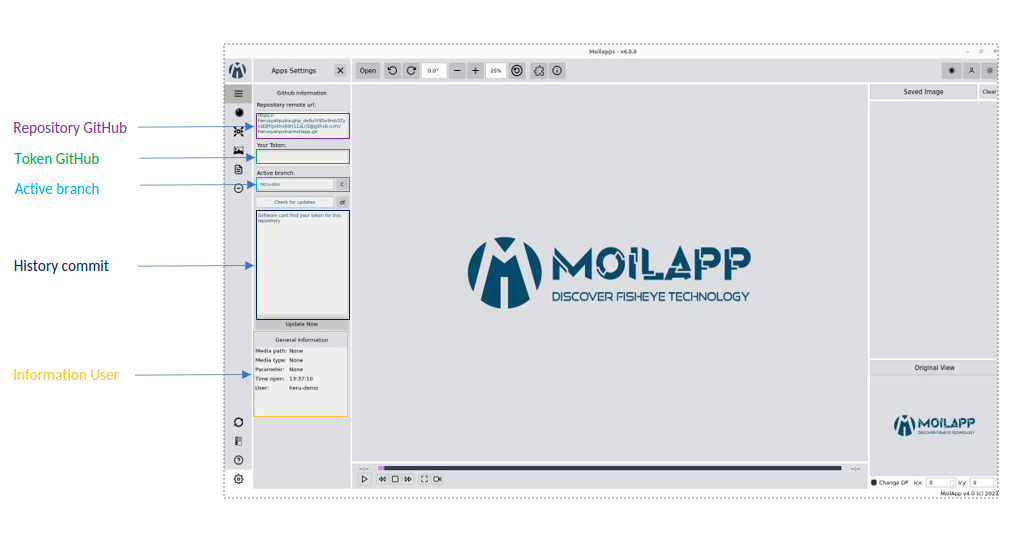
19. Apps Setting
Additionally, by providing information on the update history of each commit made by the developer when the application is updated, users can stay informed about changes to the application and have a better understanding of how the application works. Overall, application settings are a crucial component of any modern application, and they play a vital role in providing users with a rich and personalized experience.
Generate documents to html
Mouse Event
There are several functions of the mouse event that you can use to speed up work. The mouse event will only work on the result image and the original image of the user interface widget. Some of the mouse event's functions include.
Mouse click event
When in Anypoint mode, the mouse click event only functions on the original picture widget. The coordinates of the points whose alpha-beta value will be transformed can be easily determined using this. which means that when converting the original image to an Anypoint image, this value will be a parameter.
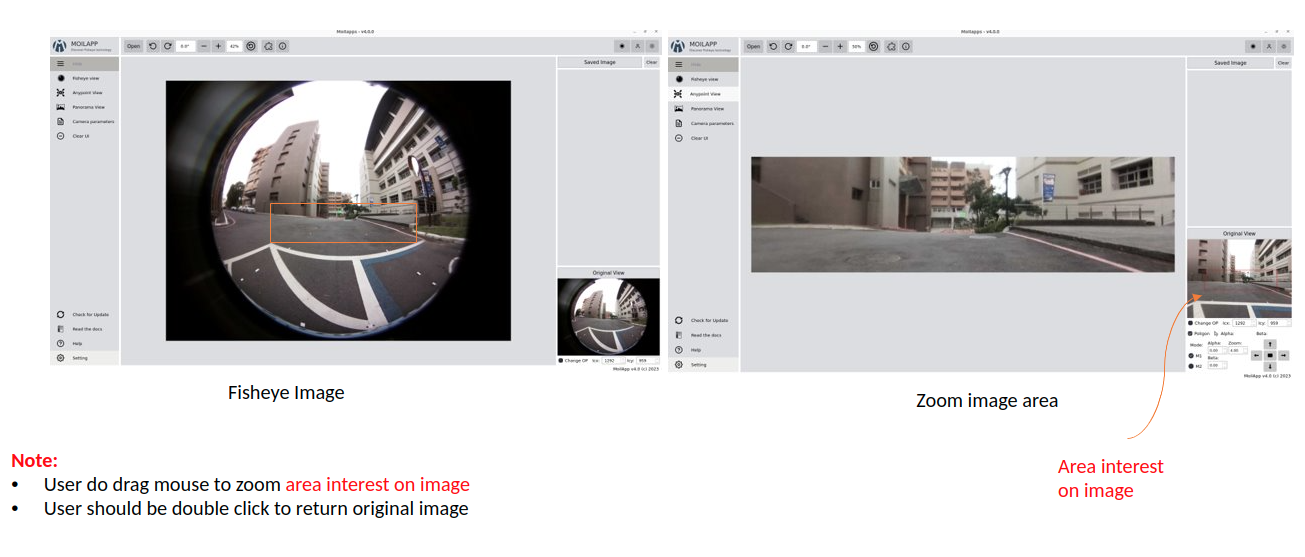
Mouse press-move event
The mouse press event has its own function in each image widget; in the origin image, this widget works in Anypoint mode. Which allows for surrounding views. If you press the press-move mouse event on the result image widget, different functions are available. You can enlarge the area you are interested in using this function, and it works in all-mode view, as in the example shown in the image below:
Double click event
The Double click mouse event has function to reset Anypoint view to default in Anypoint mode.
Right click event
If you right click on the mouse, it will display menu options like maximized, minimized, save image and show info.
Mouse wheel
Wheel event will work by pressing the ctrl key simultaneously to zoom in and zoom out images on the user interface display
Keyboard Shortcut
The majority of MoilApp's processing- and other-related commands have keyboard shortcuts.By keeping your hands on the keyboard and increasing your productivity, learning these hotkeys might be helpful.Some of the most beneficial shortcuts to learn are listed in the following table:
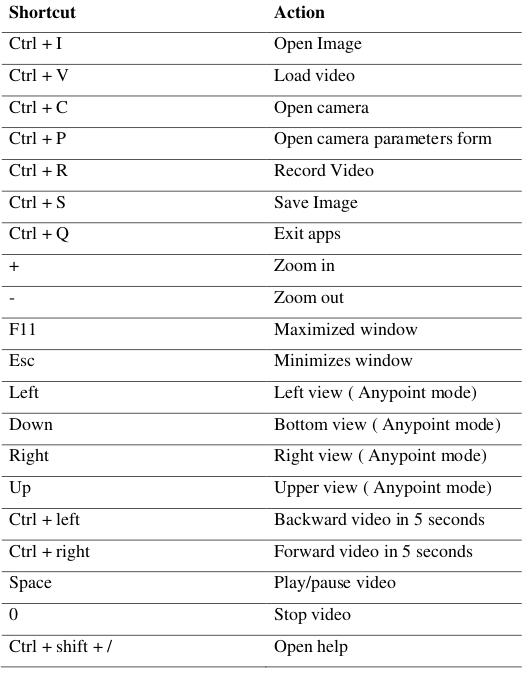
Shortcut application